Workshop
Deadline for applications to the workshop has ended
The application deadline was July 26, 2021, 11pm CEST and has now passed.
Fear not! We will be making all the material free as the workshop progresses so
you can follow along. All technical talks will be live streamed recorded and
all workshops will be recorded. We will post links to relevant content in due
course.This website site contains information, documentation, timetables, and more for
participants of the Unikraft Summer of Code 2021 (USoC21). If you are not
participating in USoC21 feel free to use this site and its resources to learn
how to build Unikraft unikernels.
Unikraft Summer of Code is a free two week virtual Unikernel and library
Operating Systems workshop held by members of the Unikraft community including
professors, lecturers, PhD and MSci students from:
To learn more about Unikraft, please visit the Unikraft Project
Website, visit the main documentation website or checkout the GitHub project.
In this workshop, you will learn about how to build Unikraft unikernels,
including zero-to-hero workshops on how to get started using Unikraft. As the
week progresses, we will dive into more in-depth topics of Unikraft, including
programming structures and architectures, how it is organized, methodologies for
porting libraries and applications to Unikraft and more!
The workshop will be hands-on and will take place for 10 days, between August 23
and September 3, 2021, 4pm-8pm CEST. And an 8 hours hackathon on September 4,
2021, 9am-5pm CEST. It will be online and in English. Topics include building
unikernels, benchmarking, debugging, porting applications, virtualization and
platform specifics.
USoC21 and Unikraft are supported by the UNICORE Project, EU Horizon 2020 grant agreement No 825377.
1 - Schedule
Unikraft Summer of Code 2021 (USoC'21) consists of 10 sessions in 10 days and a hackathon.
Each session is 4 hours long and consists of practical demos and then exercises for participants.
The hackathon is an 8 hours event where you’ll have different tasks to enable, test, fix, evaluate and improve applications and libraries with Unikraft.
The complete schedule for USoC'21 is (all times in CEST - Central European Summer Time):
| Date | Interval | Activity | TA(s) |
|---|
| Mon, 23.08.2021 | 3:30pm-4pm
4pm-8pm | Opening Ceremony
Session 01: Baby Steps | RazvanD, Alex, CristiV
Alex, CristiV, Vlad |
| Tue, 24.08.2021 | 4pm-8pm | Session 02: Behind the Scenes | RazvanD, Costi |
| Wed, 25.08.2021 | 4pm-4:30pm
4:30pm-8pm | Tech Talk: Debugging and Tracing in Unikraft
Session 03: Debugging in Unikraft | Simon
CristiV, RazvanD |
| Thu, 26.08.2021 | 4pm-8pm | Session 04: Complex Applications | Costi, Vlad |
| Fri, 27.08.2021 | 4pm-4:30pm
4:30pm-8pm | Tech Talk: Virtual Memory in Unikraft
Session 05: Contributing to Unikraft | Ștefan
Vlad, RazvanD |
| Mon, 30.08.2021 | 4pm-8pm | Session 06: Testing Unikraft | CristiB, Alex |
| Tue, 31.08.2021 | 4pm-4:30pm
4:30pm-8pm | Tech Talk: Memory Deduplication with Unikraft
Session 07: Syscall Shim | Gaulthier
RazvanD, Alex |
| Wed, 01.09.2021 | 4pm-8pm | Session 08: Basic App Porting | Cezar, RazvanD |
| Thu, 02.09.2021 | 4pm-4:30pm
4:30pm-8pm | Tech Talk: Retrofitting Isolation into Unikraft with FlexOS
Session 09: Advanced App Porting | Hugo
Vlad, Cezar |
| Fri, 03.09.2021 | 4pm-8pm | Session 10: High Performance | Alex, RazvanD |
| Sat, 04.09.2021 | 9am-5pm | Hackathon | Dragoș, Gabi, Sergiu, Florin
Laurențiu, Cătălin, Vlad, Alex |
2 - People
Program Chairs and Project Coordinators
Teaching Assistants (TAs)
You’ll see these kind people during the workshop to help answer questions and
work through problems.
Contact
The fastest way to get in contact with anyone in this workshop regarding the
workshop is to join the
Unikraft Community Discord.
3 - Session 01: Baby Steps
In this session we are going to understand the basic layout of the Unikraft working directory, its environment variables, as well as what the most common Unikraft specific files mean.
We are also going to take a look at how we can build basic applications and how we can extend their functionality and support by adding ported external libraries.
Before everything, let’s take a bird’s eye view of what Unikraft is and what we can do with it.
Unikraft is a unikernel SDK, meaning it offers you the blocks (source code, configuration and build system, runtime support) to build and run unikernels.
A unikernel is a single image file that can be loaded and run as a separate running instance, most often a virtual machine.
Summarily, Unikraft components are shown in the image below:
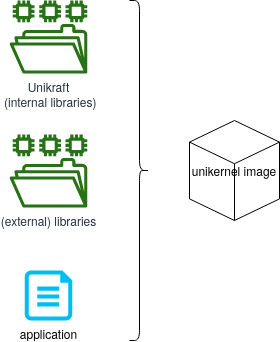
Unikraft is the core component, consisting of core / internal libraries, the build system, and platform and architecture code.
It is the basis of any unikernel image.
It is located in the main Unikraft repository.
Libraries are additional software components that will be linked with Unikraft for the final image.
There are multiple supported libraries.
Each unikernel image is using its specific libraries.
Libraries are also called external libraries as they sit outside the main Unikraft repository.
Libraries are typically common libraries (such as OpenSSL or LWIP) that have been ported on top of Unikraft.
They are located in specialized repositories in the Unikraft organization, those whose names start with lib-.
Application is the actual application code.
It typically provides the main() function (or equivalent) and is reliant on Unikraft and external libraries.
Applications that have been ported on top of Unikraft are located in repositories in the Unikraft organization, those whose names start with app-.
An important role of the core Unikraft component is providing support for different platforms and architectures.
A platform is the virtualization / runtime environment used to run the resulting unikernel image.
An architecture details the CPU and memory specifics that will run the resulting image.
As this is a rather complicated setup, a companion tool (kraft) was designed and implemented to provide the interface for configuring, building and running unikernel images based on Unikraft.
The recommended way of building and running Unikraft is via kraft.
We are going to build the helloworld application and the httpreply application using kraft.
We are also going to use the lower-level configuration and build system (based on Kconfig and Makefile) to get a grasp of how everything works.
The lower-level system will be detailed further in session 02: Behind the Scenes.
Demos
00. Manual kraft Installation
Let’s start with installing kraft (and validating the installation).
First of all, make sure you have all the dependencies installed:
$ sudo apt-get install -y --no-install-recommends build-essential \
        libncurses-dev libyaml-dev flex git wget socat bison \
        unzip uuid-runtime
We begin by cloning the kraft repository on our machine:
git clone https://github.com/unikraft/kraft.git
Now, all we have to do is enter this directory and run the setup installer:
$ cd kraft
$ pip install --user -e .
This will install kraft for the local user.
After installing or updating kraft, the first step is to download / update the software components available for building unikernel images.
For this, run:
$ kraft list update
It’s very likely that running the command above will result in the following error:
GitHub rate limit exceeded. You can tell kraft to use a personal access token by setting the UK_KRAFT_GITHUB_TOKEN environmental variable.
If this is the case, first create a GitHub personal access token by following these instructions.
Then, use the following command:
$ UK_KRAFT_GITHUB_TOKEN=<your_GitHub_token_here> kraft list update
After this is done, you can get a list of all components that are available for use with kraft:
$ kraft list
UNIKRAFT        	VERSION 	RELEASED    	LAST CHECKED
unikraft        	0.5     	17 hours ago	18 Aug 21

PLATFORMS       	VERSION 	RELEASED    	LAST CHECKED
solo5           	0.5     	13 Jul 21   	18 Aug 21
[...]

LIBRARIES       	VERSION 	RELEASED    	LAST CHECKED
newlib          	0.5     	5 days ago  	18 Aug 21
pthreadpool     	0.5     	7 days ago  	18 Aug 21
lwip            	0.5     	6 days ago  	18 Aug 21
[...]

APPLICATIONS    	VERSION 	RELEASED    	LAST CHECKED
python3         	0.4     	29 Mar 21   	18 Aug 21
helloworld      	0.5     	29 Mar 21   	18 Aug 21
httpreply       	0.5     	13 Jul 21   	18 Aug 21
[...]
So, with kraft we have an interface to configure, build and run unikernel images based on Unikraft core, (external) platforms, (external) libraries and applications.
By default, these are saved to ~/.unikraft/ directory, which is also the value of the UK_WORKDIR environment variable used by kraft.
This represents the working directory for all Unikraft components.
This is the usual layout of the ~/.unikraft/ directory:
|-- apps - This is where you would normally place existing app build
|-- archs - Here we place our custom arch's files
|-- libs - This is where the build system looks for external library pool sources
|-- plats - The files for our custom plats are placed here
`-- unikraft - The core source code of the Unikraft Unikernel
Apart from the general UK_WORKDIR environment variable that points to the overall directory, there are also environment variables available for the above subdirectories:
UK_ROOT - The directory for Unikraft's core source code [default: $UK_WORKDIR/unikraft]
UK_LIBS - The directory of all the external Unikraft libraries [default: $UK_WORKDIR/libs]
UK_APPS - The directory of all the template applications [default: $UK_WORKDIR/apps]
After successfully running the above commands, kraft is now installed on our system and we can get to building and running unikernels.
01. Building and Running the Helloworld Application
This is where the fun part begins - we get to build our first unikernel.
One Command to Rule Them All
kraft makes it easy to download, configure, build existing components into unikernel images and then run those images.
The kraft up command makes it easy to do that with one swoop.
Let’s do that for the helloworld application (listed with kraft list):
$ kraft up -t helloworld hello
 100.00% :::::::::::::::::::::::::::::::::::::::: |       21 /       21 |:  app/helloworld@0.5
[INFO    ] Initialized new unikraft application: /home/razvan/hello
make: Entering directory '/home/razvan/.unikraft/unikraft'
[...]
#
# configuration written to /home/razvan/hello/.config
#
[...]
CC      libkvmplat: trace.common.o
CC      libkvmplat: traps.isr.o
CC      libkvmplat: cpu_features.common.o
[...]
CC      libnolibc: errno.o
CC      libnolibc: stdio.o
CC      libnolibc: ctype.o
[...]
LD      hello_kvm-x86_64.ld.o
OBJCOPY hello_kvm-x86_64.o
LD      hello_kvm-x86_64.dbg
SCSTRIP hello_kvm-x86_64
GZ      hello_kvm-x86_64.gz
LN      hello_kvm-x86_64.dbg.gdb.py
[...]
Successfully built unikernels:

  => build/hello_kvm-x86_64
  => build/hello_kvm-x86_64.dbg (with symbols)

[...]
To instantiate, use: kraft run
[...]
Starting VM...
[...]
                   Tethys 0.5.0~b8be82b
Hello world!
Arguments:  "/home/razvan/hello/build/hello_kvm-x86_64" "console=ttyS0"
In the snippet above, we selected parts of the output showing what kraft does behind the scenes:
- It downloads the
helloworld application repository in the hello/ directory. - It configures the repository, resulting in a
.config file. - It builds the required components, resulting in the
build/hello_kvm-x86_64 unikernel image. - It runs the image, resulting in QEMU/KVM being run, with the “Hello world!” message getting printed.
All that magic is done using one command.
A closer inspection of the hello/ folder reveals it is a clone of the app-helloworld repository and it stores the resulting configuration file (.config) and resulting build folder (and images) (build/):
$ ls -Fa hello/
./  ../  build/  CODING_STYLE.md  .config  Config.uk  CONTRIBUTING.md  COPYING.md  .git/  kraft.yaml  main.c  MAINTAINERS.md  Makefile  Makefile.uk  monkey.h  README.md
Once this is done, we can now run the resulting unikernel image any time we want by simply using kraft run:
$ cd hello/
$ kraft run
[...]
                   Tethys 0.5.0~b8be82b
Hello world!
Arguments:  "/home/razvan/hello/build/hello_kvm-x86_64" "console=ttyS0"
Doing it Step-by-Step Using kraft
The above kraft up command seems like magic and it’s not very clear what’s really happening.
Let’s break that down into subcommands and really get a good grip of the configure, build and run process.
We will go through the same steps above, running a separate command for each step:
- Download / Initialize the helloworld appplication.
- Configure the application, resulting in a
.config file. - Build the required components, resulting in the
build/hello_kvm-x86_64 unikernel image. - Run the image, with the “Hello world!” message getting printed.
Initialize
First, let’s create a directory that will host the application.
We enter the demo/ directory of the current session and we create the 01-hello-world/ directory:
$ cd demo/
$ mkdir 01-hello-world
$ cd 01-hello-world/
Now, we initialize the application by using the template for the helloworld app and see that it’s populated with files belonging to the app:
$ kraft init -t helloworld
$ ls
CODING_STYLE.md  Config.uk  CONTRIBUTING.md  COPYING.md  kraft.yaml  main.c  MAINTAINERS.md  Makefile  Makefile.uk  monkey.h  README.md
The kraft.yaml file is the most important file.
It stores kraft-speficic configuration for the app and it’s used by kraft when configuring, building and running the application.
Other files are important as well, but they are used behind the scenes by kraft.
We will detail them later in the session and in session 02: Behind the Scenes.
A unikernel image may be targeted for multiple platforms and architectures.
The available platforms and applications are listed in the kraft.yaml file:
$ cat kraft.yaml
specification: '0.4'

unikraft: '0.5'

architectures:
  x86_64: true
  arm64: true

platforms:
  linuxu: true
  kvm: true
  xen: true
In our case, we can target the x86_64 or arm64 architectures.
And we can target linuxu, kvm or xen platforms.
The simplest way to select the platform and architecture is by running kraft configure and then interactively use arrow keys to select the desired option:
$ kraft configure
[?] Which target would you like to configure?: 01-hello-world_linuxu-x86_64
 > 01-hello-world_linuxu-x86_64
   01-hello-world_kvm-x86_64
   01-hello-world_xen-x86_64
   01-hello-world_linuxu-arm64
   01-hello-world_kvm-arm64
   01-hello-world_xen-arm64
We have 6 options (2 architectures x 3 platforms).
Once we select one, the configuration will be updated.
The alternate way (non-interactive) is to pass arguments to kraft configure to select the desired platform and architecture.
For example, if we want to use x86_64 and KVM, we use:
$ kraft configure -p kvm -m x86_64
Build
Everything is set up now, all we have left to do is tell the build system to do its magic:
$ kraft build
[...]
Successfully built unikernels:

  => build/01-hello-world_kvm-x86_64
  => build/01-hello-world_kvm-x86_64.dbg (with symbols)

To instantiate, use: kraft run
This results in the creation of two unikernel image files:
build/01-hello-world_kvm-x86_64 - the main image filebuild/01-hello-world_kvm-x86_64.dbg - the image file with debug information (useful for debugging, duh!)
And that’s it! Our final unikernel binary is ready to be launched from the build/ directory.
Run
To run an already-built unikernel image, we use kraft run:
$ kraft run
[...]

                   Tethys 0.5.0~b8be82b
Hello world!
[...]
If we want to be more specific, we could use:
$ kraft run -p kvm -m x86_64
This command is useful in the case we have multiple images built (for differing platforms and architectures).
We can then select which one to run.
For example, we can use the commands below to configure, build and run a helloworld image for the linuxu platform.
kraft configure -p linuxu -m x86_64
kraft build
kraft run -p linuxu -m x86_64
You can now alter between running the linuxu and the kvm built images by using kraft run with the appropriate arguments.
More on kraft
Of course, this is the most basic way you can use kraft, but there are many other options.
To see every option kraft has to offer, you can simply type kraft -h.
If you want to know about a certain command, just follow it with the -h option.
For example, if I wanted to know more about the configure command, I would type kraft configure -h.
Manually Building the helloworld Application
Let’s now learn how to build the app manually, without kraft.
We won’t go into too much detail, this will be handled more thoroughly in session 02: Behind the Scenes.
The manual approach is more complicated (albeit giving you potentially more control) than kraft.
For most of the use cases (development, testing, evaluating, using) of Unikraft, we recommend you use kraft.
We will go through the same steps as above:
- Download / Initialize the helloworld application.
- Configure the application, resulting in a
.config file. - Build the required components, resulting in the
build/hello_kvm-x86_64 unikernel image. - Run the image, with the “Hello world!” message getting printed.
Initialize
First, get out of the current build’s directory and make a new one:
$ cd ../ && mkdir 01-hello-world-manual && cd 01-hello-world-manual
Now, clone the remote Git repository:
$ git clone https://github.com/unikraft/app-helloworld.git .
$ ls
CODING_STYLE.md  Config.uk  CONTRIBUTING.md  COPYING.md  kraft.yaml  main.c  MAINTAINERS.md  Makefile  Makefile.uk  monkey.h  README.md
To configure the build process (and the resulting unikernel image) we access a text-user interface menu by using:
$ make menuconfig
Looks like we are met with an error:
$ make menuconfig
Makefile:9: recipe for target 'menuconfig' failed
make: *** [menuconfig] Error 2
We look in the Makefile:
$ cat -n Makefile
     1  UK_ROOT ?= $(PWD)/../../unikraft
     2  UK_LIBS ?= $(PWD)/../../libs
     3  LIBS :=
     4
     5  all:
     6          @$(MAKE) -C $(UK_ROOT) A=$(PWD) L=$(LIBS)
     7
     8  $(MAKECMDGOALS):
     9          @$(MAKE) -C $(UK_ROOT) A=$(PWD) L=$(LIBS) $(MAKECMDGOALS)
The underlying build / configuration system expects the Unikernel (UK_ROOT) to be located at ../../unikraft from the current directory, which is very likely not the case.
Recall that the build system makes use of some important environment variables, namely UK_WORKDIR, UK_ROOT and UK_LIBS.
So, in order to properly inform the build system of our current location, we will have to manually set these by prefixing whatever build command we send with the hardcoded values of where our Unikraft work directory is.
$ UK_WORKDIR=~/.unikraft UK_ROOT=~/.unikraft/unikraft UK_LIBS=~/.unikraft/libs make menuconfig
Note: This menu is also available through the kraft menuconfig command, which rids you of the hassle of manually setting the environment variables.
We are met with the following configuration menu. Let’s pick the architecture:
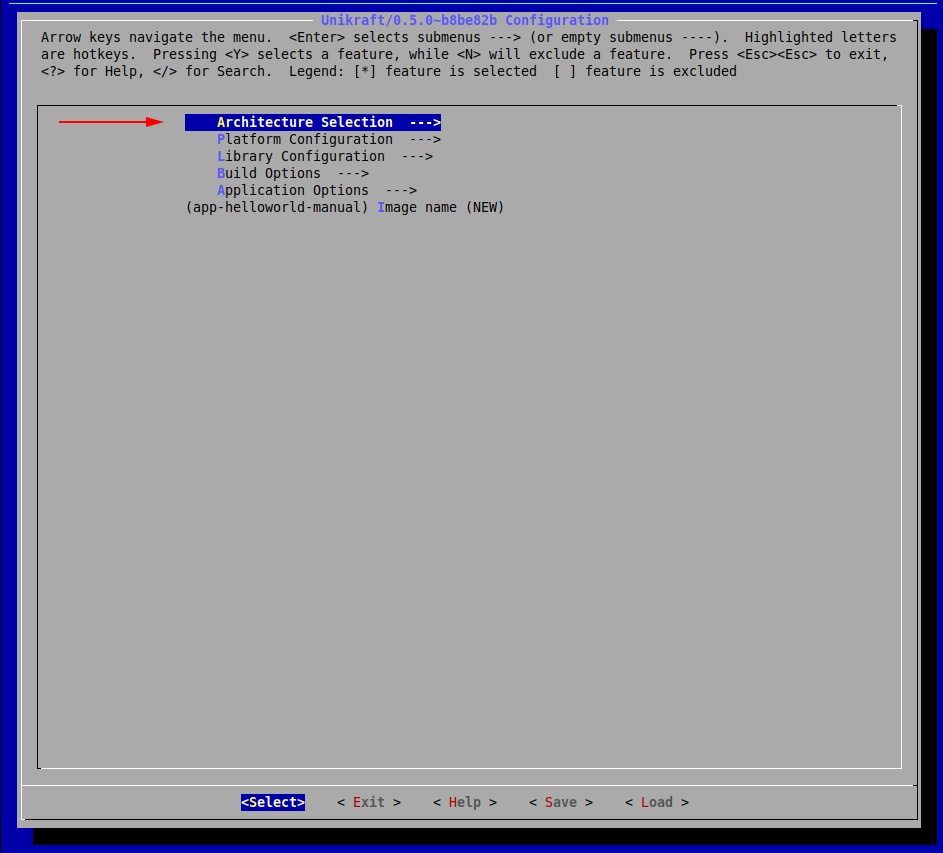
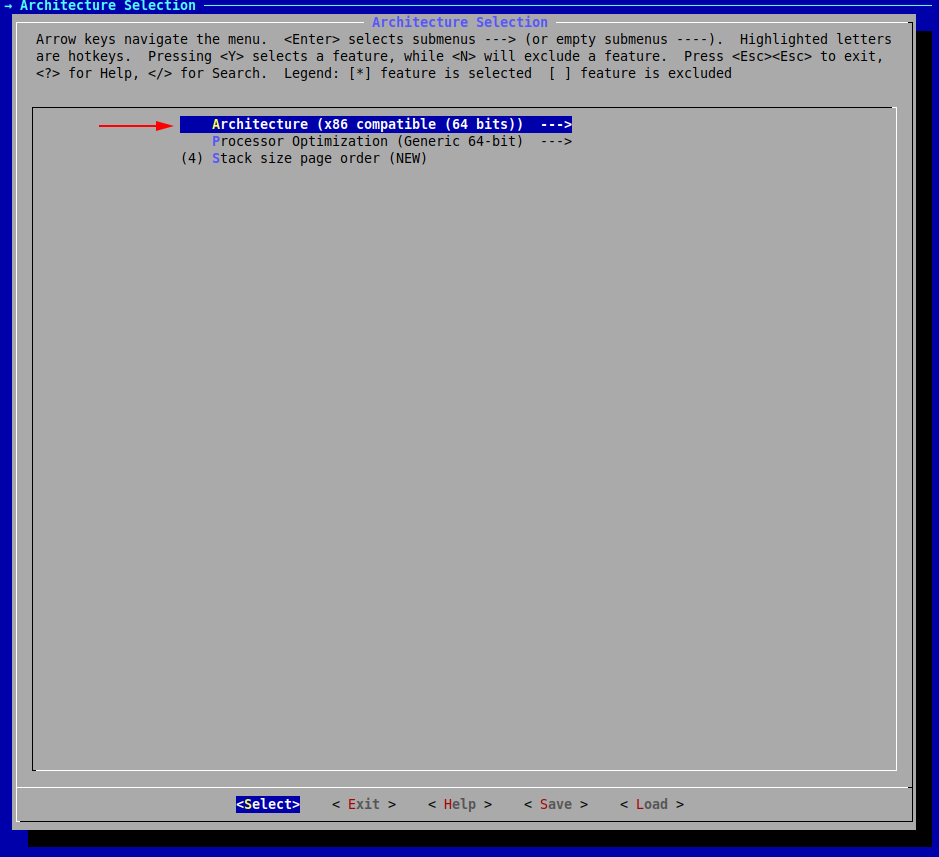
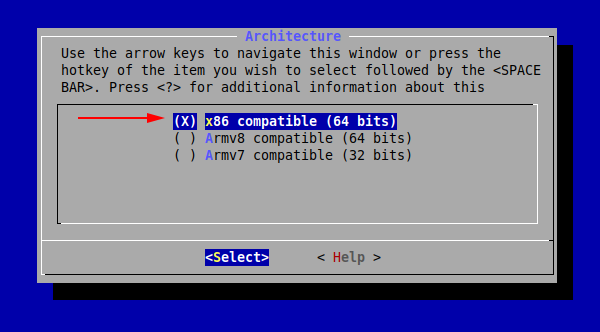
Now, press Exit (or hit the Esc key twice) until you return to the initial menu.
We have now set our desired architecture, let’s now proceed with the platform.
We will choose both linuxu and kvm:
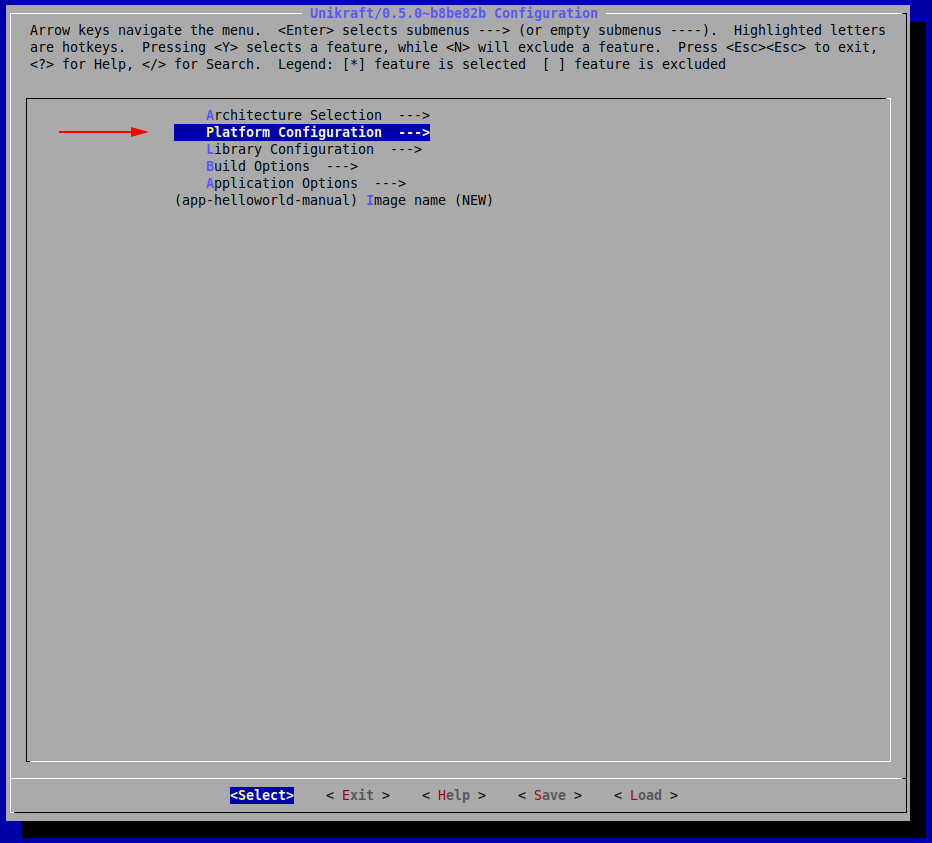
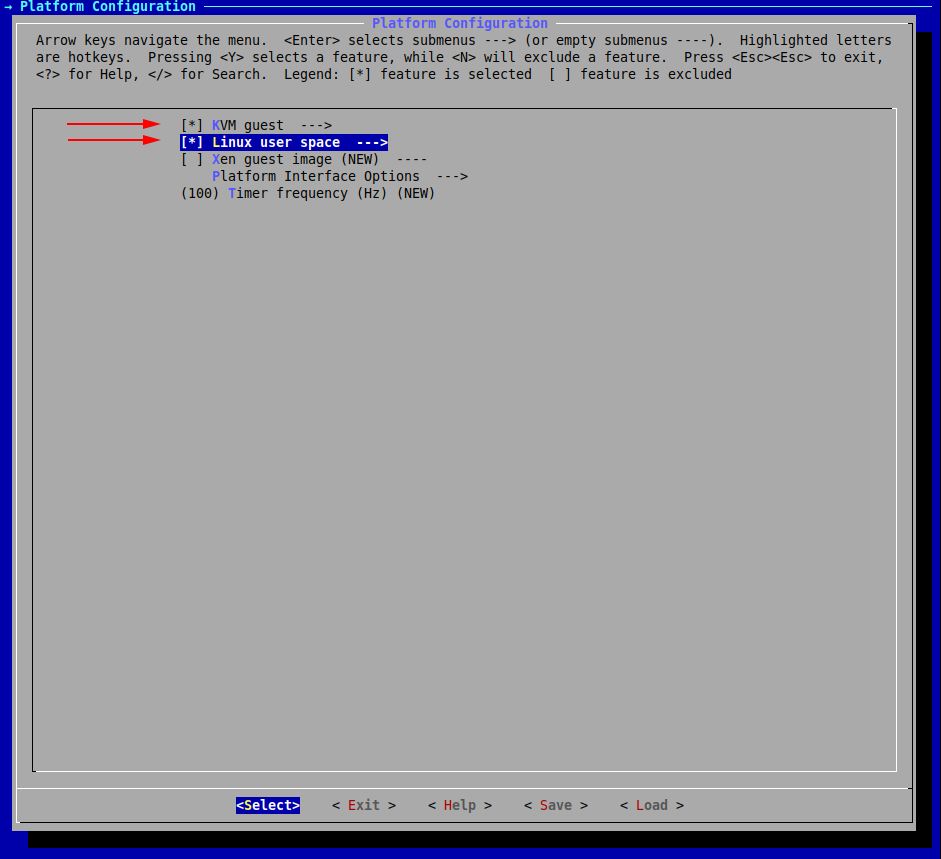
Save and exit the configuration menu by repeatedly selecting Exit.
Build
Now let’s build the final image (recall the environment variables):
$ UK_WORKDIR=~/.unikraft UK_ROOT=~/.unikraft/unikraft UK_LIBS=~/.unikraft/libs  make
[...]
  LD      01-hello-world-manual_linuxu-x86_64.dbg
  SCSTRIP 01-hello-world-manual_kvm-x86_64
  GZ      01-hello-world-manual_kvm-x86_64.gz
  SCSTRIP 01-hello-world-manual_linuxu-x86_64
  LN      01-hello-world-manual_kvm-x86_64.dbg.gdb.py
  LN      01-hello-world-manual_linuxu-x86_64.dbg.gdb.py
Our final binaries are located inside the build/ directory.
Run
Let’s run the linuxu image by doing a Linux-like executable running:
$ ./build/01-hello-world-manual_linuxu-x86_64  # The linuxu image
Powered by
o.   .o       _ _               __ _
Oo   Oo  ___ (_) | __ __  __ _ ' _) :_
oO   oO ' _ `| | |/ /  _)' _` | |_|  _)
oOo oOO| | | | |   (| | | (_) |  _) :_
 OoOoO ._, ._:_:_,\_._,  .__,_:_, \___)
                   Tethys 0.5.0~b8be82b
Hello world!
To run the KVM image, we use the qemu-system-x86_64 command:
$ qemu-system-x86_64 -kernel build/01-hello-world-manual_kvm-x86_64 -nographic
Powered by
o.   .o       _ _               __ _
Oo   Oo  ___ (_) | __ __  __ _ ' _) :_
oO   oO ' _ `| | |/ /  _)' _` | |_|  _)
oOo oOO| | | | |   (| | | (_) |  _) :_
 OoOoO ._, ._:_:_,\_._,  .__,_:_, \___)
                   Tethys 0.5.0~b8be82b
Hello world!
Arguments:  "build/hello_kvm-x86_64"
02. Building and Running the httpreply Application
This is where we will take a look at how to build a basic HTTP Server both through kraft and manually.
The latter involves understanding how to integrate ported external libraries, such as lwip.
Using kraft
Just as before, let’s create a directory that will host the application.
We enter the demo/ directory of the current session and we create the 01-hello-world/ directory:
$ cd demo/
$ mkdir 02-httpreply
$ cd 02-httpreply/
Now, we go through the steps above.
Initialize
Retrieve the already existing template for httpreply:
$ kraft init -t httpreply
Configure the building of a KVM unikernel image for x86_64:
$ kraft configure -p kvm -m x86_64
Build
$ kraft build
Run
$ kraft run -p kvm -m x86_64
[...]
Powered by
o.   .o       _ _               __ _
Oo   Oo  ___ (_) | __ __  __ _ ' _) :_
oO   oO ' _ `| | |/ /  _)' _` | |_|  _)
oOo oOO| | | | |   (| | | (_) |  _) :_
 OoOoO ._, ._:_:_,\_._,  .__,_:_, \___)
                   Tethys 0.5.0~b8be82b
Listening on port 8123...
Use Ctrl+c to stop the HTTP server running as a unikernel virtual machine.
Connecting to the HTTP Server
The server listens on port 8123 but we can’t access it, as the virtual machine doesn’t have a (virtual) network connection to the host system and it doesn’t have an IP address.
So we have to create a connection and assign an IP address.
We use a virtual bridge to create a connection between the VM and the host system.
We assign address 172.44.0.1/24 to the bridge interface (pointing to the host) and we assign address 172.44.0.2/24 to the virtual machine, by passing boot arguments.
We run the commands below to create and assign the IP address to the bridge virbr0:
$ sudo brctl addbr virbr0
$ sudo ip a a  172.44.0.1/24 dev virbr0
$ sudo ip l set dev virbr0 up
We can check the proper configuration:
$ ip a s virbr0
420: virbr0: <BROADCAST,MULTICAST,UP,LOWER_UP> mtu 1500 qdisc noqueue state UNKNOWN group default qlen 1000
    link/ether 3a:3e:88:e6:a1:e4 brd ff:ff:ff:ff:ff:ff
    inet 172.44.0.1/24 scope global virbr0
       valid_lft forever preferred_lft forever
    inet6 fe80::383e:88ff:fee6:a1e4/64 scope link
       valid_lft forever preferred_lft forever
Now we start the virtual machine and pass it the proper arguments to assign the IP address 172.44.0.2/24:
$ kraft run -b virbr0 "netdev.ipv4_addr=172.44.0.2 netdev.ipv4_gw_addr=172.44.0.1 netdev.ipv4_subnet_mask=255.255.255.0 --"
[...]
0: Set IPv4 address 172.44.0.2 mask 255.255.255.0 gw 172.44.0.1
en0: Added
en0: Interface is up
Powered by
o.   .o       _ _               __ _
Oo   Oo  ___ (_) | __ __  __ _ ' _) :_
oO   oO ' _ `| | |/ /  _)' _` | |_|  _)
oOo oOO| | | | |   (| | | (_) |  _) :_
 OoOoO ._, ._:_:_,\_._,  .__,_:_, \___)
                   Tethys 0.5.0~b8be82b
Listening on port 8123...
The boot message confirms the assigning of the 172.44.0.2/24 IP address to the virtual machine.
It’s listening on port 8123 for HTTP connections on that IP address.
We use wget to validate it’s working properly and we are able to get the index.html file:
$ wget 172.44.0.2:8123
--2021-08-18 16:47:38--  http://172.44.0.2:8123/
Connecting to 172.44.0.2:8123... connected.
HTTP request sent, awaiting response... 200 OK
[...]
2021-08-18 16:47:38 (41.5 MB/s) - ‘index.html’ saved [160]
Cleaning up means closing the virtual machine (and the HTTP server) and disabling and deleting the bridge interface:
$ sudo ip l set dev virbr0 down
$ sudo brctl delbr virbr0
The Manual Way
Initialize
First, move into a new directory and clone the httpreply repo there.
$ cd .. && mkdir 02-httpreply-manual && cd 02-httpreply-manual
$ git clone https://github.com/unikraft/app-httpreply .
Adding a Makefile
Unlike before, you can notice that this time we are missing the regular Makefile.
Let’s start by copying the Makefile from helloworld:
$ cp ../01-hello-world/Makefile .
This is how it looks like:
$ cat Makefile
UK_ROOT ?= $(PWD)/../../unikraft
UK_LIBS ?= $(PWD)/../../libs
LIBS :=

all:
	@$(MAKE) -C $(UK_ROOT) A=$(PWD) L=$(LIBS)

$(MAKECMDGOALS):
	@$(MAKE) -C $(UK_ROOT) A=$(PWD) L=$(LIBS) $(MAKECMDGOALS)
As you can see, the previously presented environment values make the same wrong assumption.
Previously, we fixed this by preceding the make command with the updated values for the environment variables, but we could have also simply modified them from within the Makefile, like so:
UK_ROOT ?= $(HOME)/.unikraft/unikraft
UK_LIBS ?= $(HOME)/.unikraft/libs
LIBS :=


	@$(MAKE) -C $(UK_ROOT) A=$(PWD) L=$(LIBS)

$(MAKECMDGOALS):
	@$(MAKE) -C $(UK_ROOT) A=$(PWD) L=$(LIBS) $(MAKECMDGOALS)
For the HTTP server, however, we need the lwip library, and we have to add it to the LIBS variable in the Makefile.
We add it by first downloading it on our system in $(UK_WORKDIR)/libs/:
$ git clone https://github.com/unikraft/lib-lwip ~/.unikraft/libs/lwip
fatal: destination path '~/.unikraft/libs/lwip' already exists and is not an empty directory.
The library is already cloned. That is because kraft took care of it for us behind the scenes in our previous automatic build.
The next step is to add this library in the Makefile:
UK_ROOT ?= $(HOME)/.unikraft/unikraft
UK_LIBS ?= $(HOME)/.unikraft/libs
LIBS := $(UK_LIBS)/lwip

all:
        @$(MAKE) -C $(UK_ROOT) A=$(PWD) L=$(LIBS)

$(MAKECMDGOALS):
        @$(MAKE) -C $(UK_ROOT) A=$(PWD) L=$(LIBS) $(MAKECMDGOALS)
Now, we configure it through make menuconfig.
If you noticed, the menu also automatically selected some other internal components that would be required by lwip.
Now Save and Exit the configuration and run make.
Build
$ make
Run
To run the KVM image, we use the qemu-system-x86_64 command:
$ qemu-system-x86_64 -kernel build/02-httpreply-manual_kvm-x86_64 -nographic
[...]
Powered by
o.   .o       _ _               __ _
Oo   Oo  ___ (_) | __ __  __ _ ' _) :_
oO   oO ' _ `| | |/ /  _)' _` | |_|  _)
oOo oOO| | | | |   (| | | (_) |  _) :_
 OoOoO ._, ._:_:_,\_._,  .__,_:_, \___)
                   Tethys 0.5.0~b8be82b
Listening on port 8123...
To close the running QEMU process, use the Ctrl+a x key combination.
Note: We didn’t go into configuring a functional network connection and actually querying the HTTP server.
This is a bit more complicated and is outside the scope of this session.
sudo qemu-system-x86_64 -netdev bridge,id=en0,br=virbr0 -device virtio-net-pci,netdev=en0 -append "netdev.ipv4_addr=172.44.0.2 netdev.ipv4_gw_addr=172.44.0.1 netdev.ipv4_subnet_mask=255.255.255.0 --" -kernel build/02-httpreply-manual_kvm-x86_64 -nographic
Connecting to the HTTP Server
Similarly to kraft, in order to connect to the HTTP server, we use a virtual bridge to create a connection between the VM and the host system.
We assign address 172.44.0.1/24 to the bridge interface (pointing to the host) and we assign address 172.44.0.2/24 to the virtual machine, by passing boot arguments.
We run the commands below to create and assign the IP address to the bridge virbr0:
$ sudo brctl addbr virbr0
$ sudo ip a a  172.44.0.1/24 dev virbr0
$ sudo ip l set dev virbr0 up
Now we start the virtul machine and pass it the proper arguments to assing the IP address 172.44.0.2/24:
$ sudo qemu-system-x86_64 -netdev bridge,id=en0,br=virbr0 -device virtio-net-pci,netdev=en0 -append "netdev.ipv4_addr=172.44.0.2 netdev.ipv4_gw_addr=172.44.0.1 netdev.ipv4_subnet_mask=255.255.255.0 --" -kernel build/02-httpreply-manual_kvm-x86_64 -nographic
0: Set IPv4 address 172.44.0.2 mask 255.255.255.0 gw 172.44.0.1
en0: Added
en0: Interface is up
Powered by
o.   .o       _ _               __ _
Oo   Oo  ___ (_) | __ __  __ _ ' _) :_
oO   oO ' _ `| | |/ /  _)' _` | |_|  _)
oOo oOO| | | | |   (| | | (_) |  _) :_
 OoOoO ._, ._:_:_,\_._,  .__,_:_, \___)
                   Tethys 0.5.0~b8be82b
Listening on port 8123...
[...]
The boot message confirms the assigning of the 172.44.0.2/24 IP address to the virtual machine.
It’s listening on port 8123 for HTTP connections on that IP address.
We use wget to validate it’s working properly and we are able to get the index.html file:
$ wget 172.44.0.2:8123
--2021-08-18 16:47:38--  http://172.44.0.2:8123/
Connecting to 172.44.0.2:8123... connected.
HTTP request sent, awaiting response... 200 OK
[...]
2021-08-18 16:47:38 (41.5 MB/s) - ‘index.html’ saved [160]
Cleaning up means closing the virtual machine (and the HTTP server) and disabling and deleting the bridge interface:
$ sudo ip l set dev virbr0 down
$ sudo brctl delbr virbr0
Summary
kraftis an extremely useful tool for quickly deploying unikernel images.
It abstracts away many factors that would normally increase the difficulty of such tasks.
Through just a simple set of a few commands, we can build and run a set of fast and secure unikernel images with low memory footprint.
Practical Work
01. Echo-back Server
You will have to implement a simple echo-back server in C for the KVM platform.
The application will have to be able to open a socket on 172.44.0.2:1234 and send back to the client whatever the client sends to the server.
If the client closes the connection, the server will automatically close.
Enter the work/01-echo-back/ directory.
Check the source code file (main.c) and support files.
Work on the contents to have a viable echo-back server implementation.
Things to consider:
- You will need some network client utility such as
netcat. - You will need the Lightweight TCP/IP stack library (lwip): https://github.com/unikraft/lib-lwip
- You will have to update the build and support files in the
work/01-echo-back/ directory. - If you want to run the application without
kraft, the KVM launch script and network setup are already included inside work/01-echo-back/launch.sh.
To test if your application works you can try sending it messages like so:
$ nc 172.44.0.2 1234
After connecting to the server, whatever you enter in standard input, should be echoed back to you.
02. ROT-13
Update the previously built application, to echo back a rot-13 encoded message.
To do this, you will have to create a custom function inside lwip (~/.unikraft/libs/lwip/) that your application (from the new directory work/02-rot13) can call in order to encode the string.
For example, you could implement the function void rot13(char *msg); inside ~/.unikraft/libs/lwip/sockets.c and add its header inside ~/.unikraft/libs/lwip/include/sys/socket.h.
The required resources are the exact same as in the previous exercise, you will just have to update lwip.
To test if this works, use the same methodology as before, but ensure that the echoed back string is encoded.
03. Tutorial: Mount 9pfs
In this tutorial, we will see what we would need to do if we wanted to have a filesystem available.
To make it easy, we will use the 9pfs filesystem, as well as the newlib library.
The latter is used so that we have available an API that would enable us to interact with this filesystem (functions such as lseek, open).
Note: the build will fail if unikraft and newlib repositories aren’t both on the staging or the stable branches.
To avoid this situation, go to ~/.unikraft/unikraft and checkout branch staging:
cd ~/.unikraft/unikraft
git checkout staging
We will need to download newlib:
git clone https://github.com/unikraft/lib-newlib.git ~/.unikraft/libs/newlib
Next, we include it in our Makefile:
LIBS := $(UK_LIBS)/lwip:$(UK_LIBS)/newlib
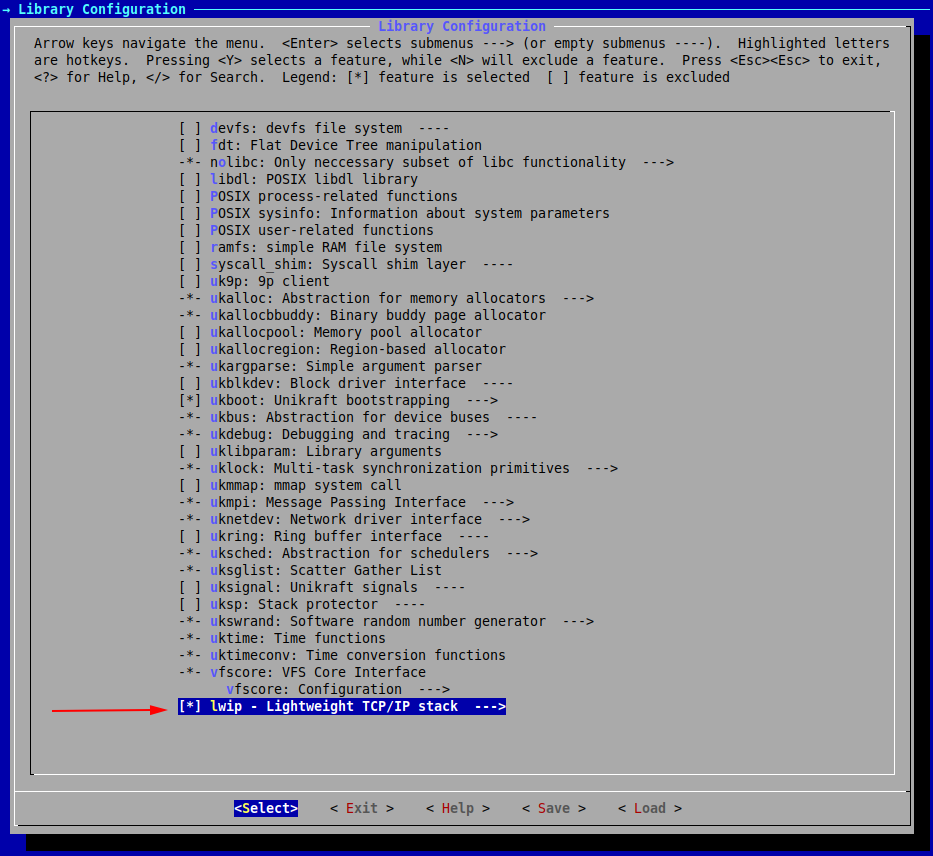
And now, for the final step, through make menuconfig make sure you have selected libnewlib as well as 9pfs: 9p filesystem inside the Library Configuration menu.
We will also check these options inside Library Configuration -> vfscore: Configuration:

What is more, you should also have present in the current directory an additional directory called fs0:
mkdir fs0
And so, fs0 will contain whatever files you create, read from or write to from within your unikernel.
For now, just make sure it successfully builds. If it does, move on to the next work item.
04. Store Strings
For the final work item, you will have to update the source code from the second task, so that it stores in a file the received string before sending the encoded one back to the client.
In order to achieve this, you must have the previous work item completed.
The available resources are the exact same, you will simply have to modify main.c.
To test if your application ran successfully, check to see whether the original strings you sent through the client are present in that file or not.
Further Reading
Unikraft Documentation
4 - Session 02: Behind the Scenes
Reminders
Kraft
Kraft is the tool developed by the Unikraft team, to make application deployment easier.
To automatically download, configure, build and run an application, for example Helloworld, run
$ kraft list update
$ kraft up -t helloworld@staging ./my-first-unikernel
If you are already working with cloned / forked repositories from Unikraft, kraft can also help you configure, build and run you application.
kraft up can be broken down into the following commands:
$ kraft configure
$ kraft build
$ kraft run
For this session, the following tools are needed: qemu-kvm, qemu-system-x86_64, qemu-system-aarch64, gcc-aarch64-linux-gnu.
To install on Debian/Ubuntu use the following command
$ sudo apt-get -y install qemu-kvm qemu-system-x86 qemu-system-arm gcc-aarch64-linux-gnu
Support Files
Session support files are available in the repository.
If you already cloned the repository, update it and enter the session directory:
$ cd path/to/repository/clone

$ git pull --rebase

$ cd content/en/docs/sessions/02-behind-scenes/

$ ls
demo/  images/  index.md  sol/
If you haven’t cloned the repository yet, clone it and enter the session directory:
$ git clone https://github.com/unikraft/summer-of-code-2021

$ cd summer-of-code-2021/content/en/docs/sessions/02-behind-scenes/

$ ls
demo/  images/  index.md  sol/
Overview
01. Virtualization
Through virtualization, multiple operating systems (OS) are able to run on the same hardware, independently, thinking that each one of them controls the entire system.
This can be done using a hypervisor, which is a low-level software that virtualizes the underlying hardware and manages access to the real hardware, either directly or through the host Operating System.
There are 2 main virtualized environments: virtual machines and containers, each with pros and cons regarding complexity, size, performance and security.
Unikernels come somewhere between those 2.
Virtual Machines
Virtual machines represent an abstraction of the hardware, over which an operating system can run, thinking that it is alone on the system and that it controls the hardware below it.
Virtual machines rely on hypervisors to run properly.
Those hypervisors can be classified in 2 categories: Type 1 and Type 2.
We won’t go in depth into them, but it is good to know how they are different:
- The Type 1 hypervisor, also known as bare-metal hypervisor, has direct access to the hardware and controls all the operating systems that are running on the system.
KVM, despite the appearances, is a Type 1 hypervisor.
- The Type 2 hypervisor, also known as hosted hypervisor, has to go through the host operating system to reach the hardware.
An example of Type 2 hypervisor is VirtualBox.
 |  |
|---|
| Operating systems over type 1 hypervisor | Operating systems over type 2 hypervisor |
Containers
Containers are environments designed to contain and run only one application and its dependencies.
This leads to very small sizes.
The containers are managed by a Container Management Engine, like Docker, and are dependent on the host OS, as they cannot run without it.
 |
|---|
| Containers |
Unikraft
Unikraft has a size comparable with that of a container, while it retains the power of a virtual machine, meaning it can directly control the hardware components (virtualized, or not, if running bare-metal).
This gives it an advantage over classical Operating Systems.
Being a special type of operating system, Unikraft can run bare-metal or over a hypervisor.
 |  |
|---|
| Unikraft over Type 1 hypervisor | Unikraft over Type 2 hypervisor |
The following table makes a comparison between regular Virtual Machines (think of an Ubuntu VM), Containers and Unikernels, represented by Unikraft:
| Virtual Machines | Containers | Unikernels |
|---|
| Time performance | Slowest of the 3 | Fast | Fast |
| Memory footprint | Heavy | Depends on the number of features | Light |
| Security | Very secure | Least secure of the 3 | Very secure |
| Features | Everything you would think of | Depends on the needs | Only the absolute necessary |
02. linuxu and KVM
Unikraft can be run in 2 ways:
- As a virtual machine, using QEMU/KVM or Xen.
It acts as an operating system, having the responsibility to configure the hardware components that it needs (clocks, additional processors, etc).
This mode gives Unikraft direct and total control over hardware components, allowing advanced functionalities.
- As a
linuxu build, in which it behaves as a Linux user-space application.
This severely limits its performance, as everything Unikraft does must go through the Linux kernel, via system calls.
This mode should be used only for development and debugging.
When Unikraft is running using QEMU/KVM, it can either be run on an emulated system or a (para)virtualized one.
Technically, KVM means virtualization support is enabled.
If using QEMU in emulated mode, KVM is not used.
To keep things simple, we will use interchangeably the terms QEMU, KVM or QEMU/KVM to refer to this use (either virtualized, or emulated).
Emulation is slower, but it allows using CPU architectures different from the local one (you can run ARM code on a x86 machine).
Using (para)virtualisation, aka hardware acceleration, greater speed is achieved and more hardware components are visible to Unikraft.
03. Unikraft Core
The Unikraft core is comprised of several components:
- the architecture code:
This defines behaviours and hardware interactions specific to the target architecture (x86_64, ARM, RISC-V).
For example, for the x86_64 architecture, this component defines the usable registers, data types sizes and how Thread-Local Storage should happen.
- the platform code:
This defines interaction with the underlying hardware, depending on whether a hypervisor is present or not, and which hypervisor is present.
For example, if the KVM hypervisor is present, Unikraft will behave almost as if it runs bare-metal, needing to initialize the hardware components according to the manufacturer specifications.
The difference from bare-metal is made only at the entry, where some information, like the memory layout, the available console, are supplied by the bootloader (Multiboot) and there’s no need to interact with the BIOS or UEFI.
In the case of Xen, many of the hardware-related operations must be done through hypercalls, thus reducing the direct interaction of Unikraft with the hardware.
- internal libraries:
These define behaviour independent of the hardware, like scheduling, networking, memory allocation, basic file systems.
These libraries are the same for every platform or architecture, and rely on the platform code and the architecture code to perform the needed actions.
The internal libraries differ from the external ones in the implemented functionalities.
The internal ones define parts of the kernel, while the external ones define user-space level functionalities.
For example, uknetdev and lwip are 2 libraries that define networking components.
Uknetdev is an internal library that interacts with the network card and defines how packages are sent using it.
Lwip is an external library that defines networking protocols, like IP, TCP, UDP.
This library knows that the packages are somehow sent over the NIC, but it is not concerned how.
That is the job of the kernel.
04. libc in Unikraft
The Unikraft core provides only the bare minimum components to interact with the hardware and manage resources.
A software layer, similar to the standard C library in a general-purpose OS, is required to make it easy to run applications on top of Unikraft.
Unikraft has multiple variants of a libc-like component:
- nolibc is a minimalistic libc, part of the core Unikraft code, that contains only the functionality needed for the core (strings, qsort, etc).
- isrlib is the interrupt-context safe variant of nolibc.
It is used for interrupt handling code.
- newlibc is the most complete libc currently available for Unikraft, but it still lacks some functionalities, like multithreading.
Newlibc was designed for embedded environments.
- musl is, theoretically, the best libc that will be used by Unikraft, but it’s currently in testing.
Nolibc and isrlib are part of the Unikraft core.
Newlibc and musl are external libraries, from the point of view of Unikraft, and they must be included to the build, as shown in Session 01: Baby Steps.
05. Configuring Unikraft - Config.uk
Unikraft is a configurable operating system, where each component can be modified, configured, according to the user’s needs.
This configuration is done using a version of Kconfig, through the Config.uk files.
In these files, options are added to enable libraries, applications and different components of the Unikraft core.
The user can then apply those configuration options, using make menuconfig, which generates an internal configuration file that can be understood by the build system, .config.
Once configured, the Unikraft image can be built, using make, and run, using the appropriate method (Linux ELF loader, qemu-kvm, xen, others).
Configuration can be done in 3 ways:
Manually, using
$ make menuconfig
Adding a dependency in Config.uk for a component, so that the dependency gets automatically selected when the component is enabled.
This is done using depends on and select keywords in Config.uk.
The configuration gets loaded and the .config file is generated by running
$ make menuconfig
This type of configuration removes some configuration steps, but not all of them.
Writing the desired configuration in kraft.yaml.
The configuration gets loaded and the .config file is generated by running
$ kraft configure
In this session, we will use the first and the last configuration options.
06. The Build System - basics
Once the application is configured, in .config, symbols are defined (e.g. CONFIG_ARCH_X86_64).
Those symbols are usable both in the C code, to include certain functionalities only if they were selected in the configuring process, and in the actual building process, to include / exclude source files, or whole libraries.
This last thing is done in Makefile.uk, where source code files are added to libraries.
During the build process, all the Makefile.uk files (from the Unikraft core and external libraries) are evaluated, and the selected files are compiled and linked, to form the Unikraft image.
 |
|---|
| The build process of Unikraft |
Summary
- Unikraft is a special type of operating system, that can be configured to match the needs of a specific application.
- This configuration is made possible by a system based on Kconfig, that uses Config.uk files to add possible configurations, and .config files to store the specific configuration for a build.
- The configuration step creates symbols that are visible in both Makefiles and source code.
- Each component has its own Makefile.uk, where source files can be added, removed, or be made dependent on the configuration.
- Unikraft has an internal libc, but it can use others, more complex and complete, like newlib and musl.
- Being an operating system, it needs to be run by a hypervisor, like KVM, xen, to work at full capacity.
It can also be run as an ELF, in Linux, but in this way the true power of Unikraft is not achieved.
Work Items
Support Files
Session support files are available in the repository.
If you already cloned the repository, update it and enter the session directory:
$ cd path/to/repository/clone

$ git pull --rebase

$ cd content/en/docs/sessions/02-behind-scenes/

$ ls
demo/  images/  index.md  sol/
If you haven’t cloned the repository yet, clone it and enter the session directory:
$ git clone https://github.com/unikraft/summer-of-code-2021

$ cd summer-of-code-2021/content/en/docs/sessions/02-behind-scenes/

$ ls
demo/  images/  index.md  sol/
01. Tutorial / Reminder: Building and Running Unikraft
We want to build the Helloworld application, using the Kconfig-based system, for the linuxu and KVM platforms, for the ARM and x86 architectures, and then run them.
If you don’t have the unikraft and app-helloworld repositories cloned already, do so, by running the following commands:
$ git clone https://github.com/unikraft/unikraft
$ cd apps
$ git clone https://github.com/unikraft/app-helloworld helloworld/
As you can see from the commands above, it is recommended to have the following file structure in your working directory:
workdir
|_______apps
|	|_______helloworld
|_______libs
|_______unikraft
Make sure that UK_ROOT and UK_LIBS are set correctly in the Makefile file, in the helloworld folder.
If you are not sure if they are set correctly, set them like this:
UK_ROOT ?= $(PWD)/../../unikraft
UK_LIBS ?= $(PWD)/../../libs
Linuxu, x86_64
First, we will the image for the linuxu platform.
As the resulting image will be an ELF, we can only run the x86 Unikraft image.
We follow the steps:
While in the helloworld folder, run
$ make menuconfig
From Architecture Selection, select Architecture -> x86 compatible.
From Platform Configuration, select Linux user space.
Save, exit and run
$ make
The resulting image, app-helloworld_linuxu-x86_64 will be present in the build/ folder.
Run it.
$ ./build/app-helloworld_linuxu-x86_64
KVM, x86_64
Next, we will build the image for the kvm platform.
Before starting the process, make sure that you have the necessary tools, listed in the Required Tools section.
We follow the steps:
Run
$ make menuconfig
We will leave the architecture as is, for now.
From Platform Configuration, select KVM guest.
Save, exit and run
$ make
Load the resulting image in QEMU by using
$ sudo qemu-system-x86_64 -kernel ./build/app-helloworld_kvm-x86_64 -serial stdio
Besides -serial stdio, no other option is needed to run the Helloworld application.
Other, more complex applications, will require more options given to qemu.
We have run Unikraft in the emulation mode, with the command from above.
We can also run it in the virtualization mode, by adding the -enable-kvm option.
You may receive a warning, host doesn't support requested feature:.
This is because kvm uses a generic CPU model.
You can instruct kvm to use your local CPU model, by adding -cpu host to the command.
The final command will look like this:
$ sudo qemu-system-x86_64 -enable-kvm -cpu host -kernel ./build/app-helloworld_kvm-x86_64 -serial stdio
While we are here, we can check some differences between emulation and virtualization.
Record the time needed by each image to run, using time, like this:
$ time sudo qemu-system-x86_64 -kernel ./build/app-helloworld_kvm-x86_64 -serial stdio
$ time sudo qemu-system-x86_64 -enable-kvm -cpu host -kernel ./build/app-helloworld_kvm-x86_64 -serial stdio
Because helloworld is a simple application, the real running time will be similar.
The differences are where each image runs most of its time: in user space, or in kernel space.
Find an explanation to those differences.
KVM, ARM
To configure Unikraft for the ARM architecture, go to the configuration menu, like before, and select, from Architecture Selection, Armv8 compatible.
Save and exit the configuration.
As a new architecture is selected, you have to clean the previously compiled files:
$ make clean
After cleaning, build the image:
$ make
To run Unikraft, use the following command:
$ sudo qemu-system-aarch64 -machine virt -cpu cortex-a57 -kernel ./build/app-helloworld_kvm-arm64 -serial stdio
Note that now we need to provide a machine and a CPU model to be emulated, as there are no defaults available.
If you want to find information about other machines, run
$ sudo qemu-system-aarch64 -machine help
02. Tutorial: Make It Speak
The goal of this exercise is to enable the internal debugging library for Unikraft (ukdebug) and make it display messages up to the info level.
We also want to identify which hardware components are initialized for both x86 and ARM, and where.
ARM
Considering that the last exercise ended with an ARM image, we will start now with that configuration.
We need to enable ukdebug in the configuration menu.
It is located in the Library Configuration menu.
But, for this exercise, besides enabling a component, we must modify it.
Enter the ukdebug configuration menu.
We need to have Enable kernel messages (uk_printk) checked.
Also, we need to change the option below it, Kernel message level, from Show critical and error messages (default) to Show all types of messages.
To make thing prettier, also enable the Colored output option.
Save and exit the configuration, then build and run the image.
We have a bunch of initializations happening, before seeing the “Hello world!” message.
Let’s break them down. We start with the platform internal library, libkvmplat.
Here, the hardware components are initialized, like the Serial module, PL001 UART, and the GIC, which is the interrupt controller.
After that, the memory address space is defined, and the booting process starts, by replacing the current stack with a larger one, that is part of the defined address space.
Lastly, before calling the main function of the application, the software components of Unikraft are initialized, like timers, interrupts, and bus handlers.
The execution ends in in the platform library, with the shutdown command.
x86_64
For the x86 part, just change the architecture in the configuration interface.
Recall that, after changing the architecture, we have to clean the previously compiled files:
$ make clean
Build Unikraft:
$ make
And run in under QEMU/KVM.
The output differs.
We can see that, in the case of x86, the platform library initializes less components, or it is less verbose than the ARM one.
But the timer and bus initialization is more verbose.
We see what timer is used, the i8254 one.
Also, we see that the PCI bus is used.
If you are wondering what the Constructors are, they will be covered in Session 06: Testing Unikraft
03. More Messages
Sometimes we need a more detailed output.
For this, ukdebug has the option to show debug level messages.
Enable them and run Unikraft, for either ARM or x86 architectures, or both.
04. Going through the Code
Having the output of ukdebug, go through the Unikraft code, in the unikraft folder.
Find the components that you have seen in the outputs, in the platform library, and where the kernel messages are sent.
The platform library, even though is called a library, is not in the lib subfolder.
It is placed in the plat folder.
Explore the code, at your own pace.
Can you also find where the main function is called?
05. I Have an Important Message
Send an important kernel message, that everyone needs to see, right before the main function is called.
Try different message levels (critical, error, warning, info, debug), to see how they differ.
Note: sending a critical kernel message will not affect how Unikraft runs after the message.
06. Tutorial / Reminder: Adding Filesystems to an Application
For this tutorial, the aim is to create a simple QEMU/KVM application that reads from a file and displays the contents to standard output.
A local directory is to be mounted as the root directory (/) inside the QEMU/KVM virtual machine.
Some parts of this tutorial were already discussed in Session 01: Baby Steps.
We will use both the manual approach (make and qemu-system-x86_64 / qemu-guest) and kraft to configure, build and run the application.
Setup
The basic setup is in the work/06-adding-filesystems/ folder in the session directory.
Enter that folder:
$ cd work/06-adding-filesystems/

$ ls -F
guest_fs/  kraft.yaml  launch.sh*  main.c  Makefile  Makefile.uk  qemu-guest*
The guest_fs/ local directory is to be mounted as the root directory (/) inside the QEMU/KVM virtual machine.
It contains the grass file.
The program (main.c) reads the contents of the /grass file and prints it to standard output.
Makefile.uk lists the main.c file as the application source file to be compiled and linked with Unikraft.
Makefile is used by the manual configuration and build system.
kraft.yaml is used by kraft to configure, build and run the application.
launch.sh is a wrapper script around qemu-system-x86_64 used to manually run the application.
Similarly, qemu-guest is a wrapper script used internally by kraft.
We’ll use it as well to run the application.
If, at any point of this tutorial, something doesn’t work, or you want a quick check, see the reference solution in sol/06-adding-filesystems/ folder in the session directory.
Using the Manual Approach
Firstly, we will use the manual approach to configure, build and run the application.
For filesystem functionalities (opening, reading, writing files) we require a more powerful libc.
newlib is already ported in Unikraft and will do nicely.
For this, we update the LIBS line in the Makefile:
LIBS := $(UK_LIBS)/newlib
Update the UK_ROOT and UK_LIBS variables in the Makefile to point to the folders storing the Unikraft and libraries repositories.
Make sure that both unikraft and newlib repositories are on the staging branch.
Go to each of the two repository folders (unikraft and newlib) and check the current branch:
$ git checkout
Now we need to enable 9pfs and newlib in Unikraft.
To do this, we run:
$ make menuconfig
We need to select the following options, from the Library Configuration menu:
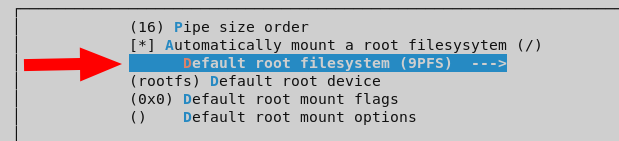
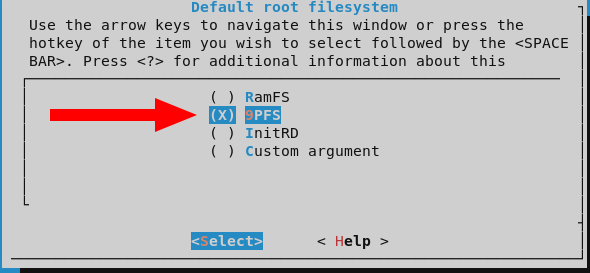
libnewlibvfscore: VFS Core Interfacevfscore: VFS Configuration -> Automatically mount a root filesystem -> Default root filesystem -> 9pfs- For the
Default root device option fill the fs0 string (instead of the default rootfs string).
These configurations will also mark as required 9pfs and uk9p in the menu.
We want to run Unikraft with QEMU/KVM, so we must select KVM guest in the Platform Configuration menu.
For 9PFS we also need to enable, in the KVM guest options menu, Virtio -> Virtio PCI device support.
Save the configuration and exit.
Do a quick check of the configuration in .config by pitting it against the config.sol file in the reference solution:
$ diff -u .config ../../sol/06-adding-filesytstems/config.sol
Differences should be minimal, such as the application identifier.
Build
Build the Unikraft image:
make
Building the Unikraft image will take a while.
It has to pull newlib source code, patch it and then build it, together with the Unikraft source code.
Run with qemu-system-x86_64
To run the Unikraft image with QEMU/KVM, we use the wrapper launch.sh script, that calls qemu-system-x86_64 command with the proper arguments:
$ ./launch.sh ./build/unikraft-kraft-9pfs-issue_kvm-x86_64
[...]
o.   .o       _ _               __ _
Oo   Oo  ___ (_) | __ __  __ _ ' _) :_
oO   oO ' _ `| | |/ /  _)' _` | |_|  _)
oOo oOO| | | | |   (| | | (_) |  _) :_
 OoOoO ._, ._:_:_,\_._,  .__,_:_, \___)
                   Tethys 0.5.0~825b115
Hello, world!
File contents: The grass is green!
Bye, world!
A completely manual run would use the command:
$ qemu-system-x86_64 -fsdev local,id=myid,path=guest_fs,security_model=none -device virtio-9p-pci,fsdev=myid,mount_tag=fs0 -kernel build/06-adding-filesystems_kvm-x86_64 -nographic
[...]
Powered by
o.   .o       _ _               __ _
Oo   Oo  ___ (_) | __ __  __ _ ' _) :_
oO   oO ' _ `| | |/ /  _)' _` | |_|  _)
oOo oOO| | | | |   (| | | (_) |  _) :_
 OoOoO ._, ._:_:_,\_._,  .__,_:_, \___)
                   Tethys 0.5.0~825b115
Hello, world!
File contents: The grass is green!
Bye, world!
Lets break it down:
-fsdev local,id=myid,path=guest_fs,security_model=none - assign an id (myid) to the guest_fs/ local folder-device virtio-9p-pci,fsdev=myid,mount_tag=fs0 - create a device with the 9pfs type, assign the myid for the -fsdev option and also assign the mount tag that we configured above (fs0)
Unikraft will look after that mount tag when trying to mount the filesystem, so it is important that the mount tag from the configuration is the same as the one given as argument to qemu.-kernel build/06-adding-filesystems_kvm-x86_64 - tells QEMU that it will run a kernel;
if this parameter is omitted, QEMU will think it runs a raw file-nographic - prints the output of QEMU to the standard output, it doesn’t open a graphical window
Run with qemu-guest
qemu-guest is the script used by kraft to run its QEMU/KVM images.
Before looking at the command, take some time to look through the script, and maybe figure out the arguments needed for our task.
To run a QEMU/KVM application using qemu-guest, we use:
$ ./qemu-guest -e guest_fs/ -k build/06-adding-filesystems_kvm-x86_64
If we add the -D option, we can see the qemu-system command generated.
You may get the following error:
[ 0.100664] CRIT: [libvfscore] <rootfs.c @ 122> Failed to mount /: 22
If you do, check that the mount tag in the configuration is the same as the one used by qemu-guest.
qemu-guest will use the tag fs0.
The fs0 tag is hardcoded for qemu-guest (and, thus, for kraft).
This is why we used the fs0 tag when configuring the application with make menuconfig.
Another tag could be used but then we couldn’t run the application with qemu-guest or kraft.
It could only be run by manually using qemu-system-x86_64 with the corresponding arguments.
Using kraft
With kraft, the whole process of configuring, building and running Unikraft can be made easier.
First, we need to replace the TODO lines in kraft.yaml, to reflect our new configuration.
The first set of TODO lines correspond to the Unikraft configuration.
They are used by the kraft configure command.
This is the equivalent of what make menuconfig does.
We need to update those TODO lines with:
  kconfig:
    - CONFIG_LIBUK9P=y
    - CONFIG_LIB9PFS=y
    - CONFIG_LIBVFSCORE_AUTOMOUNT_ROOTFS=y
    - CONFIG_LIBVFSCORE_ROOTFS_9PFS=y
    - CONFIG_LIBVFSCORE_ROOTDEV="fs0"
Then, we need to update the TODO lines for the volume configuration (for mounting the filesystem).
These configuration lines are to be used by the kraft run command.
We need to update those TODO lines with:
volumes:
  guest_fs:
    driver: 9pfs
In the end, the resulting kraft.yaml file will look like this:
---
specification: '0.5'
name: 06-adding-filesystems
unikraft:
  version: 'staging'
  kconfig:
    - CONFIG_LIBUK9P=y
    - CONFIG_LIB9PFS=y
    - CONFIG_LIBVFSCORE_AUTOMOUNT_ROOTFS=y
    - CONFIG_LIBVFSCORE_ROOTFS_9PFS=y
    - CONFIG_LIBVFSCORE_ROOTDEV="fs0"
targets:
  - architecture: x86_64
    platform: kvm
libraries:
  newlib:
    version: 'staging'
    kconfig:
      - CONFIG_LIBNEWLIBC=y
volumes:
  guest_fs:
    driver: 9pfs
Next, we will make kraft reconfigure our application, using kraft configure.
In our case, nothing should be modified in .config, as we had the same configuration before.
If you get an error like “missing component: newlib”, you need to run kraft list update.
Build
We can now build the application using:
$ kraft build
Run
Run the application using:
$ kraft run
Note: This step is not currently working due to a kraft issue.
You can use the fix described in the issue to make kraft run work.
07. Tutorial: Give the User a Choice
The goal of this exercise is to modify Config.uk, for the Helloworld app, so that the user can choose if the app will display Hello world, or what it reads from the file from the previous exercise.
First of all, we need to add a new configuration in Config.uk.
We will do it like this:
config APPHELLOWORLD_READFILE
	bool "Read my file"
	default n
	help
	  Reads the file in guest_fs/ and prints its contents,
	  instead of printing helloworld
After this, we need to modify our code in main.c, to use this configuration option.
#ifndef CONFIG_APPHELLOWORLD_READFILE
	printf("Hello world!\n");
#else
	FILE *in = fopen("file", "r");
	char buffer[100];

	fread(buffer, 1, 100, in);
	printf("File contents: %s\n", buffer);
	fclose(in);
#endif
Note that, for our configuration option APPHELLOWORLD_READFILE, a symbol, CONFIG_APPHELLOWORLD_READFILE, was defined.
We tell GCC that, if that symbol was not defined, it should use the printf("Hello world!\n").
Otherwise, it should use the code written by us.
The last step is to configure the application.
We do this by running make menuconfig, then going to the Application Options and enabling our configuration option.
Now we can build and run the new Unikraft image.
08. Tutorial: Arguments from Command Line
We want to configure the helloworld app to receive command line arguments and then print them.
For this, the Helloworld application already has a configuration option.
Configure the application by running
$ make menuconfig
In the configuration menu, go to Application Options and enable Print arguments.
If we build and run the image now, using qemu-guest, we will see that two arguments are passed to Unikraft: the kernel argument, and a console.
We want to pass it an aditional argument, "foo=bar".
Before this, make sure to reset your configuration, so Unikraft won’t use 9pfs for this task:
$ make clean
Raw qemu command
To send an argument with qemu-system, we use the -append option, like this:
$ qemu-system-x86_64 -kernel build/app-helloworld_kvm-x86_64 -append "console=ttyS0 foo=bar" -serial stdio
qemu-guest script
To send an argument with the qemu-guest script, we use the -a option, like this:
$ ./qemu-guest -k build/app-helloworld_kvm-x86_64 -a "foo=bar"
Kraft
To send an argument while using kraft, run it like this:
$ kraft run "foo=bar"
09. Adding a new source file
Create a new source file for your application, and implement a function that sorts a given integer array, by calling qsort, in turn, from different libc variants, and then prints that array.
For each library, check the size of the Unikraft image.
Enable nolibc and then, as a separate config / build, newlibc, both by using make menuconfig and modifying kraft.yaml.
You will have four different configurations and builds:
- nolibc + kraft
- nolibc + make
- newlibc + kraft
- newlibc + make
10. More Power to the User
Add the possibility to include the new source file only if a configuration option is selected.
Make sure that after this change, the application can still be built and run.
11. Less Power to the User
Delete Config.uk and reconfigure / rebuild the app.
What happens when you run the app?
12. Give Us Feedback
We want to know how to make the next sessions better.
Fo this we need your feedback.
5 - Session 03: Debugging in Unikraft
Because unikernels aim to be a more efficient method of virtualization, this can sometimes cause problems.
This session aims to familiarize you to solve any problem encountered during the development using GDB and Tracepoints.
Reminders
At this stage, you should be familiar with the steps of configuring, building and running any application within Unikraft and know the main parts of the architecture.
Below you can see a list of the commands you have used so far.
| Command | Description |
|---|
kraft list | Get a list of all components that are available for use with kraft |
kraft up -t <appname> <your_appname> | Download, configure and build existing components into unikernel images |
kraft run | Run resulting unikernel image |
kraft init -t <appname> | Initialize the application |
kraft configure | Configure platform and architecture (interactive) |
kraft configure -p <plat> -m <arch> | Configure platform and architecture (non-interactive) |
kraft build | Build the application |
kraft clean | Clean the application |
make menuconfig | Configure application through the main menu |
Support Files
Session support files are available in the repository.
If you already cloned the repository, update it and enter the session directory:
$ cd path/to/repository/clone

$ git pull --rebase

$ cd content/en/docs/sessions/03-debugging/

$ ls
demo/  images/  index.md  sol/  work/
If you haven’t cloned the repository yet, clone it and enter the session directory:
$ git clone https://github.com/unikraft/summer-of-code-2021

$ cd summer-of-code-2021/content/en/docs/sessions/03-debugging/

$ ls
demo/  images/  index.md  sol/  work/
Debugging
Contrary to popular belief, debugging a unikernel is in fact simpler than debugging a standard operating system.
Since the application and OS are linked into a single binary, debuggers can be used on the running unikernel to debug both application and OS code at the same time.
A couple of hints that should help starting:
- In the configuration menu (presented with
make menuconfig), under Build Options make sure that Drop unused functions and data is unselected.
This prevents Unikraft from removing unused symbols from the final image and, if enabled, might hide missing dependencies during development. - Use
make V=1 to see verbose output for all of the commands being executed during the build.
If the compilation for a particular file is breaking and you would like to understand why (e.g., perhaps the include paths are wrong), you can debug things by adding the -E flag to the command, removing the -o [objname], and redirecting the output to a file which you can then inspect. - Check out the targets under
Miscellaneous when typing make help, these may come in handy.
For instance, make print-vars enables inspecting at the value of a particular variable in Makefile.uk. - Use the individual
make clean-[libname] targets to ensure that you’re cleaning only the part of Unikraft you’re working on and not all the libraries that it may depend on.
This will speed up the build and thus the development process. - Use the Linux user space platform target (
linuxu) for quicker and easier development and debugging.
Using GDB
The build system always creates two image files for each selected platform:
- one that includes debugging information and symbols (
.dbg file extension) - one that does not
Before using GDB, go to the configuration menu under Build Options and select a Debug information level that is bigger than 0.
We recommend 3, the highest level.

Once set, save the configuration and build your images.
Linuxu
For the Linux user space target (linuxu) simply point GDB to the resulting debug image, for example:
$ gdb build/app-helloworld_linuxu-x86_64.dbg
KVM
For KVM, you can start the guest with the kernel image that includes debugging information, or the one that does not.
We recommend creating the guest in a paused state (the -S option):
$ qemu-system-x86_64 -s -S -cpu host -enable-kvm -m 128 -nodefaults -no-acpi -display none -serial stdio -device isa-debug-exit -kernel build/app-helloworld_kvm-x86_64.dbg -append verbose
Note that the -s parameter is shorthand for -gdb tcp::1234.
To avoid this long qemu-system-x86 command with a lot of arguments, we can use qemu-guest.
$ qemu-guest -P -g 1234 -k build/app-helloworld_kvm-x86_64.dbg
Now connect GDB by using the debug image with:
$ gdb --eval-command="target remote :1234" build/app-helloworld_kvm-x86_64.dbg
Unless you’re debugging early boot code (until _libkvmplat_start32), you’ll need to set a hardware break point:
Hardware breakpoints have the same effect as the common software breakpoints you are used to, but they are different in the implementation.
As the name suggests, hardware breakpoints are based on direct hardware support.
This may limit the number of breakpoints you can set, but makes them especially useful when debugging kernel code.
hbreak [location]
continue
We’ll now need to set the right CPU architecture:
disconnect
set arch i386:x86-64:intel
And reconnect:
tar remote localhost:1234
You can now run continue and debug as you would normally.
Xen
Running Unikraft in Xen
For Xen you first need to create a VM configuration (save it under helloworld.cfg):
name          = 'helloworld'
vcpus         = '1'
memory        = '4'
kernel        = 'build/app-helloworld_xen-x86_64.dbg'
Start the virtual machine with:
$ xl create -c helloworld.cfg
For Xen the process is slightly more complicated and depends on Xen’s gdbsx tool.
First you’ll need to make sure you have the tool on your system.
Here are sample instructions to do that:
[get Xen sources]
$ ./configure
$ cd tools/debugger/gdbsx/ && make
The gdbsx tool will then be under tools/debugger.
For the actual debugging, you first need to create the guest (we recommend paused state: xl create -p), note its domain ID (xl list) and execute the debugger backend:
$ gdbsx -a [DOMAIN ID] 64 [PORT]
You can then connect GDB within a separate console and you’re ready to debug:
$ gdb --eval-command="target remote :[PORT]" build/helloworld_xen-x86_64.dbg
You should be also able to use the debugging file (build/app-helloworld_xen-x86_64.dbg) for GDB instead passing the kernel image.
Tracepoints
Because Unikraft needs a tracing and performance measurement system, one method to do this is using Unikrat’s tracepoint system.
A tracepoint provides a hook to call a function that you can provide at runtime.
You can put tracepoints at important locations in the code.
They are lightweight hooks that can pass an arbitrary number of parameters, which prototypes are described in a tracepoint declaration placed in a header file.
Dependencies
We provide some tools to read and export trace data that were collected with Unikraft’s tracepoint system.
The tools depend on Python3, as well as the click and tabulate modules.
You can install them by running (Debian/Ubuntu):
sudo apt-get install python3 python3-click python3-tabulate
Enabling Tracing
Tracepoints are provided by lib/ukdebug.
To enable Unikraft to collect trace data, enable the option CONFIG_LIBUKDEBUG_TRACEPOINTS in your configuration (via make menuconfig under Library Configuration -> ukdebug -> Enable tracepoints).

The configuration option CONFIG_LIBUKDEBUG_ALL_TRACEPOINTS activates all existing tracepoints.
Because tracepoints may noticeably affect performance, you can alternatively enable tracepoints only for compilation units that you are interested in.
This can be done with the Makefile.uk of each library.
# Enable tracepoints for a whole library
LIBNAME_CFLAGS-y += -DUK_DEBUG_TRACE
LIBNAME_CXXFLAGS-y += -DUK_DEBUG_TRACE

# Alternatively, enable tracepoints of source files you are interested in
LIBNAME_FILENAME1_FLAGS-y += -DUK_DEBUG_TRACE
LIBNAME_FILENAME2_FLAGS-y += -DUK_DEBUG_TRACE
This can also be done by defining UK_DEBUG_TRACE in the head of your source files.
Please make sure that UK_DEBUG_TRACE is defined before <uk/trace.h> is included:
#ifndef UK_DEBUG_TRACE
#define UK_DEBUG_TRACE
#endif

#include <uk/trace.h>
As soon as tracing is enabled, Unikraft will store samples of each enabled tracepoint into an internal trace buffer.
Currently this is not a circular buffer.
This means that as soon as it is full, Unikraft will stop collecting further samples.
Creating Tracepoints
Instrumenting your code with tracepoints is done by two steps.
First, you define and register a tracepoint handler with the UK_TRACEPOINT() macro.
Second, you place calls to the generated handler at those places in your code where your want to trace an event:
#include <uk/trace.h>

UK_TRACEPOINT(trace_vfs_open, "\"%s\" 0x%x 0%0o", const char*, int, mode_t);

int open(const char *pathname, int flags, ...)
{
      trace_vfs_open(pathname, flags, mode);

      /* lots of cool stuff */

      return 0;
}
UK_TRACEPOINT(trace_name, fmt, type1, type2, ... typeN) generates the handler trace_name() (static function).
It will accept up to 7 parameters of type type1, type2, etc.
The given format string fmt is a printf-style format which will be used to create meaningful messages based on the collected trace parameters.
This format string is only kept in the debug image and is used by the tools to read and parse the trace data.
Unikraft’s trace buffer stores for each sample a timestamp, the name of the tracepoint, and the given parameters.
Reading Trace Data
Unikraft is storing trace data to an internal buffer that resides in the guest’s main memory.
You can use GDB to read and export it.
For this purpose, you will need to load the uk-gdb.py helper script into your GDB session.
It adds additional commands that allow you to list and store the trace data.
We recommend to automatically load the script to GDB.
For this purpose, add the following line to your ~/.gdbinit:
source /path/to/your/build/uk-gdb.py
In order to collect the data, open GDB with the debug image and connect to your Unikraft instance as described in Section Using GDB:
$ gdb build/app-helloworld_linuxu-x86_64.dbg
The .dbg image is required because it contains offline data needed for parsing the trace buffer.
As soon as you let run your guest, samples should be stored in Unikraft’s trace buffer.
You can print them by issuing the GDB command uk trace:
(gdb) uk trace
Alternatively, you can save all trace data to disk with uk trace save <filename>:
(gdb) uk trace save traces.dat
It may make sense to connect with GDB after the guest execution has been finished (and the trace buffer got filled).
For this purpose, make sure that your hypervisor is not destroying the instance after guest shut down (on QEMU add --no-shutdown and --no-reboot parameters).
If you are seeing the error message Error getting the trace buffer. Is tracing enabled?, you probably did not enable tracing or Unikraft’s trace buffer is empty.
This can happen when no tracepoint was ever called.
Any saved trace file can be later processed with the trace.py script. In our example:
$ support/scripts/uk_trace/trace.py list traces.dat
Summary
Practical Work
Support Files
Session support files are available in the repository.
If you already cloned the repository, update it and enter the session directory:
$ cd path/to/repository/clone

$ git pull --rebase

$ cd content/en/docs/sessions/03-debugging/

$ ls
demo/  images/  index.md  sol/  work/
If you haven’t cloned the repository yet, clone it and enter the session directory:
$ git clone https://github.com/unikraft/summer-of-code-2021

$ cd summer-of-code-2021/content/en/docs/sessions/03-debugging/

$ ls
demo/  images/  index.md  sol/  work/
01. Tutorial. Use GDB in Unikraft
For this tutorial, we will just start the app-helloworld application and inspect it with the help of GDB.
First make sure you have the following file structure in your working directory:
workdir
|_______apps
|	|_______helloworld
|_______libs
|_______unikraft
Linuxu
For the image for the linuxu platform we can use GDB directly with the binary already created.
$ gdb build/app-helloworld_linuxu-x86_64.dbg
KVM
To avoid using a command with a lot of parameters that you noticed above in the KVM section, we can use qemu-guest.
$ qemu-guest -P -g 1234 -k build/app-helloworld_kvm-x86_64.dbg
Open another terminal to connect to GDB by using the debug image with:
$ gdb --eval-command="target remote :1234" build/app-helloworld_kvm-x86_64.dbg
First you can set the right CPU architecture and then reconnect:
disconnect
set arch i386:x86-64:intel
tar remote localhost:1234
Then you can put a hardware break point at main function and run continue:
hbreak main
continue
All steps described above can be done using the script kvm_gdb_debug located in the work/01-tutorial-gdb/ folder.
All you need to do is to provide the path to kernel image.
kvm_gdb_debug build/app-helloworld_kvm-x86_64.dbg
02. Mystery: Find the secret using GDB
Before starting the task let’s get familiar with some GDB commands.
ni - go to the next instruction, but skip function calls
si - go to the next instruction, but enters function calls
c - continue execution to the next breakpoint
p expr - display the value of an expression
x addr - get the value at the indicated address (similar to p *addr)
whatis arg - print the data type of arg
GDB provides convenience variables that you can use within GDB to hold on to a value and refer to it later.
For example:
set $foo = *object_ptr
Note that you can also cast variables in GDB similar to C:
set $var = (int *) ptr
If you want to dereference a pointer and actually see the value, you can use the following command:
p *addr
You can find more GDB commands here
Also, if you are unfamiliar with X86_64 calling convention you can read more about it here.
Now, let’s get back to the task.
Download the mystery_kvm-x86_64 file from here.
Copy the mystery_kvm-x86_64 file to the work/02-mystery/ directory.
Navigate to work/02-mystery/ directory.
Use the 2 scripts in the directory (debug.sh and connect.sh) to start the mystery_kvm-x86_64.dbg executable using GDB.
Do you think you can find out the secret?
HINT Use the nm utility on the binary as a starting point.
03. Bug or feature?
There are two kernel images located in the work/03-app-bug/ folder.
One of them is build for Linuxu, the other for KVM.
First try to inspect what it’s wrong with Linuxu image.
You will notice that if you run the program you will get a segmentation fault.
Why does this happen?
After you figure out what it’s happening with Linuxu image have a look also at the KVM one.
It was built from the code source, but when you will try to run it, you will not get a segmentation fault.
Is this a bug or a feature?
04. Tutorial. Use Tracepoints.
We will start from the app-helloworld application and we will put two tracepoints.
One at the beginning of the program (after the main) and one at the end of it and these tracepoints should print argc.
First we need to define UK_DEBUG_TRACE and to include uk/trace.h.
#ifndef UK_DEBUG_TRACE
#define UK_DEBUG_TRACE
#endif

#include <uk/trace.h>
After that we have to define those tracepoints that we want to use.
In our case it should be something similar with:
UK_TRACEPOINT(start_trace, "%d", int);
UK_TRACEPOINT(stop_trace, "%d", int);
Now we can invoke them inside the main.
int main(int argc, char *argv[])
{
    start_trace(argc);
    start_status();

    printf("Hello world!\n");

    stop_trace(argc);
    stop_status();

    return 0;
}
We also added two simple functions for a better view of tracepoints in GDB.
void start_status(){
    printf("Start tracing\n");
}

void stop_status(){
    printf("Stop tracing\n");
}
You can check the source code for this tutorial in work/04-tutorial-tracepoints.
Now we can build the application, but we need to make sure that we have checked the CONFIG_LIBUKDEBUG_TRACEPOINTS option in the configuration.(Library Configuration -> ukdebug -> Enable tracepoints)
Now we will have to start the application in paused state.
qemu-guest -P -g 1234 -k build/app-helloworld-tracepoints_kvm-x86_64.dbg
In another terminal we will start the GDB:
gdb --eval-command="target remote :1234" build/app-helloworld-tracepoints_kvm-x86_64.dbg
Put a hardware break to main and continue until there.
(gdb) hbreak main
(gdb) continue
Now we can put a break to first function start_status to check if the first tracepoint is successful.
To show all the tracepoints we can use uk trace.
GDB configuration
Don’t forget to put this line source /path/to/your/build/uk-gdb.py in your GDB file configuration ~/.gdbinit.
Otherwise you won’t be able to use uk trace.(gdb) break start_status
(gdb) continue
(gdb) uk trace
0000116012362374 start_trace: 2
We notice that we got an output and that the tracepoint was reached.
We continue until the second trace point and we will save all the tracepoints obtained with the command uk trace save traces.dat
(gdb) break stop_status
(gdb) continue
(gdb) uk trace save traces.dat
Saving traces to traces.dat ...
Now we can read all the tracepoints obtained using trace.py from the main repo located in unikraft/support/scripts/uk_trace/trace.py.
The output will be similar to this:
       time  tp_name        msg
-----------  -----------  -----
 5321091993  start_trace      2
11121071844  stop_trace       2
05. Can you trace your own program?
Modify your Echo-back Server application implemented in the first session so that each time the server responds with a message a tracepoint with the corresponding message will be activated.
Save all your tracepoints in a traces.dat file and show them in a user-friendly view with trace.py.
06. Nginx with or without main? That’s the question.
Let’s try a new application based on networking, Nginx.
First clone the repository for app-nginx and put it in the right hierarchy.
Then you need to create Makefile and Makefile.uk.
Make sure to respect the order of libraries in Makefile. For more information check lib-nginx repository.
Do you observe something strange? Where is the main.c?
Deselect this option Library Configuration -> libnginx -> Provide a main function and try to make your own main.c that will run Nginx.
- Nginx + Makefile
- Nginx without
provide main function
07. Bonus. Bad ELF in Town
We managed to build an ELF file that is valid when doing static analysis, but that can’t be executed.
The file is bad_elf, located in the work/07-bad-elf/ folder.
Running it triggers a segmentation fault message.
Running it using strace show an error with execve().
~/Doc/U/summer-of-code-2021/c/e/d/s/0/w/05-bad-elf > ./bad_elf
[1]    125458 segmentation fault  ./bad_elf
~/Doc/U/summer-of-code-2021/c/e/d/s/0/w/05-bad-elf > strace ./bad_elf
execve("./bad_elf", ["./bad_elf"], 0x7ffc9ca2e960 /* 66 vars */) = -1 EINVAL (Invalid argument)
+++ killed by SIGSEGV +++
[1]    125468 segmentation fault (core dumped)  strace ./bad_elf
The ELF file itself is valid.
You can check using readelf:
$ readelf -a ./bad_elf
The issue is to be detected in the kernel.
Use either perf, or, better yet ftrace to inspect the kernel function calls done by the program.
Identify the function call that sends out the SIGSEGV signal.
Identify the cause of the issue.
Find that cause in the manual page elf(5).
08. Give Us Feedback
We want to know how to make the next sessions better.
For this we need your feedback.
Thank you!
Further Reading
6 - Session 04: Complex Applications
Reminders
Print system
This print system in implemented in lib/ukdebug and can be activated using make menuconfig (Library Configuration -> ukdebug: Debugging and Tracing).
We have two types of messages:
- Kernel messages
- Information(
uk_pr_info) - Warnings(
uk_pr_warn) - Errors(
uk_pr_err) - Critical Messages(
uk_pr_crit)
- Debug messages(
uk_pr_debug)
Assertions
We can use assertions to check if the system is in a defined and stable state.
Can be compiled-in or compiled-out and it can be activated from Library Configuration -> ukdebug: Debugging and Tracing -> Enable assertions.
The macros used can be:
UK_ASSERT (condition)UK_BUGON (negative condition)UK_CTASSERT (condition)(used for compile-time assertions)
GDB
To use GDB we need the symbols from the gdb file generated at build time.
For this we need to set Debug information level to Level 3 from make menuconfig (Build Options -> Debug information level -> Level 3).
Linux
For the Linux user space target (linuxu) simply point GDB to the resulting debug image:
$ gdb path_to_unikraft_gdb_image
KVM
For KVM we need to go through few steps:
Run guest in paused state
Using qemu:
$ qemu-guest -P -g 1234 -k path_to_unikraft_gdb_image
Using kraft:
$ kraft run -d -g 1234 -P
Attach debugger
$ gdb --eval-command="target remote :1234" path_to_unikraft_gdb_image
Disconnect GDB
disconnect
Set GDB’s machine architecture to x86_64
$ set arch i386:x86-64:intel
Re-connect
tar remote localhost:1234
Tracepoints
Tracepoints are provided by lib/ukdebug.
To enable Unikraft to collect trace data, enable the option CONFIG_LIBUKDEBUG_TRACEPOINTS in your configuration (via make menuconfig under Library Configuration -> ukdebug -> Enable tracepoints).
Instrumenting
Instrumenting your code with tracepoints is done by two steps:
- Define and register a tracepoint handler with the
UK_TRACEPOINT() macro. - Place calls to the generated handler at those places in your code where your want to trace an event.
Reading traces
Unikraft is storing trace data to an internal buffer that resides in the guest’s main memory.
To access that data you need to configure the GDB and add source /path/to/your/build/uk-gdb.py to ~/.gdbinit
Commands available in GDB:
| Commands | Deion |
|---|
| uk trace | show tracepoints in GDB |
uk trace save <file> | save tracepoints to file |
Any saved trace file can be later processed with the trace.py .
$ support/s/uk_trace/trace.py list <file>
Work Items
In this session, we are going to run some real-world applications on top of Unikraft.
Support Files
Session support files are available in the repository.
If you already cloned the repository, update it and enter the session directory:
$ cd path/to/repository/clone

$ git pull --rebase

$ cd content/en/docs/sessions/04-complex-applications/

$ ls -F
images/  index.md  sol/  work/
If you haven’t cloned the repository yet, clone it and enter the session directory:
$ git clone https://github.com/unikraft/summer-of-code-2021

$ cd summer-of-code-2021/content/en/docs/sessions/04-complex-applications/

$ ls -F
images/  index.md  sol/  work/
00. Qemu Wrapper
As we saw during the other sessions, qemu-guest is a wrapper script over the qemu-system-x86_64 executable, to make the use of binary less painful.
In the following session, it will be very handy to use it.
To see the options for this wrapper you can use qemu-guest -h.
It is possible to run a lot of complex applications on Unikraft.
In this session we analyze 3 of them:
01. SQLite (Tutorial)
The goal of this tutorial is to get you to set up and run SQLite on top of Unikraft.
Find the support files in the work/01-set-up-and-run-sqlite/ folder of the session directory.
SQLite is a C library that implements an encapsulated SQL database engine that does not require any setting or administration.
It is one of the most popular in the world and is different from other SQL database engines because it is simple to administer, use, maintain, and test.
Thanks to these features, SQLite is a fast, secure, and most crucial simple application.
The SQLite application is formed by a ported external library that depends on two other libraries that are also ported for Unikraft: pthread-embedded and newlib.
To successfully compile and run the SQLite application for the KVM platform and x86-64 architecture, we follow the steps below.
Setup
First, we make sure we have the directory structure to store the local clones of Unikraft, library and application repositories.
The structure should be:
workdir
|-- unikraft/
|-- libs/
`-- apps/
We clone the lib-sqlite repository in the libs/ folder.
The libraries on which lib-sqlite depends (pthread-embedded and newlib) are also to be cloned in the libs/ folder.
We clone the app-sqlite repository in the apps/ folder.
In this directory, we need to create two files:
Makefile: containing rules for building the application as well as specifying the libraries that the application needsMakefile.uk: used to define variables needed to compile the application or to add application-specific flags
Also, in the Makefile, the order in which the libraries are mentioned in the LIBS variable is important to avoid the occurrence of compilation errors.
UK_ROOT ?= $(PWD)/../../unikraft
UK_LIBS ?= $(PWD)/../../libs
LIBS := $(UK_LIBS)/lib-pthread-embedded:$(UK_LIBS)/lib-newlib:$(UK_LIBS)/lib-sqlite

all:
	@$(MAKE) -C $(UK_ROOT) A=$(PWD) L=$(LIBS)

$(MAKECMDGOALS):
	@$(MAKE) -C $(UK_ROOT) A=$(PWD) L=$(LIBS) $(MAKECMDGOALS)
We configure the application by running:
$ make menuconfig
We select the SQLite library from the configuration menu, Library Configuration section.
For starters, we select the option to generate the main source file used to run the application.
To import or export databases or CSV/SQL files, the SQLite application needs to configure a filesystem.
The filesystem we use is 9pfs.
Hence, in the Library Configuration section, we select the 9pfs filesystem within the vfscore library options.
Make sure, that both options Virtio PCI device support and Virtio 9P device are selected.
Those can be found in: Platform Configuration -> KVM guest -> Virtio.
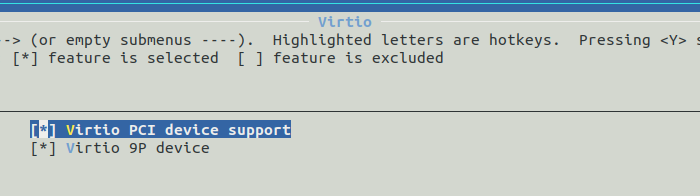
Build
We build the application by running:
$ make
Test
For testing we can use the following SQLite script, which inserts ten values into a table:
CREATE TABLE tab (d1 int, d2 text);
INSERT INTO tab VALUES (random(), cast(random() as text)),
(random(), cast(random() as text)),
(random(), cast(random() as text)),
(random(), cast(random() as text)),
(random(), cast(random() as text)),
(random(), cast(random() as text)),
(random(), cast(random() as text)),
(random(), cast(random() as text)),
(random(), cast(random() as text)),
(random(), cast(random() as text));
Up next, create a folder in the application folder called sqlite_files and write the above script into a file.
When you run the application, you can specify the path of the newly created folder to the qemu-guest as following:
$ ./qemu-guest -k ./build/app-sqlite_kvm-x86_64 \
               -e ./sqlite_files \
               -m 500
The SQLite start command has several parameters:
k indicates the executable resulting from the build of the entire system together with the SQLite applicatione indicates the path to the shared directory where the Unikraft filesystem will be mountedm indicates the memory allocated to the application
To load the SQLite script, we use the following command .read <sqlite_script_name.sql>.
And in the end, we run select * from tab to see the contents of the table.
If everything runs as expected, then we’ll see the following output:
SeaBIOS (version 1.10.2-1ubuntu1)
Booting from ROM...
Powered by
o.   .o       _ _               __ _
Oo   Oo  ___ (_) | __ __  __ _ ' _) :_
oO   oO ' _ `| | |/ /  _)' _` | |_|  _)
oOo oOO| | | | |   (| | | (_) |  _) :_
 OoOoO ._, ._:_:_,\_._,  .__,_:_, \___)
                   Tethys 0.5.0~825b115
SQLite version 3.30.1 2019-10-10 20:19:45
Enter ".help" for usage hints.
sqlite> .read script.sql
sqlite> select * from tab;
-4482895989777805454|-110319092326802521
1731384004930241734|4521105937488475129
394829130239418471|-5931220326625632549
4715172377251814631|3421393665393635031
2633802986882468389|174376437407985264
-1691186051150364618|3056262814461654943
-4054754806183404125|-2391909815601847844
-4437812378917371546|-6267837926735068846
8830824471222267926|7672933566995619644
4185269687730257244|-3477150175417807640
sqlite>
02. SQLite New Filesystem (Tutorial)
In the previous work item, we have chosen to use 9PFS as the filesystem.
For this work item, we want to change the filesystem to RamFS and load the SQLlite script as we have done in the previous work item.
Find the support files in the work/02-change-filesystem-sqlite/ folder of the session directory.
First, we need to change the filesystem to InitRD.
We can obtain that by using the command make menuconfig and from the vfscore: Configuration option, we select the default root filesystem as InitRD.
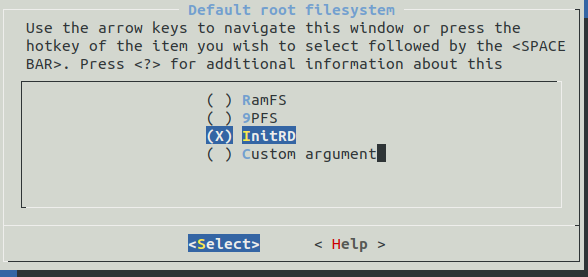
The InitRD filesystem can load only cpio archives, so to load our SQLite script into RamFS filesystem, we need to create a cpio out of it.
This can be achieved the following way: Create a folder, move the SQLite script in it, and cd in it.
After that we run the following command:
$ find -type f | bsdcpio -o --format newc > ../archive.cpio
We’ll obtain an cpio archive called archive.cpio in the parent directory.
Next we run the following qemu command to run the instance:
$ ./qemu-guest -k build/app-sqlite_kvm-x86_64 -m 100 -i archive.cpio
If everything runs as expected, then we’ll see the following output:
SeaBIOS (version 1.10.2-1ubuntu1)
Booting from ROM...
Powered by
o.   .o       _ _               __ _
Oo   Oo  ___ (_) | __ __  __ _ ' _) :_
oO   oO ' _ `| | |/ /  _)' _` | |_|  _)
oOo oOO| | | | |   (| | | (_) |  _) :_
 OoOoO ._, ._:_:_,\_._,  .__,_:_, \___)
                   Tethys 0.5.0~825b115
SQLite version 3.30.1 2019-10-10 20:19:45
Enter ".help" for usage hints.
sqlite> .read script.sql
sqlite> select * from tab;
-4482895989777805454|-110319092326802521
1731384004930241734|4521105937488475129
394829130239418471|-5931220326625632549
4715172377251814631|3421393665393635031
2633802986882468389|174376437407985264
-1691186051150364618|3056262814461654943
-4054754806183404125|-2391909815601847844
-4437812378917371546|-6267837926735068846
8830824471222267926|7672933566995619644
4185269687730257244|-3477150175417807640
sqlite>
03. Redis (Tutorial)
The goal of this tutorial is to get you to set up and run Redis on top of Unikraft.
Find the support files in the work/03-set-up-and-run-redis/ folder of the session directory.
Redis is one of the most popular key-value databases, with a design that facilitates the fast writing and reading of data from memory as well as the storage of data on disk to be able to reconstruct the state of data in memory in case of a system restart.
Unlike other data storage systems, Redis supports different types of data structures such as lists, maps, strings, sets, bitmaps, streams.
The Redis application is formed by a ported external library that depends on other ported libraries for Unikraft (pthread-embedded, newlib, lwip-network library).
To successfully compile and run the Redis application for the KVM platform and x86-64 architecture, we follow the steps below.
Setup
As above, we make sure we have the directory structure to store the local clones of Unikraft, library and application repositories.
The structure should be:
workdir
|-- unikraft/
|-- libs/
`-- apps/
We clone the lib-redis repository in the libs/ folder.
We alsoe clonethe library repositories which lib-redis depends on ([pthread-embedded](pthread-embedded, newlib and lwip) in the libs/ folder.
We clone the app-redis repository in the apps/ folder.
In this directory, we need to create two files:
Makefile: it contains rules for building the application as well as specifying the libraries that the application needsMakefile.uk: used to define variables needed to compile the application or to add application-specific flags
Also, in the Makefile, the order in which the libraries are mentioned in the LIBS variable is important to avoid the occurrence of compilation errors.
UK_ROOT ?= $(PWD)/../../unikraft
UK_LIBS ?= $(PWD)/../../libs
LIBS := $(UK_LIBS)/lib-pthread-embedded:$(UK_LIBS)/lib-newlib:$(UK_LIBS)/lib-lwip:$(UK_LIBS)/lib-redis

all:
	@$(MAKE) -C $(UK_ROOT) A=$(PWD) L=$(LIBS)

$(MAKECMDGOALS):
	@$(MAKE) -C $(UK_ROOT) A=$(PWD) L=$(LIBS) $(MAKECMDGOALS)
We configure the application by running:
$ make menuconfig
We select the Redis library from the configuration menu, Library Configuration section.
For starters, we select the option to generate the main source file used to run the application.
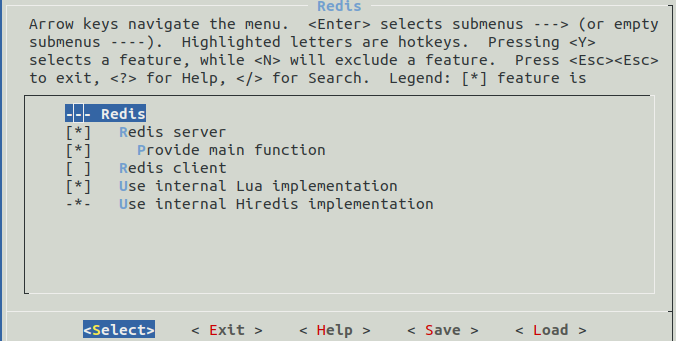
Build
We build the application by running:
$ make
Test
To connect to the Redis server, the network features should be configured.
Hence, in the configuration menu in the Library Configuration section, within the lwip library the following options should be selected:
IPv4UDP supportTCP supportICMP supportDHCP supportSocket API

The Redis application needs a configuration file to start.
Thus, a filesystem should be selected in Unikraft.
The filesystem we used was 9PFS.
So, in the Library Configuration section of the configuration menu, the following selection chain should be made in the vfscore library: VFSCore Interface -> vfscore Configuration -> Automatically mount a root filesystem -> Default root filesystem -> 9PFS.
Therefore, following the steps above, the build of the entire system, together with the Redis application will be successful.
We used a script to run the application in which a bridge and a network interface (kraft0) are created.
The network interface has an IP associated with it used by clients to connect to the Redis server.
Also, the script takes care of starting the Redis server, but also of stopping it, deleting the settings created for the network.
brctl addbr kraft0
ifconfig kraft0 172.44.0.1
ifconfig kraft0 up

dnsmasq -d \
        --log-queries \
        --bind-dynamic \
        --interface=kraft0 \
        --listen-addr=172.44.0.1 \
        --dhcp-range=172.44.0.2,172.44.0.254,255.255.255.0,12h &> $WORKDIR/dnsmasq.log &

./qemu-guest.sh -k ./build/redis_kvm-x86_64 \
                -a "/redis.conf" \
                -b kraft0 \
                -e ./redis_files
                -m 100
The Redis server start command has several parameters:
k indicates the executable resulting from the build of the entire system together with the Redis applicatione indicates the path to the shared directory where the Unikraft filesystem will be mountedb indicates the network interface used for external communicationm indicates the memory allocated to the applicationa allows the addition of parameters specific to running the application
The following image is presenting an overview of our setup:
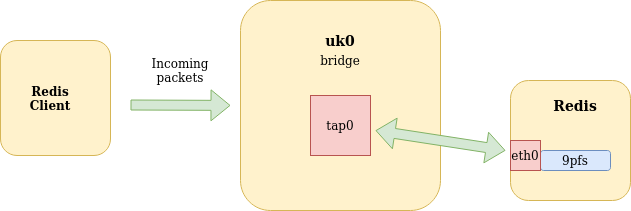
Consequently, after running the script the Redis server will start and dnsmasq will dynamically assign an IP address.
The IP can be seen in the output of qemu as bellow:

Using the received IP, it will be possible to connect clients to it using redis-cli (the binary redis-cli is the folder for this work item):
$ ./redis-cli -h 172.88.0.76 -p 6379
172.88.0.2:6379> PING
PONG
172.88.0.2:6379>
04. Redis Static IP Address
In tutorial above we have dynamically assigned an IP to the network interface used by Unikraft using the dnsmasq utility.
Find the support files in the work/04-obtain-the-ip-statically/ folder of the session directory.
Modify the launching script and run the application with a static IP.
Beware that the assigned IP address must differ from the one assigned on the bridge.
You can use redis-cli, found in the suport folder to test your changes.
If everything runs as expected you should see the following output:
$ ./redis-cli -h 172.88.0.76 -p 6379
172.88.0.2:6379> PING
PONG
172.88.0.2:6379>
05. Redis Benchmarking (Tutorial)
We aim to do benchmarking for the Redis app running on top of Unikraft and for the Redis running on top of Linux.
Find the support files in the work/05-benchmark-redis/ folder of the session directory.
There are three binaries: redis-cli, redis-benchmark, and redis.
First, we will start by benchmarking redis app, running on Unikraft.
Start the Redis on the top of Unikraft as we have already done at above and in another terminal run the following command:
$ ./redis-benchmark --csv -q -r 100 -n 10000 -c 1 -h 172.44.0.76 -p 6379 -P 8 -t set,get
The description of the used option can be seen here:
Usage: redis-benchmark [-h <host>] [-p <port>] [-c <clients>] [-n <requests>] [-k <boolean>]

 -h <hostname>      Server hostname (default 127.0.0.1)
 -p <port>          Server port (default 6379)
 -c <clients>       Number of parallel connections (default 50)
 -n <requests>      Total number of requests (default 100000)
 -P <numreq>        Pipeline <numreq> requests. Default 1 (no pipeline).
 -q                 Quiet. Just show query/sec values
 --csv              Output in CSV format
 -t <tests>         Only run the comma separated list of tests. The test
                    names are the same as the ones produced as output.
If everything runs as expected, you’ll see the following output:
"SET","147058.81"
"GET","153846.16"
The printed values represent requests/second for the operation set and get.
Further, we will run the executable redis-server (./redis-server), which can be found in the support folder, and the following command (only the IP address of the redis server was changed):
$ ./redis-benchmark --csv -q -r 100 -n 10000 -c 1 -h 127.0.0.1 -p 6379 -P 8 -t set,get
After that you’ll get something like this:
"SET","285714.28"
"GET","294117.62"
06. Nginx
The aim of this work item is to set up and run Nginx.
Find the support files in the work/06-set-up-and-run-nginx/ folder of the session directory.
From the point of view of the library dependencies, the nginx app has the same dependencies as the Redis app.
It’s your choice how you assign the IP to the VM.
In the support folder of this work item there is a subfolder called nginx with the following structure:
nginx_files
`-- nginx/
    |-- conf/
    |   |-- fastcgi.conf
    |   |-- fastcgi_params
    |   |-- koi-utf
    |   |-- koi-win
    |   |-- mime.types
    |   |-- nginx.conf
    |   |-- nginx.conf.default
    |   |-- scgi_params
    |   |-- uwsgi_params
    |   `-- win-utf
    |-- data/
    |   `-- images/
    |       `-- small-img100.png
    |-- html/
    |   |-- 50x.html
    |   `-- index.html
    `-- logs/
        |-- error.log
        `-- nginx.pid
The path to the nginx_files folder should be given as a parameter to the -e option of the qemu-guest.
The html/ folder stores the files of the website you want to be run.
If everything works as expected, you should see the following web page in the browser.

07. Nginx Benchmarking (Tutorial)
Benchmarking Nginx running on the top of Unikraft can be achieved with a utility called iperf.
The package can be easily installed using the command:
sudo apt-get install -y iperf
Next, we will start the nginx app as we have done at the previous work item and then we will open another two terminals.
We’ll start an iperf server in the first terminal with the command:
$ iperf -s
In the second terminal we’ll start an iperf client with the command:
$ iperf -c 172.44.0.76 -p 80
If everything runs as expected, then we will see the following output:
------------------------------------------------------------
Client connecting to 172.44.0.76, TCP port 80
TCP window size: 85.0 KByte (default)
------------------------------------------------------------
[  3] local 172.44.0.1 port 33262 connected with 172.44.0.76 port 80
[ ID] Interval       Transfer     Bandwidth
[  3]  0.0-10.0 sec  1.28 GBytes  1.10 Gbits/sec
08. Give Us Feedback
We want to know how to make the next sessions better. For this we need your feedback. Thank you!
7 - Session 05: Contributing to Unikraft
The focus of this session will be on porting new libraries to Unikraft and preparing them for upstreaming to the main organization’s GitHub.
Being a library operating system, the unikernels created using Unikraft are mainly a collection of internal and external libraries, alongside the ported application.
As a consequence, a large library pool is mandatory in order to make this project compatible with as many applications as possible.
Reminders
From earlier sessions we saw that we can add an external library as a dependency for an application by appending it to the $LIBS variable of the application’s Makefile:
LIBS := $(UK_LIBS)/my_lib
Having done that, we can then select it in the menuconfig interface in order to be included in the build process.
Running an unikernel built for kvm can be done using the qemu command as follows:
$ qemu-system-x86_64 -kernel unikraft_unikernel -nographic
The -nographic argument redirects the output generated by the unikernel to the console.
In Session 02: Behind the Scenes we saw that there are two types of libraries:
- internal, which are generally part of the kernel / core (schedulers, file systems, etc.);
- external: which generally provide user space-level functionalities
The external libraries should be placed in the $UK_LIBS folder, which is by default $UK_WORKDIR/libs, and the applications should be placed in the $UK_APPS folder, which is by default $UK_WORKDIR/apps.
Overview
Support Files
Session support files are available in the repository.
If you already cloned the repository, update it and enter the session directory:
$ cd path/to/repository/clone

$ git pull --rebase

$ cd content/en/docs/sessions/05-contributing-to-unikraft/

$ ls -F
index.md  work/
If you haven’t cloned the repository yet, clone it and enter the session directory:
$ git clone https://github.com/unikraft/summer-of-code-2021

$ cd summer-of-code-2021/content/en/docs/sessions/05-contributing-to-unikraft/

$ ls -F
index.md  work/
Git Structure
The organization’s GitHub contains the main Unikraft repository and separate repositories for external libraries, as well as already ported apps.
In the previous sessions, we saw that the Unikraft repository consists of internal libraries, platform code and architecture code.
It doesn’t have any external dependencies, in contrast to the external libraries or applications, which can have external dependencies.
External libraries can have more specific purposes.
So, we can port a library even just for a single application.
The process of adding new internal libraries is almost the same as for external ones, so further we will focus on porting an external library.
Also, the main repository has open issues to which you can contribute.
In general, this process is done by solving the issue on a fork of the project, and after that making a pull request (PR) with your solution.
Example of External Library
Let’s focus for now on an already ported library: lib-libhogweed.
Let’s examine its core components.
Go to the work/01-tut-porting/libs/libhogweed/ directory and follow the bookmarks marked with USOC_X, where X is the index of the item in the list, from the files specified in the sections below.
Glue Code
In some cases, not all the dependencies of an external library are already present in the Unikraft project, so the solution is to add them manually, as glue code, to the library’s sources.
Another situation when we need glue code is when the ported library comes with test modules, used for testing the library’s functionalities.
The goal, in this case, is to wrap all the test modules into one single function.
In this way, we can check the library integrity if we want so by just a single function call.
Moreover, we can create a test framework which can periodically check all of the ported libraries, useful especially for detecting if a new library will interfere with an already ported one.
Moving back to libhogweed, a practical example of the second case is the run_all_libhogweed_tests(int v) function from libhogweed/testutils_glue.c, line #674, which calls every selected (we will see later how we can make selectable config variables) test module and exits with EXIT_SUCCESS only if it passes over all the tests.
For exposing this API, we should also make a header file with all of the test modules, as well as our wrapper function.
Note: Check libhogweed/include/testutils_glue.h.
Config.uk
The Config.uk file stores all the config variables, which will be visible in make menuconfig.
These variables can be accessed from Makefile.uk or even from C sources, by including "uk/config.h", using the prefix CONFIG_.
Moving to the source code, libhogweed/Config.uk, we have:
The main variable of the library which acts as an identifier for it:
config LIBHOGWEED
	bool "libhogweed - Public-key algorithms"
	default n
We can also set another library’s main variable, in this case newlib, which involves including it in the build process:
select LIBNEWLIBC
Creating an auxiliary menu, containing all the test cases:
menuconfig TESTSUITE
     bool "testsuite - tests for libhogweed"
     default n
     if TESTSUITE
         config TEST_X
             bool "test x functionality"
             default y
     endif
Each test case has its own variable in order to allow testing just some tests from the whole suite.
Makefile.uk
The libhogweed/Makefile.uk file is used to:
Register the library to Unikraft’s build system:
$(eval $(call addlib_s,libhogweed,$(CONFIG_LIBHOGWEED)))
As you can see, we are registering the library to Unikraft’s build system only if the main library’s config variable, LIBHOGWEED, is set.
Set the URL from where the library will be automatically downloaded at build time:
LIBHOGWEED_VERSION=3.6
LIBHOGWEED_URL=https://ftp.gnu.org/gnu/nettle/nettle-$(LIBHOGWEED_VERSION).tar.gz
Declare helper variables for the most used paths:
LIBHOGWEED_EXTRACTED = $(LIBHOGWEED_ORIGIN)/nettle-$(LIBHOGWEED_VERSION)
There are some useful default variables, for example:
$LIBNAME_ORIGIN: represents the path where the original library is downloaded and extracted during the build process;$LIBNAME_BASE: represents the path of the ported library sources(the path appended to the $LIBS variable).
You can check all reserved variables in the main documentation.
Set the locations where the headers are searched:
// including the path of the glue header added by us
LIBHOGWEED_COMMON_INCLUDES-y += -I$(LIBHOGWEED_BASE)/include
You should include the directories with the default library’s headers as well as the directories with the glue headers created by you, if it’s the case.
Add compile flags, used in general for suppressing some compile warnings and making the build process neater:
LIBHOGWEED_SUPPRESS_FLAGS += -Wno-unused-parameter \
        -Wno-unused-variable -Wno-unused-value -Wno-unused-function \
        -Wno-missing-field-initializers -Wno-implicit-fallthrough \
        -Wno-sign-compare

LIBHOGWEED_CFLAGS-y   += $(LIBHOGWEED_SUPPRESS_FLAGS) \
        -Wno-pointer-to-int-cast -Wno-int-to-pointer-cast
LIBHOGWEED_CXXFLAGS-y += $(LIBHOGWEED_SUPPRESS_FLAGS)
Register the library’s sources:
LIBHOGWEED_SRCS-y += $(LIBHOGWEED_EXTRACTED)/bignum.c
Register the library’s tests:
ifeq ($(CONFIG_RSA_COMPUTE_ROOT_TEST),y)
LIBHOGWEED_SRCS-y += $(LIBHOGWEED_EXTRACTED)/testsuite/rsa-compute-root-test.c
LIBHOGWEED_RSA-COMPUTE-ROOT-TEST_FLAGS-y += -Dtest_main=rsa_compute_root_test
endif
There are situations when the test cases have each a main() function.
In order to wrap all the tests into one single main function, we have to modify their main function name by using preprocessing symbols.
You can read more about compile flags in the main documentation.
Note: A good practice is to include a test only if the config variable corresponding to that test is set.
This step is very customizable, being like a script executed before starting to compile the unikernel.
In most cases, and in this case too, the libraries build their own config file through a provided executable, usually named configure:
$(LIBHOGWEED_EXTRACTED)/config.h: $(LIBHOGWEED_BUILD)/.origin
	$(call verbose_cmd,CONFIG,libhogweed: $(notdir $@), \
        cd $(LIBHOGWEED_EXTRACTED) && ./configure --enable-mini-gmp \
    )
LIBHOGWEED_PREPARED_DEPS = $(LIBHOGWEED_EXTRACTED)/config.h

$(LIBHOGWEED_BUILD)/.prepared: $(LIBHOGWEED_PREPARED_DEPS)

UK_PREPARE += $(LIBHOGWEED_BUILD)/.prepared
We can also do things like generating headers using the original building system, modify sources, etc.
Warm-Up
Let’s check the integrity of this library using its test suite through the exposed wrapper function.
For this task, you have to move, or clone, the library in the $UK_LIBS folder and the work/01-tut-porting/apps/app-libhogweed application in the $UK_APPS folder.
Fill the TODO lines from the application code: add the libhogweed library as a dependency in its Makefile and call from main.c the function exposed by the library for running the test suite.
Disable some tests, rebuild, and run again the checker application.
Note: The libhogweed library depends on newlib.
Note: Remember to select the test suite from menuconfig.
You can also check the library’s README.md for additional information.
Summary
We need a large library pool in order to make the Unikraft project compatible with as many applications as possible.
There are also many ways in which you can contribute to the Unikraft project, and you can find them in the issues section of the main repository.
Practical Work
Moving to a more hands-on experience, let’s port a new library.
Support Files
Session support files are available in the repository.
If you already cloned the repository, update it and enter the session directory:
$ cd path/to/repository/clone

$ git pull --rebase

$ cd content/en/docs/sessions/05-contributing-to-unikraft/

$ ls -F
index.md  work/
If you haven’t cloned the repository yet, clone it and enter the session directory:
$ git clone https://github.com/unikraft/summer-of-code-2021

$ cd summer-of-code-2021/content/en/docs/sessions/05-contributing-to-unikraft/

$ ls -F
index.md  work/
00. Prepare
Let’s suppose that we need kd tree support and that we found a C library, kdtree, that does what we need.
After downloading and inspecting this library, we can see that it also has a set of examples, which can be used by us to test if we ported this library properly.
Move the skeleton of this library, work/02-task-porting/src/libs/kdtree/, in the $UK_LIBS directory and complete the porting process by following the TODO lines.
01. Declare Library Identifier
Let’s start by declaring a new config variable in the Config.uk file.
As stated before, this variable will represent the library’s identifier.
02. Register it to the Build System
For the next steps, the working file will be Makefile.uk from the library’s skeleton.
Let’s use the previously declared variable: register the library to the build system only if the variable is set.
03. Set its URL
Having the library registered, set the URL from where it will be downloaded at build time, and explicitly fetch it.
04 Helper Variables
Make a variable with the path of the default directory obtained by extracting the original library’s archive.
Add the directory which contains the library’s header.
Hint: Inspect $LIBKDTREE_EXTRACTED.
06. Add Sources
Add the library’s C sources.
Hint: Inspect $LIBKDTREE_EXTRACTED.
07. Additional Requirements
Check the original library’s README to see if it needs to be configured first, and add the proper rule if so.
Until now we have registered the library and its sources, and we should be able to compile an unikernel with it if it doesn’t have any more unresolved dependencies.
Move the work/02-task-porting/src/apps/app-kdtree application in the $UK_APPS directory, fill its Makefile, and use it to build an unikernel with our ported library as a dependency!
If needed, provide additional flags in order to suppress the compile warnings generated by this library.
Note: You can leave the application’s main() function empty, the resulted unikernel will just print the Unikraft` banner.
Hint: You can readme, but the solution isn’t here.
09. Add Test Config Variables
Now let’s make a wrapper for the test cases provided as examples.
Uncomment lines #7-#15 from the library’s Config.uk and complete TODO_9 by adding new config variables for each test case.
10. Register Test Sources
Moving back to the library’s Makefile.uk, register the tests sources to the build system.
Note: Inspect the functions from the tests.
Note: Don’t forget to uncomment the lines.
11. Wrapper Glue
Integrate all the test functions into a glue main.
Also, update the library’s include/test_suite_glue.h header accordingly.
Note: You can use test_suite_glue.c from the library’s skeleton.
12. Register Glue Code
Register both the glue test wrapper source and its header in Makefile.uk.
Note: Don’t forget to uncomment the lines.
13. Final Verification
Test the resulted library by calling the test function from the app-kdtree application.
14. Give Us Feedback
We want to know how to make the next sessions better.
For this we need your feedback.
Thank you!
Further Reading
You can get more in-depth information for the contributing process from the main documentation.
8 - Session 06: Testing Unikraft
00. The Concept of Testing
In this session, we are going to explore the idea of validation by testing.
Even though our main focus will be testing, we’ll also tackle other validation methods such as fuzzing and symbolic execution.
Before diving into how we can do testing on Unikraft, let’s first focus on several key concepts that are used when talking about testing.
There are three types of testing: unit testing, integration testing and end-to-end testing.
To better understand the difference between them, we will look over an example of a webshop.
If we’re testing the whole workflow (creating an account, logging in, adding products to a cart, placing an order) we will call this end-to-end testing.
Our shop also has an analytics feature that allows us to see a couple of data points such as: how many times an article was clicked on, how much time did a user look at it and so on.
To make sure the inventory module and the analytics module are working correctly (a counter in the analytics module increases when we click on a product), we will be writing integration tests.
Our shop also has at least an image for every product which should maximize when we’re clicking on it. To test this, we would write a unit test.
Running the test suite after each change is called regression testing. Automatic testing means that the tests are run and verified automatically. Automated regression testing is the best practice in software engineering.
One of the key metrics used in testing is code coverage.
This is used to measure the percentage of code that is executed during a test suite run.
There are three common types of coverage:
- Statement coverage: the percentage of code statements that are run during the testing
- Branch coverage: the percentage of branches executed during the testing (e.g. if or while)
- Path coverage: the percentage of paths executed during the testing
We’ll now go briefly over two other validation techniques: fuzzing and symbolic execution.
Fuzzing
Fuzzing or fuzz testing is an automated software testing technique that involves providing invalid, unexpected, or random data as inputs to a computer program.
The program is then monitored for exceptions such as crashes, failing built-in code assertions, or potential memory leaks.
The most popular OS fuzzers are kAFL and syzkaller, but research in this area is very active.
Symbolic Execution
As per Wikipedia, symbolic execution is a means of analyzing a program to determine what inputs cause each part of a program to execute.
An interpreter follows the program, assuming symbolic values for inputs rather than obtaining actual inputs as normal execution of the program would.
An example of a program being symbolically executed can be seen in the figure below:

The most popular symbolic execution engines are KLEE, S2E and angr.
01. Existing Testing Frameworks
Nowadays, testing is usually done using a framework.
There is no single testing framework that can be used for everything but one has plenty of options to chose from.
Linux Testing
The main framework used by Linux for testing is KUnit.
The building block of KUnit are test cases, functions with the signature void (*)(struct kunit *test). For example:
void example_add_test(struct kunit *test)
{
  /* check if calling add(1,0) is equal to 1 */
  KUNIT_EXPECT_EQ(test, 1, add(1, 0));
}
We can use macros such as KUNIT_EXPECT_EQ to verify results.
A set of test cases is called a test suite.
In the example below, we can see how one can add a test suite.
static struct kunit_case example_add_cases[] = {
        KUNIT_CASE(example_add_test1),
        KUNIT_CASE(example_add_test2),
        KUNIT_CASE(example_add_test3),
        {}
};

static struct kunit_suite example_test_suite = {
        .name = "example",
        .init = example_test_init,
        .exit = example_test_exit,
        .test_cases = example_add_cases,
};
kunit_test_suite(example_test_suite);
The API is pretty intuitive and thoroughly detailed in the official documentation.
KUnit is not the only tool used for testing Linux, there are tens of tools used to test Linux at any time:
- Test suites: Linux Test Project (collection of tools), static code analyzers (Coverity, coccinelle, smatch, sparse), module tests (KUnit), fuzzing tools (Trinity, Syzkaller) and subsystem tests.
- Automatic testing: kisskb, 0Day, kernelci, Kerneltests.
In the figure below, we can see that as more and better tools were developed we saw an increase in reported vulnerabilities.
There was a peak in 2017, after which a steady decrease which may be caused by the amount of tools used to verify patches before being upstreamed.
OSV Testing
Let’s see how another unikernel does the testing.
OSv uses a different approach.
They’re using the Boost test framework alongside tests consisting of standalone simple applications.
For example, to test read they have the following standalone app, whereas for testing thevfs, they use boost.
User Space Testing
Right now, there are a plethora of existing testing frameworks for different programming languages.
For example, Google Test is a testing framework for C++ whereas JUnit for Java.
Let’s take a quick look at how Google Test works:
We have the following C++ code for the factorial in a function.cpp:
int Factorial(int n) {
  int result = 1;
  for (int i = 1; i <= n; i++) {
    result *= i;
  }

  return result;
}
To create a test file, we’ll create a new C++ source that includes gtest/gtest.h
We can now define the tests using the TEST macro. We named this test Negative and added it to the FactorialTest.
TEST(FactorialTest, Negative) {
...
}
Inside the test we can write C++ code as inside a function and use existing macros for adding test checks via macros such as EXPECT_EQ, EXPECT_GT.
#include "gtest/gtest.h"

TEST(FactorialTest, Negative)
{
      EXPECT_EQ(1, Factorial(-5));
      EXPECT_EQ(1, Factorial(-1));
      EXPECT_GT(Factorial(-10), 0);
}
In order to run the test we add a main function similar to the one below to the test file that we have just created:
int main(int argc, char ∗∗argv) {
  ::testing::InitGoogleTest(&argc, argv);
  return RUN_ALL_TESTS();
}
Easy?
This is not always the case, for example this sample shows a more advanced and nested test.
02. Unikraft’s Testing Framework
Unikraft’s testing framework, uktest, has been inspired by KUnit and provides a flexible testing API.
API Overview
To use the API you have to include uk/test.h.
To register a testsuite, we simply call uk_testsuite_register.
uk_testsuite_register(factorial_testsuite, NULL);
We use the macro UK_TESTCASE to both declare a test suite and add a test case to it:
UK_TESTCASE(testsuite_name, testcase1_name)
{
	UK_TEST_EXPECT_SNUM_EQ(some_function(2), 2);
}

UK_TESTCASE(testsuite_name, testcase2_name)
{
	UK_TEST_EXPECT_SNUM_EQ(some_other_function(2), 2);
}
The entire API can be found here.
03. The Design behind Unikraft’s Testing Framework
The key ideas that were followed when writing uktest are:
- Non-sophisticated. It should follow an existing framework (e.g. KUnit) in order to reuse the existing documentation and have a smaller learning curve
- Ability to specify when to run the tests during the boot process
- Written in C
- Should not conflict with other unit test frameworks (e.g. the one used for testing libraries and apps such as Google Test)
- BSD-compatible license
- Have the ability to write tests as a whole file or as in-line tests above a method
How Tests Are Run
Unikraft boot process is centred around the idea of constructors.
Not to be confused with class constructors, Unikraft’s constructors are simply functions registered in a special section inside the image and ran at boot time.
We use the section attribute from GCC to tell the compiler to a specific section inside the binary, in our case .uk_ctortab.
Later at boot, we go through each value stored in the section and run it:
uk_ctortab_foreach(ctorfn, __init_array_start, __init_array_end) {
  if (!*ctorfn)
    continue;

  uk_pr_debug("Call constructor: %p()...\n", *ctorfn);
  (*ctorfn)();
}
There are multiple such loops through the boot code found in ukboot/boot.c.
The testing framework simply registers the test function that needs to be called during the run.
Key Functions and Data Structures
The key structure used is uk_testcase defined as:
struct uk_testcase {
	/* The name of the test case. */
	const char *name;
	/* Pointer to the method  */
	void (*func)(struct uk_testcase *self);
	/* The number of failed assertions in this case. */
	unsigned int failed_asserts;
	/* The number of assertions in this case. */
	unsigned int total_asserts;
};
The macro that we’re using to check conditions is UK_TEST_ASSERT.
It is a wrapper over _uk_test_do_assert:
static inline void
_uk_test_do_assert(struct uk_testcase *esac, bool cond, const char *fmt, ...)
{
	...
	esac->total_asserts++;

	if (!cond) {
		esac->failed_asserts++;
	...
}
Basically, what the function does is to increment the number of failed asserts if the condition is false.
We’ve seen that uk_testsuite_register is used to register tests.
What this call boils down to is:
#define uk_test_at_initcall_prio(suite, class, prio)			\
	static int UK_TESTSUITE_FN(suite)(void)				\
	{								\
		uk_testsuite_add(&suite);				\
		uk_testsuite_run(&suite);				\
		return 0;						\
	}								\
	uk_initcall_class_prio(UK_TESTSUITE_FN(suite), class, prio)
We can see that uk_initcall_class_prio registers the newly defined function as a constructor to be called at a specific time during the boot process.
uk_testsuite_add simply adds the test suite to a linked listed of available test suites.
uk_testsuite_run simply iterates runs all the test cases in the test suite.
int
uk_testsuite_run(struct uk_testsuite *suite)
{
	...
	/* Iterate through all the registered test cases */
	uk_testsuite_for_each_case(suite, testcase) {

    /* Run the test case function
		testcase->func(testcase);

		/* If one case fails, the whole suite fails. */
		if (testcase->failed_asserts > 0)
			suite->failed_cases++;
	}
	...
}
Work Items
In this work session we will go over writing and running tests for Unikraft.
We will use uktest and Google Test.
Make sure you are on the usoc21 branch on the core Unikraft repo and staging on all others.
uktest should be enabled from the Kconfig.
Support Files
Session support files are available on Google Drive.
You can use your own setup or the per cloned repos in work.zip.
Take a peek at the solutions in sol.zip.
01. Tutorial: Testing a Simple Application
We will begin this session with a very simple example.
We can use the app-helloworld as a starting point.
In main.c remove all the existing code.
The next step is to include uk/test.h and define the factorial function:
#include <uk/test.h>

int factorial(int n) {
  int result = 1;
  for (int i = 1; i <= n; i++) {
    result *= i;
  }

  return result;
}
We are now ready to add a test suite with a test case:
UK_TESTCASE(factorial_testsuite, factorial_test_positive)
{
       UK_TEST_EXPECT_SNUM_EQ(factorial(2), 2);
}

uk_testsuite_register(factorial_testsuite, NULL);
When we run this application, we should see the following output.
test: factorial_testsuite->factorial_test_positive
    :	expected `factorial(2)` to be 2 but was 2 ....................................... [ PASSED ]
Throughout this session we will extend this simple app that we have just written.
02. Adding a New Test Suite
For this task, you will have to modify the existing factorial application by adding a new function that computes if a number is prime.
Add a new testsuite for this function.
03. Tutorial: Testing vfscore
We begin by adding a new file for the tests called test_stat.c in a newly created folder tests in the vfscore internal library:
LIBVFSCORE_SRCS-$(CONFIG_LIBVFSCORE_TEST_STAT) += \
    $(LIBVFSCORE_BASE)/tests/test_stat.c
We then add the menuconfig option in the if LIBVFSCORE block:
menuconfig LIBVFSCORE_TEST
    bool "Test vfscore"
    select LIBVFSCORE_TEST_STAT if LIBUKTEST_ALL
    default n

if LIBVFSCORE_TEST

config LIBVFSCORE_TEST_STAT
    bool "test: stat()"
    select LIBRAMFS
    default n

endif
And finally add a new testsuite with a test case.
#include <uk/test.h>

#include <fcntl.h>
#include <errno.h>
#include <unistd.h>
#include <sys/stat.h>
#include <sys/mount.h>

typedef struct vfscore_stat {
    int rc;
    int errcode;
    char *filename;
} vfscore_stat_t;

static vfscore_stat_t test_stats [] = {
    { .rc = 0,    .errcode = 0,        .filename = "/foo/file.txt" },
    { .rc = -1,    .errcode = EINVAL,    .filename = NULL },
};

static int fd;

UK_TESTCASE(vfscore_stat_testsuite, vfscore_test_newfile)
{
    /* First check if mount works all right */
    int ret = mount("", "/", "ramfs", 0, NULL);
    UK_TEST_EXPECT_SNUM_EQ(ret, 0);

    ret = mkdir("/foo", S_IRWXU);
    UK_TEST_EXPECT_SNUM_EQ(ret, 0);

    fd = open("/foo/file.txt", O_WRONLY | O_CREAT, S_IRWXU);
    UK_TEST_EXPECT_SNUM_GT(fd, 2);

    UK_TEST_EXPECT_SNUM_EQ(
        write(fd, "hello\n", sizeof("hello\n")),
        sizeof("hello\n")
    );
    fsync(fd);
}

/* Register the test suite */
uk_testsuite_register(vfscore_stat_testsuite, NULL);
We will be using a simple app without any main function to run the testsuite, the output should be similar with:
test: vfscore_stat_testsuite->vfscore_test_newfile
    :	expected `ret` to be 0 but was 0 ................................................ [ PASSED ]
    :	expected `ret` to be 0 but was 0 ................................................ [ PASSED ]
    :	expected `fd` to be greater than 2 but was 3 .................................... [ PASSED ]
    :	expected `write(fd, "hello\n", sizeof("hello\n"))` to be 7 but was 7 ............ [ PASSED ]
04. Add a Test Suite for nolibc
Add a new test suite for nolibc with four test cases in it.
You can use any POSIX function from nolibc for this task.
Feel free to look over the documentation to write more complex tests.
05. Tutorial: Running Google Test on Unikraft
For this tutorial, we will use Google Test under Unikraft.
Aside from lib-googletest, we’ll also need to have libcxx, libcxxabi, libunwind, compiler-rt and newlib because we’re testing C++ code.
The second step is to enable the Google Test library and its config option Build google test with main.
We can now add a new cpp file, main.cpp.
Make sure that the files end in .cpp and not .c, otherwise you’ll get lots of errors.
In the source file we’ll include gtest/gtest.h
We will now be able to add our factorial function and test it.
int Factorial(int n) {
  int result = 1;
  for (int i = 1; i <= n; i++) {
    result *= i;
  }

  return result;
}

TEST(FactorialTest, Negative) {
  EXPECT_EQ(1, Factorial(-5));
  EXPECT_EQ(1, Factorial(-1));
  EXPECT_GT(Factorial(-10), 0);

}
If we run our unikernel, we should see the following output:
[==========] Running 1 test from 1 test case.
[----------] Global test environment set-up.
[----------] 1 test from FactorialTest
[ RUN      ] FactorialTest.Negative
[       OK ] FactorialTest.Negative (0 ms)
[----------] 1 test from FactorialTest (0 ms total)

[----------] Global test environment tear-down
[==========] 1 test from 1 test case ran. (0 ms total)
[  PASSED  ] 1 test.
We can see that in this case, the tests are being run after the main call, not before!
06. Tutorial (Bonus): Using KLEE for Symbolic Execution
One of the most popular symbolic execution engine is KLEE.
For convenience, we’ll be using Docker.
docker pull klee/klee:2.1
docker run --rm -ti --ulimit='stack=-1:-1' klee/klee:2.1
Let’s look over this regular expression program, can you spot any bugs?
We’ll create a file ex.c with this code:
#include <stdio.h>

static int matchhere(char*,char*);

static int matchstar(int c, char *re, char *text) {
  do {
    if (matchhere(re, text))
      return 1;
  } while (*text != '\0' && (*text++ == c || c== '.'));
  return 0;
}

static int matchhere(char *re, char *text) {
  if (re[0] == '\0')
     return 0;
  if (re[1] == '*')
    return matchstar(re[0], re+2, text);
  if (re[0] == '$' && re[1]=='\0')
    return *text == '\0';
  if (*text!='\0' && (re[0]=='.' || re[0]==*text))
    return matchhere(re+1, text+1);
  return 0;
}

int match(char *re, char *text) {
  if (re[0] == '^')
    return matchhere(re+1, text);
  do {
    if (matchhere(re, text))
      return 1;
  } while (*text++ != '\0');
  return 0;
}

#define SIZE 7

int main(int argc, char **argv) {
  char re[SIZE];

  int count = read(0, re, SIZE - 1);
  //klee_make_symbolic(re, sizeof re, "re");

  int m = match(re, "hello");
  if (m) printf("Match\n", re);

  return 0;
}
Now, let’s run this program symbolically.
To do this, we’ll uncomment the klee_make_symbol line, and comment the line with read and printf.
We’ll compile the program with clang this time:
clang -c -g -emit-llvm ex.c
And run it with KLEE:
We’ll see the following output:
KLEE: output directory is "/home/klee/klee-out-4"
KLEE: Using STP solver backend
KLEE: ERROR: ex1.c:13: memory error: out of bound pointer
KLEE: NOTE: now ignoring this error at this location
KLEE: ERROR: ex1.c:15: memory error: out of bound pointer
KLEE: NOTE: now ignoring this error at this location

KLEE: done: total instructions = 5314314
KLEE: done: completed paths = 7692
KLEE: done: generated tests = 6804
This tells us that KLEE has found two memory errors.
It also gives us some info about the number of paths and instructions executed.
After the run, a folder klee-last has been generated that contains all the test cases.
We want to find the ones that generated memory errors:
klee@affd7769bb39:~/klee-last$ ls | grep err
test000018.ptr.err
test000020.ptr.err
We look at testcase 18:
klee@affd7769bb39:~/klee-last$ ktest-tool test000018.ktest
ktest file : 'test000018.ktest'
args       : ['ex1.bc']
num objects: 1
object 0: name: 're'
object 0: size: 7
object 0: data: b'^\x01*\x01*\x01*'
object 0: hex : 0x5e012a012a012a
object 0: text: ^.*.*.*
This is just a quick example of the power of symbolic execution, but it comes with one great problem: path explosion.
When we have more complicated programs that have unbounded loops, the number of paths grows exponentially and thus symbolic execution is not viable anymore.
Further Reading
9 - Session 07: Syscall Shim
In this session we are going to understand how we can run applications using the binary compatibility layer as well as the inner workings of the system call shim layer.
One of the obstacles when trying to use Unikraft could be the porting effort of your application.
One way we can avoid this is through binary compatibility.
Binary compatibility is the possibility to take already compiled binaries and run them on top of Unikraft without porting effort and at the same time keeping the benefits of unikernels.
In our case, we support binaries compiled for the Linux kernel.
In order to achieve binary compatibility with the Linux kernel, we had to find a way to have support for system calls, for this, the system call shim layer (also called syscall shim) was created.
The system call shim layer provides Linux-style mappings of system call numbers to actual system call handler functions.
Reminders
Configuring, Building and Running Unikraft
At this stage, you should be familiar with the steps of configuring, building and running any application within Unikraft and know the main parts of the architecture.
Below you can see a list of the commands you have used so far.
| Command | Description |
|---|
kraft list | Get a list of all components that are available for use with kraft |
kraft up -t <appname> <your_appname> | Download, configure and build existing components into unikernel images |
kraft run | Run resulting unikernel image |
kraft init -t <appname> | Initialize the application |
kraft configure | Configure platform and architecture (interactive) |
kraft configure -p <plat> -m <arch> | Configure platform and architecture (non-interactive) |
kraft build | Build the application |
kraft clean | Clean the application |
kraft clean -p | Clean the application, fully remove the build/ folder |
make clean | Clean the application |
make properclean | Clean the application, fully remove the build/ folder |
make distclean | Clean the application, also remove .config |
make menuconfig | Configure application through the main menu |
make | Build configured application (in .config) |
qemu-guest -k <kernel_image> | Start the unikernel |
qemu-guest -k <kernel_image> -e <directory> | Start the unikernel with a filesystem mapping of fs0 id from <directory> |
qemu-guest -k <kernel_image> -g <port> -P | Start the unikernel in debug mode, with GDB server on port <port> |
System Calls
A system call is the programmatic way in which a process requests a privileged service from the kernel of the operating system.
A system call is not a function, but specific assembly instructions that do the following:
- setup information to identify the system call and its parameters
- trigger a kernel mode switch
- retrieve the result of a system call
In Linux, system calls are identified by a system call ID (a number) and the parameters for system calls are machine word sized (32 or 64 bit).
There can be a maximum of 6 system call parameters.
Both the system call number and the parameters are stored in certain registers.
For example, on 32bit x86 architecture, the system call identifier is stored in the EAX register, while parameters in registers EBX, ECX, EDX, ESI, EDI, EBP.
Usually an application does not make a system call directly, but call functions in the system libraries (e.g. libc) that implement the actual system call.
Let’s take an example that you can see in the below image:
- Application program makes a system call by invoking a wrapper function in the C library.
- Each system call has a unique call number which is used by kernel to identify which system call is invoked.
The wrapper function again copies the system call number into specific CPU registers.
- The wrapper function takes care of copying the arguments to the correct registers.
- Now the wrapper function executes trap instruction (
int 0x80 or syscall or sysenter).
This instruction causes the processor to switch from user mode to kernel mode. - We reach a trap handler, that will call the correct kernel function based on the id we passed.
- The system call service routine is called.

Now, let’s take a quick look at unikernels.
As stated above, in Linux, we use system calls to talk to the operating system, but there is a slight problem.
The system calling process adds some overhead to our application, because we have to do all the extra operations to switch from user space to kernel space.
In unikernels, because we don’t have a delimitation between kernel space and user space we do not need system calls so everything can be done as simple function calls.
This is both good and bad.
It is good because we do not get the overhead that Linux does when doing a system call.
At the same time it is bad because we need to find a way to support applications that are compiled on Linux, so application that do system calls, even though we don’t need them.
Overview
01. The Process of Loading and Running an Application with Binary Compatibility
For Unikraft to achieve binary compatibility there are two main objectives that need to be met:
- The ability to pass the binary to Unikraft.
- The ability to load the binary into memory and jump to its entry point.
For the first point we decided to use the initial ramdisk in order to pass the binary to the unikernel.
With qemu-guest, in order to pass an initial ramdisk to a virtual machine you have to use the -initrd option.
As an example, if we have a helloworld binary, we can pass it to the unikernel with the following command:
sudo qemu-guest -kernel build/unikernel_image -initrd helloworld_binary
After the unikernel gets the binary the next step is to load it into memory.
The dominant format for executables is the Executable and Linkable File format (ELF), so, in order to run executables we need an ELF loader.
The job of the ELF Loader is to load the executable into the main memory.
It does so by reading the program headers located in the ELF formatted executable and acting accordingly.
For example, you can see the program headers of a program by running readelf -l binary:
$ readelf -l helloworld_binary

Elf file type is DYN (Shared object file)
Entry point 0x8940
There are 8 program headers, starting at offset 64

Program Headers:
  Type           Offset             VirtAddr           PhysAddr
                 FileSiz            MemSiz              Flags  Align
  LOAD           0x0000000000000000 0x0000000000000000 0x0000000000000000
                 0x00000000000c013e 0x00000000000c013e  R E    0x200000
  LOAD           0x00000000000c0e40 0x00000000002c0e40 0x00000000002c0e40
                 0x00000000000053b8 0x0000000000006aa0  RW     0x200000
  DYNAMIC        0x00000000000c3c18 0x00000000002c3c18 0x00000000002c3c18
                 0x00000000000001b0 0x00000000000001b0  RW     0x8
  NOTE           0x0000000000000200 0x0000000000000200 0x0000000000000200
                 0x0000000000000044 0x0000000000000044  R      0x4
  TLS            0x00000000000c0e40 0x00000000002c0e40 0x00000000002c0e40
                 0x0000000000000020 0x0000000000000060  R      0x8
  GNU_EH_FRAME   0x00000000000b3d00 0x00000000000b3d00 0x00000000000b3d00
                 0x0000000000001afc 0x0000000000001afc  R      0x4
  GNU_STACK      0x0000000000000000 0x0000000000000000 0x0000000000000000
                 0x0000000000000000 0x0000000000000000  RW     0x10
  GNU_RELRO      0x00000000000c0e40 0x00000000002c0e40 0x00000000002c0e40
                 0x00000000000031c0 0x00000000000031c0  R      0x1

 Section to Segment mapping:
  Segment Sections...
   00     .note.ABI-tag .note.gnu.build-id .gnu.hash .dynsym .dynstr .rela.dyn .rela.plt .init .plt .plt.got .text __libc_freeres_fn __libc_thread_freeres_fn .fini .rodata .stapsdt.base .eh_frame_hdr .eh_frame .gcc_except_table
   01     .tdata .init_array .fini_array .data.rel.ro .dynamic .got .data __libc_subfreeres __libc_IO_vtables __libc_atexit __libc_thread_subfreeres .bss __libc_freeres_ptrs
   02     .dynamic
   03     .note.ABI-tag .note.gnu.build-id
   04     .tdata .tbss
   05     .eh_frame_hdr
   06
   07     .tdata .init_array .fini_array .data.rel.ro .dynamic .got
As an overview of the whole process, when we want to run an application on Unikraft using binary compatibility, the first step is to pass the application to the unikernel as an initial ram disk.
Once the unikernel gets the application, the loader reads the executable segments and loads them accordingly.
After the program is loaded, the last step is to jump to its entry point and start executing.
The loader that we currently have implemented in Unikraft only supports executables that are static (so all the libraries are part of the executables) and also position-independent.
A position independent binary is a binary that can run correctly independent of the address at which it was loaded.
So we need executables that are built using the -static-pie compiler / linker option, available in GCC since version 8.
02. Unikraft Syscall Shim
As stated previously, the system call shim layer in Unikraft is what we use in order to achieve the same system call behaviour as the Linux kernel.
Let’s take a code snippet that does a system call from a binary:
mov	edx,4		; message length
mov	ecx,msg		; message to write
mov	ebx,1		; file descriptor (stdout)
mov	eax,4		; system call number (sys_write)
syscall		    ; call kernel
In this case, when the syscall instruction gets executed, we have to reach the write function inside our unikernel.
In our case, when the syscall instruction gets called there are a few steps taken until we reach the system call inside Unikraft:
After the syscall instruction gets executed we reach the ukplat_syscall_handler.
This function has an intermediate role, printing some debug messages and passing the correct parameters further down.
The next function that gets called is the uk_syscall6_r function.
void ukplat_syscall_handler(struct __regs *r)
{
	UK_ASSERT(r);

	uk_pr_debug("Binary system call request \"%s\" (%lu) at ip:%p (arg0=0x%lx, arg1=0x%lx, ...)\n",
         uk_syscall_name(r->rsyscall), r->rsyscall,
         (void *) r->rip, r->rarg0, r->rarg1);
	r->rret0 = uk_syscall6_r(r->rsyscall,
              r->rarg0, r->rarg1, r->rarg2,
              r->rarg3, r->rarg4, r->rarg5);
}
The uk_syscall6_r is the function that redirects the flow of the program to the actual system call function inside the kernel.
switch (nr) {
	case SYS_brk:
     return uk_syscall_r_brk(arg1);
	case SYS_arch_prctl:
     return uk_syscall_r_arch_prctl(arg1, arg2, arg3);
	case SYS_exit:
     return uk_syscall_r_exit(arg1);
    ...
All the above functions are generated, so the only thing that we have to do when we want to register a system call to the system call shim layer is to use the correct macros.
There are four definition macros that we can use in order to add a system call to the system call shim layer:
UK_SYSCALL_DEFINE - to implement the libc style system calls. That returns -1 and sets the errno accordingly.UK_SYSCALL_R_DEFINE - to implement the raw variant which returns a negative error value in case of errors. errno is not used at all.
The above two macros will generate the following functions:
/* libc-style system call that returns -1 and sets errno on errors */
long uk_syscall_e_<syscall_name>(long <arg1_name>, long <arg2_name>, ...);

/* Raw system call that returns negative error codes on errors */
long uk_syscall_r_<syscall_name>(long <arg1_name>, long <arg2_name>, ...);

/* libc-style wrapper (the same as uk_syscall_e_<syscall_name> but with actual types) */
<return_type> <syscall_name>(<arg1_type> <arg1_name>,
                              <arg2_type> <arg2_name>, ...);
For the case that the libc-style wrapper does not match the signature and return type of the underlying system call, a so called low-level variant of these two macros are available: UK_LLSYSCALL_DEFINE, UK_LLSYSCALL_R_DEFINE.
These macros only generate the uk_syscall_e_<syscall_name> and uk_syscall_r_<syscall_name> symbols. You can then provide the custom libc-style wrapper on top.
Apart from using the macro to define the function, we also have to register the system call by adding it to UK_PROVIDED_SYSCALLS-y withing the corresponding Makefile.uk file.
Let’s see how this is done with an example for the write system call.
We have the following definition of the write system call:
ssize_t write(int fd, const void * buf, size_t count)
{
    ssize_t ret;

    ret = vfs_do_write(fd, buf, count);
    if (ret < 0) {
        errno = EFAULT;
        return -1;
    }
    return ret;
}
The next step is to define the function using the correct macro:
#include <uk/syscall.h>

UK_SYSCALL_DEFINE(ssize_t, write, int, fd, const void *, buf, size_t, count)
{
    ssize_t ret;

    ret = vfs_do_write(fd, buf, count);
    if (ret < 0) {
        errno = EFAULT;
        return -1;
    }
    return ret;
}
And the raw variant:
    #include <uk/syscall.h>

    UK_SYSCALL_R_DEFINE(ssize_t, write, int, fd, const void *, buf, size_t, count)
    {
        ssize_t ret;

        ret = vfs_do_write(fd, buf, count);
        if (ret < 0) {
            return -EFAULT;
        }
        return ret;
    }
The last step is to add the system call to UK_PROVIDED_SYSCALLS-y in the Makefile.uk file.
The format is:
UK_PROVIDED_SYSCALLS-$(CONFIG_<YOURLIB>) += <syscall_name>-<number_of_arguments>
So, in our case:
UK_PROVIDED_SYSCALLS-$(CONFIG_LIBWRITESYS) += write-3
Summary
The binary compatibility layer is a very important part of the Unikraft unikernel.
It helps us run applications that were not build for Unikraft while, at the same time, keeps the classic benefits of Unikraft: speed, security and small memory footprint.
Practical Work
Support Files
Session support files are available in the repository.
If you already cloned the repository, update it and enter the session directory:
$ cd path/to/repository/clone

$ git pull --rebase

$ cd content/en/docs/sessions/07-syscall-shim/

$ ls -F
demo/  images/  index.md  work/
If you haven’t cloned the repository yet, clone it and enter the session directory:
$ git clone https://github.com/unikraft/summer-of-code-2021

$ cd content/en/docs/sessions/07-syscall-shim/

$ ls -F
demo/  images/  index.md  work/
00. Setup
For the practical work we will need the following prerequisites:
gcc version >= 8 - installation guide here.
the elfloader application - this is the implementation of our loader which is build like a normal Unikraft application.
You can clone the ELF Loader repository, on the usoc21 branch.
This cloned repo should go into the apps folder in your Unikraft directory structure.
the configuration file - you can find the config files in the demo/01 and demo/03 folder of this session.
lwip, zydis, libelf libs - we have to clone all the repos corresponding to the previously mentioned libraries into the libs folder.
All of them have to be on the staging branch.
unikraft - the Unikraft repository must also be cloned and checked out on the usoc21 branch.
Set the repositories in a directory of your choosing.
We’ll call this directory <WORKDIR>.
The final directory structure for this session should look like this:
workdir/
`-- apps/
|   `-- app-elfloader/ [usoc21]
`-- libs/
|   |-- lwip/ [staging]
|   |-- libelf/ [staging]
|   `-- zydis/ [staging]
`-- unikraft/ [usoc21]
01. Compiling the ELF Loader Application
The goal of this task is to make sure that our setup is correct.
The first step is to copy the correct .config file into our application.
$ cp demo/01/config <WORKDIR>/apps/app-elfloader/.config
To check that the config file is the correct one, go to the app-elfloader/ directory and configure it:
Change the directory to <WORKDIR>/apps/app-elfloader/.
Run make menuconfig.
Select library configuration.
It should look like the below picture.
Take a moment and inspect all the sub-menus, especially the syscall-shim one.

If everything is correct, we can run make and the image for our unikernel should be compiled.
In the build folder you should have the elfloader_kvm-x86_64 binary.
To also test if it runs correctly:
.../<WORKDIR>/apps/app-elfloader$ qemu-guest -k build/elfloader_kvm-x86_64

SeaBIOS (version 1.10.2-1ubuntu1)
Booting from ROM...
Powered by
o.   .o       _ _               __ _
Oo   Oo  ___ (_) | __ __  __ _ ' _) :_
oO   oO ' _ `| | |/ /  _)' _` | |_|  _)
oOo oOO| | | | |   (| | | (_) |  _) :_
 OoOoO ._, ._:_:_,\_._,  .__,_:_, \___)
                  Tethys 0.5.0~825b1150
[    0.105192] ERR:  <0x3f20000> [appelfloader] No image found (initrd parameter missing?)
Because we did not pass an initial ramdisk, the loader does not have anything to load, so that’s where the error comes from.
02. Compile a Static-Pie Executable and Run It On Top of Unikraft
The next step is to get an executable with the correct format.
We require a static executable that is also PIE (Position-Independent Executable).
We go to the apps/app-elfloader/example/helloworld directory.
We can see that the directory has a helloworld.c (a simple helloworld program) and a Makefile.
The program will be compiled as a static PIE:
RM = rm -f
CC = gcc
CFLAGS += -O2 -g -fpie # fpie generates position independet code in the object file
LDFLAGS += -static-pie # static-pie makes the final linking generate a static and a pie executable
LDLIBS +=

all: helloworld

%.o: %.c
	$(CC) $(CFLAGS) -c $< -o $@

%: %.o
	$(CC) $(LDFLAGS) $^ $(LDLIBS) -o $@

helloworld: helloworld.o

clean:
	$(RM) *.o *~ core helloworld
We can now run make so we can get the helloworld executable:
.../<WORKDIR>/apps/app-elfloader/example/helloworld$ make
gcc -O2 -g -fpie -c helloworld.c -o helloworld.o
gcc -static-pie helloworld.o  -o helloworld

.../<WORKDIR>/apps/app-elfloader/example/helloworld$ ldd helloworld
	statically linked

.../<WORKDIR>/apps/app-elfloader/example/helloworld$ checksec helloworld
[*] '/home/daniel/Faculty/BachelorThesis/apps/app-elfloader/example/helloworld/helloworld'
    Arch:     amd64-64-little
    RELRO:    Full RELRO
    Stack:    Canary found
    NX:       NX enabled
    PIE:      PIE enabled
We can see above from the ldd and checksec output that the helloworld executable is a static PIE.
Now, the last part is to pass this executable to our unikernel.
We can use the -i option to pass the initial ramdisk to the virtual machine.
.../<WORKDIR>/apps/app-elfloader$ qemu-guest -k build/elfloader_kvm-x86_64 -i example/helloworld/helloworld

SeaBIOS (version 1.10.2-1ubuntu1)
Booting from ROM...
Powered by
o.   .o       _ _               __ _
Oo   Oo  ___ (_) | __ __  __ _ ' _) :_
oO   oO ' _ `| | |/ /  _)' _` | |_|  _)
oOo oOO| | | | |   (| | | (_) |  _) :_
 OoOoO ._, ._:_:_,\_._,  .__,_:_, \___)
                  Tethys 0.5.0~825b1150
Hello world!
We can see that the binary is successfully loaded and executed.
03. Diving Deeper
Now that we saw how we can run an executable on top of Unikraft through binary compatibility, let’s take a look at what happens behind the scenes.
For this we have to compile the unikernel with debug printing.
Copy the config_debug file to our application folder:
$ cp demo/03/config_debug <WORKDIR>/apps/app-elfloader/.config
Now, recompile the unikernel:
.../<WORKDIR>/apps/app-elfloader$ make properclean
[...]
.../<WORKDIR>/apps/app-elfloader$ make
Now, let’s rerun the previously compiled executable on top of Unikraft:
.../<WORKDIR>/apps/app-elfloader$ qemu-guest -k build/elfloader_kvm-x86_64 -i example/helloworld/helloworld

SeaBIOS (version 1.10.2-1ubuntu1)
Booting from ROM...
Powered by
o.   .o       _ _               __ _
Oo   Oo  ___ (_) | __ __  __ _ ' _) :_
oO   oO ' _ `| | |/ /  _)' _` | |_|  _)
oOo oOO| | | | |   (| | | (_) |  _) :_
 OoOoO ._, ._:_:_,\_._,  .__,_:_, \___)
                  Tethys 0.5.0~825b1150
[    0.153848] dbg:  <0x3f20000> [libukboot] Call constructor: 0x10b810()...
[    0.156271] dbg:  <0x3f20000> [appelfloader] Searching for image...
[    0.159115] dbg:  <0x3f20000> [appelfloader] Load image...
[    0.161569] dbg:  <0x3f20000> [appelfloader] build/elfloader_kvm-x86_64: ELF machine type: 62
[    0.164844] dbg:  <0x3f20000> [appelfloader] build/elfloader_kvm-x86_64: ELF OS ABI: 3
[    0.167843] dbg:  <0x3f20000> [appelfloader] build/elfloader_kvm-x86_64: ELF object type: 3
[...]
We now have a more detailed output to see exactly what happens.
The debug output is divided as follows:
- Debug information that comes from when the unikernel is executing.
- Debug information that comes from when the binary is executing.
When the unikernel is executing (so our loader application) there are two phases:
The loading phase: copies the contents of the binary at certain memory zones, as specified by the ELF header.
You can see the loading phase in the debug output:
[appelfloader] Load image...
[...]
[appelfloader] build/elfloader_kvm-x86_64: Program/Library memory region: 0x3801000-0x3ac88e0 <- this is the memory zone where our binary will be mapped
[appelfloader] build/elfloader_kvm-x86_64: Copying 0x171000 - 0x23113e -> 0x3801000 - 0x38c113e <- actual copying of the binary
[appelfloader] build/elfloader_kvm-x86_64: Zeroing 0x38c113e - 0x38c113e <- zeroing out zones of the binary, like the bss
[...]
The execution phase: sets the correct information on the stack (for example environment variables) and jumps to the program entry point.
[appelfloader] Execute image...
[appelfloader] build/elfloader_kvm-x86_64: image:          0x3801000 - 0x3ac88e0
[appelfloader] build/elfloader_kvm-x86_64: start:          0x3801000
[appelfloader] build/elfloader_kvm-x86_64: entry:          0x3809940
[appelfloader] build/elfloader_kvm-x86_64: ehdr_phoff:     0x40
[appelfloader] build/elfloader_kvm-x86_64: ehdr_phnum:     8
[appelfloader] build/elfloader_kvm-x86_64: ehdr_phentsize: 0x38
[appelfloader] build/elfloader_kvm-x86_64: rnd16 at 0x3f1ff20
[appelfloader] Jump to program entry point at 0x3809940...
From this point forward, the binary that we passed in the initial ramdisk starts executing.
Now all the debug messages come from an operation that happened in the binary.
We can also now see the syscall shim layer in action:
[libsyscall_shim] Binary system call request "write" (1) at ip:0x3851c21 (arg0=0x1, arg1=0x3c01640, ...)
Hello world!
In the above case, the binary used a write system call in order to write Hello world! to standard output.
04. Solve the Missing Syscall
For the last part of today’s session we will try to run another binary on top of Unikraft.
You can find the C program in the 04-missing-syscall/ directory.
Try compiling it as static-pie and then run it on top of Unikraft.
[libsyscall_shim] Binary system call request "getcpu" (309) at ip:0x3851926 (arg0=0x3f1fc14, arg1=0x0, ...)
[libsyscall_shim] syscall "getcpu" is not available
[libsyscall_shim] Binary system call request "write" (1) at ip:0x3851cb1 (arg0=0x1, arg1=0x3c01640, ...)
Here we are in the binary, calling getcpu
Getcpu returned: -1
Your task is to print a debug message between the Here we are in the binary and Getcpu returned message above and also make the sched_getcpu() return 0.
Hint 1: Syscall Shim Layer
Hint 2: Check the brk.c, Makefile.uk and exportsyms.uk files in the app-elfloader directory.
You do not have to use UK_LLSYSCALL_R_DEFINE, instead, use the two other macros previously described in the session (eg. UK_SYSCALL_DEFINE and UK_SYSCALL_R_DEFINE).
05. Inspect the program flow of an application.
Take the above C program and compile it directly into Unikraft.
Inspect the flow of the program, see how we get from the application code to the library code and then to the unikernel code.
After you see all the functions that get called, modify the program to skip the library code but still keep the same functionality.
Hint 1: You should call a function that is generated with the syscall shim macros.
06. Give Us Feedback
We want to know how to make the next sessions better. For this we need your feedback. Thank you!
Further Reading
Elf Loaders, Libraries and Executables on Linux
10 - Session 08: Basic App Porting
Reminders
Configuring, Building and Running Unikraft
At this stage, you should be familiar with the steps of configuring, building and running any application within Unikraft and know the main parts of the architecture.
Below you can see a list of the commands you have used so far.
| Command | Description |
|---|
kraft list | Get a list of all components that are available for use with kraft |
kraft up -t <appname> <your_appname> | Download, configure and build existing components into unikernel images |
kraft run | Run resulting unikernel image |
kraft init -t <appname> | Initialize the application |
kraft configure | Configure platform and architecture (interactive) |
kraft configure -p <plat> -m <arch> | Configure platform and architecture (non-interactive) |
kraft build | Build the application |
kraft clean | Clean the application |
kraft clean -p | Clean the application, fully remove the build/ folder |
make clean | Clean the application |
make properclean | Clean the application, fully remove the build/ folder |
make distclean | Clean the application, also remove .config |
make menuconfig | Configure application through the main menu |
make | Build configured application (in .config) |
qemu-guest -k <kernel_image> | Start the unikernel |
qemu-guest -k <kernel_image> -e <directory> | Start the unikernel with a filesystem mapping of fs0 id from <directory> |
qemu-guest -k <kernel_image> -g <port> -P | Start the unikernel in debug mode, with GDB server on port <port> |
Overview
In previous sessions, you have learnt how to retrieve, configure and build applications which are already supported by Unikraft.
The applications which are supported by Unikraft are located on Unikraft’s Github organization and are prefixed with app- (known colloquially as app repos or app-* as app star repos).
Alternatively, when you have used the Unikraft companion command-line client kraft, you can view these supported applications by running:
$ kraft list add https://github.com/unikraft/app-*
$ kraft list update
$ kraft list --apps
In this session, we dive into the ways in which you can bring an application which does not already exist within the Unikraft ecosystem.
You wish to make a traditional Linux user space application (which you have access to its source code) to run using Unikraft and to be listed in the command above, and, of course, be run as a single, specialized unikernel.
This tutorial shows you exactly how to do this.
The Unikraft Build Lifecycle
The lifecycle of the construction of a Unikraft unikernel includes several distinct steps:
 Overview of the Unikraft build process.
- Configuring the Unikraft unikernel application with compile-time options;
- Fetching the remote “origin” code of libraries;
- Preparing the remote “origin” code of libraries;
- Compiling the libraries and the core Unikraft code; and,
- Finally, linking a final unikernel executable binary together.
The above steps are displayed in the diagram.
The Unikraft unikernel targets a specific platform and hardware architecture, which are set during the configuration step of the lifecycle.
The steps in the lifecycle above are discussed in this tutorial in greater depth.
Particularly, we cover fetching, prepareing and compiling (building) “external” code which is to be used as a Unikraft unikernel application (or library for that matter).
Identifying a Candidate Application
The scope of this tutorial only covers how to bring an application to Unikraft “from first principles”;
that is, before you use Unikraft, you can access the source files of the application and compile the application natively for Linux user space.
You wish to compile this application against the Unikraft core and any auxiliary necessary third-party libraries in order to make it a unikernel.
Classic examples of these types of applications are open-source ones, such as NGINX, Redis, etc.
Of course, you can work with code which is not open-source, but again, you must be able to access the source files and the build system before you can begin.
For the sake of simplicity, this tutorial will only be targeting applications which are C/C++-based.
Unikraft supports other compile-time languages, such as Golang, Rust and WASM.
However, the scope of this tutorial only follows an example with a C/++-based program.
Many of the principles in this tutorial, however, can be applied in the same way for said languages, with a bit of context-specific work.
Namely, this may include additional build rules for target files, using specific compilers and linkers, etc.
It is worth noting that we are only targeting compile-time applications in this tutorial.
Applications written a runtime language, such as Python or Lua, require an interpreter which must be brought to Unikraft first.
There are already lots of these high-level languages supported by Unikraft.
If you wish to run an application written in such a language, please check out the list of available applications.
However, if the language you wish to run is interpreted and not yet available on Unikraft, porting the interpreter would be in the scope of this tutorial, as the steps here would cover the ones needed to bring the interpreter, which is a program after all, as a Unikraft unikernel application.
Note: In the case of higher-level languages which are interpreted, you do not need to follow this tutorial.
Instead, simply mount the application code with the relevant Unikernel binary.
For example, mounting a directory with python code to the python Unikraft unikernel.
Please review Session 04: Complex Applications for more information on this topic.
Starting with a Linux User Space Build
For the remainder of this tutorial, we will be targeting the network utility program iperf3 as our application example we wish to bring to Unikraft.
iperf3 is a benchmarking tool, and is used to determine the bandwidth between a client and server.
It makes for an excellent application to be run as a Unikernel because:
- It can run as a “server-type” application, receiving and processing requests for clients;
- It is a standalone tool which does one thing;
- It’s GNU Make and C-based; and,
- It’s quite useful :)
Bringing an application to Unikraft will involve understanding some of the way in which the application works, especially how it is built.
Usually during the porting process we also end up diving through the source code, and in the worst-case scenario, have to make a change to it.
More on this is covered later in this tutorial.
We start by simply trying to follow the steps to compile the application from source.
Compiling the Application from Source
The README for the iperf3 program has relatively simple build instructions, and uses GNU Make which is a first good sign.
Unikraft uses GNU Make to handle its internal builds and so when we see an application using Make, it makes porting a little easier.
For non-Make type build systems, such as CMake, Bazel, etc., it is still possible to bring this application to Unikraft, but the flags, files, and compile-time options, etc. will have to be considered with more care as they do not necessarily align in the same ways.
It is still possible to bring an application using an alternative build system, but you must closely follow how the program is built in order to bring it to Unikraft.
Let’s walk through the build process of iperf3 from its README:
First we obtain the source code of the application:
$ git clone https://github.com/esnet/iperf.git
Then, we are asked to configure and build the application:
$ cd ./iperf
$ ./configure;
$ make
If this has worked for you, your terminal will be greeted with several pieces of useful information:
The first thing we did was run ./configure: an auto-generated utility program part of the automake build system.
Essentially, it checks the compatibility of your system and the program in question.
If everything went well, it will tell us information about what it checked and what was available.
Usually this “./configure"-type program will raise any issues when it finds something missing.
One of the things it is checking is whether you have relevant shared libraries (e.g. .so files) installed on your system which are necessary for the application to run.
The application will be dynamically linked to these shared libraries and they will be referenced at runtime in a traditional Linux user space manner.
If something is missing, usually you must use your Linux-distro’s package manager to install this dependency, such as via apt-get.
The ./configure program also comes with a useful --help page where we can learn about which features we would like to turn on and off before the build.
It’s useful to study this page and see what is available, as these can later become build options (see exercise 2) for the application when it is brought to the Unikraft ecosystem. The only thing to notice for the case of iperf3 is that it uses OpenSSL.
Unikraft already has a port of OpenSSL, which means we do not have to port this before starting.
If, however, there are library dependencies for the target application which do not exist within the Unikraft ecosystem, then these library dependencies will need to be ported first before continuing.
The remainder of this tutorial also applies to porting libraries to Unikraft.
When we next run make in the sequence above, we can see the intermediate object files which are compiled during the compilation process before iperf3 is finally linked together to form a final Linux user space binary application.
It can be useful to note these files down, as we will be compiling these files with respect to Unikraft’s build system.
You have now built iperf3 for Linux user space and we have walked through the build process for the application itself.
In the next section, we prepare ourselves to bring this application to Unikraft.
Setting up Your Workspace
Applications which are brought to Unikraft are actually libraries.
Everything in Unikraft is “libracized”, so it is no surprise to find out that even applications are a form of library: they are a single component which interact with other components; have their own options and build files; and, interact in the same ways in which other libraries interact with each other.
The “main” difference between actual libraries and applications, is that we later invoke the application’s main method.
The different ways to do this are covered later in this tutorial.
Creating a Boilerplate Microlibrary for Your Application
To get started, we must create a new library for our application.
The premise here is that we are going to “wrap” or “decorate” the source code of iperf3 with the lingua franca of Unikraft’s build system.
That is, when we eventually build the application, the Unikraft build system will understand where to get the source code files, which ones to compile and how, with respect to the rest of Unikraft’s internals and other dependencies.
Let’s first start by initializing a working environment for ourselves:
Let’s create a workspace with a typical Unikraft structure using kraft:
$ cd ~/workspace
$ export UK_WORKDIR=$(pwd)
$ kraft list update
$ kraft list pull unikraft@staging
This will generate the necessary directory structure to build a new Unikraft application, and will also download the latest staging branch of Unikraft’s core.
When we list the directories, we should get something like this:
.
├── apps
├── archs
├── libs
├── plats
└── unikraft

5 directories, 0 files
Let’s now create a library for iperf3.
We can use kraft to initialize some boilerplate for us too.
To do this, we must first retrieve some information about the program itself.
First, we need to identify the latest version number of iperf3.
GitHub tells us (as of the time of writing this tutorial) that this is 3.10.1.
Unikraft relies on the ability to download the source code of the “origin” code which is about to be compiled.
Usually these are tarballs or zips.
Ideally, we want to have a version number in the URL so we can safely know the version being downloaded.
However, if the source code is on GitHub, which it is in the case of iperf3, then kraft can figure this out for us.
We can now use kraft to initialize a template library for us:
$ cd ~/workspace/libs
$ kraft lib init \
   --no-prompt \
   --author-name "Your Name" \
   --author-email "your@email.com" \
   --version 3.10.1 \
   --origin https://github.com/esnet/iperf \
   iperf3
kraft will have now generated a new Git repository in ~/workspace/libs/iperf3 which contains some of the necessary files used to create an external library.
It has also checked out the repository with a default branch of staging and created a blank (empty) commit as the base of the repository.
This is standard practice for Unikraft repositories.
Note: Our new library is called libiperf3 to Unikraft.
The last argument of kraft lib init will simply prepend lib to whatever string name you give it.
If you are porting a library which is called libsomething, still pass the full name to kraft, it will replace instances of liblibsomething with libsomething during the initialization of the project where appropriate.
The next step is to register this library with kraft such that we can use it and manipulate it with the kraft toolchain. To do this, simply add the path of the newly initialized library like so:
$ kraft list add ~/workspace/libs/iperf3
This will modify your .kraftrc file with a new local library.
When you have added this library directory, run the update command so that kraft can realize it:
You should now be able to start using this boilerplate library with Unikraft and kraft.
To view basic information about the library and to confirm everything has worked, you can run:
Using Your Library in a Unikraft Unikernel Application
Now that we have a library set up in iperf3’s name, located at ~/workspace/libs/iperf3, we should immediately start using it so that we can start the porting effort.
To do this, we create a parallel application which uses both the library we are porting and the Unikraft core source code.
First start by creating a new application structure, which we can do by initializing a blank project:
$ cd ~/workspace/apps
$ kraft init iperf3
We will now have a “empty” initialized project;
you’ll find boilerplate in this directory, including a kraft.yaml file which will look something like this:
$ cd ~/workspace/apps/iperf3
$ cat kraft.yaml
specification: '0.5'
unikraft: staging
targets:
   - architecture: x86_84
     platform: kvm
After setting up your application project, we should add the new library we are working on to the application.
This is done via:
$ kraft lib add iperf3@staging
Note: Remember that the default branch of the library is staging from the kraft lib init command used above.
If you change branch or use an alternative --initial-branch, set it in this step.
This command will update your kraft.yaml file:
diff --git a/kraft.yaml b/kraft.yaml
index 33696bb..c14e480 100644
--- a/kraft.yaml
+++ b/kraft.yaml
@@ -6,3 +6,6 @@ unikraft:
targets:
   - architecture: x86_64
     platform: kvm
+libraries:
+  iperf3:
+    version: staging
We are ready to configure the application to use the library.
It should be possible to now see the boilerplate iperf3 library within the menuconfig system by running:
within the application folder.
However, it will also be selected automatically since it is in the kraft.yaml file now if you run the configure step:
By default, the application targets kvm on x86_64.
Adjust appropriately for your use case either by updating the kraft.yaml file or by setting it the menuconfig.
In the next section, we study the necessary files in the workspace and how we can modify them to bring iperf3 into life with Unikraft.
Providing Build Files
Now we have everything set up.
We can start an iterative process of building the target unikernel with the application.
This process is usually very iterative because it requires building the unikernel step-by-step, including new files to the build, making adjustments, and re-building, etc.
The first thing we must do before we start is to check that fetching the remote code for iperf3 is possible.
Let’s try and do this by running in our application workspace:
$ cd ~/workspace/apps/iperf3
$ kraft fetch
If this is successful, we should see it download the remote zip file and we should see it saved within our Unikraft application’s build/.
The directory with the extracted contents should be located at:
$ ls -lsh build/libiperf3/origin/iperf-3.10.1/
total 988K
 12K -rw-r--r-- 1 root root 9.3K Jun  2 22:29 INSTALL
 12K -rw-r--r-- 1 root root  12K Jun  2 22:29 LICENSE
4.0K -rw-r--r-- 1 root root   23 Jun  2 22:29 Makefile.am
 28K -rw-r--r-- 1 root root  26K Jun  2 22:29 Makefile.in
8.0K -rw-r--r-- 1 root root 6.5K Jun  2 22:29 README.md
 32K -rw-r--r-- 1 root root  31K Jun  2 22:29 RELNOTES.md
368K -rw-r--r-- 1 root root 365K Jun  2 22:29 aclocal.m4
4.0K -rwxr-xr-x 1 root root 2.0K Jun  2 22:29 bootstrap.sh
   0 drwxr-xr-x 2 root root  260 Jun  2 22:29 config
496K -rwxr-xr-x 1 root root 494K Jun  2 22:29 configure
 12K -rw-r--r-- 1 root root  11K Jun  2 22:29 configure.ac
   0 drwxr-xr-x 2 root root  140 Jun  2 22:29 contrib
   0 drwxr-xr-x 3 root root  280 Jun  2 22:29 docs
   0 drwxr-xr-x 2 root root  120 Jun  2 22:29 examples
4.0K -rw-r--r-- 1 root root 3.0K Jun  2 22:29 iperf3.spec.in
4.0K -rwxr-xr-x 1 root root 1.2K Jun  2 22:29 make_release
   0 drwxr-xr-x 2 root root  980 Jun  2 22:29 src
4.0K -rwxr-xr-x 1 root root 1.9K Jun  2 22:29 test_commands.sh
If this has not worked, you must fiddle with the preamble at the top of the library’s Makefile.uk to ensure that correct paths are being set.
Remove the build/ directory and try fetching again.
Now that we can fetch the remote sources, cd into this directory and perform the ./configure step as above.
This will do two things for us.
The first is that it will generate (and this is very common for C-based programs) a config.h file.
This file is a list of macro flags which are used to include or exclude lines of code by the preprocessor.
If the program has one of these, we need it.
iperf3 has an iperf_config.h file, so let’s copy this file into our Unikraft port of the application.
Make an include/ directory in the library’s repository and copy the file:
$ mkdir ~/workspace/libs/iperf3/include
$ cp build/libiperf3/origin/iperf-3.10.1/src/iperf_config.h ~/workspace/libs/iperf3/include
Let’s indicate in the Makefile.uk of the Unikraft library for iperf3 that
this directory exists:
LIBIPERF3_CINCLUDES-y += -I$(LIBIPERF3_BASE)/include
We’ll come back to iperf_config.h: likely it needs edits from us to turn features on or off depending on availability or applicability based on the unikernel-context.
We can also wrap build options here (see exercise 2).
Next, let’s run make with a special flag:
$ cd build/libiperf3/origin/iperf-3.10.1/
$ make -n
This flag, -n, has just shown us what make will run; the full commands for gcc including flags.
What’s interesting here is any line which start with:
$ echo " CC "
These are lines which invoke gcc.
We can gather a few pieces of information here, namely the flags and list of files we need to make iperf3 a reality.
Let’s start by setting global flags for iperf3.
The rule of thumb here is that we copy the flags which are used in all invocations of gcc and place them within the Makefile.uk.
We should ignore flags to do with optimization, PIE, shared libraries and standard libraries as Unikraft has global build options for these.
Flags which are usually interesting are to do with suppressing warnings, e.g. things that start with -W, and are application-specific.
There doesn’t seem to be anything immediately obvious for iperf3.
However, in a later step, we’ll find out that we can set some flags.
If you do have flags which are immediately obvious, you set them like so in the library port’s Makefile.uk, for example:
LIBIPERF3_CFLAGS-y += -Wno-unused-parameter
We have a full list of files for iperf3 from step 3.
We can add them as known source files like so to the Unikraft port of iperf3’s Makefile.uk:
LIBIPERF3_SRCS-y += $(LIBIPERF3_SRC)/main.c
LIBIPERF3_SRCS-y += $(LIBIPERF3_SRC)/cjson.c
LIBIPERF3_SRCS-y += $(LIBIPERF3_SRC)/iperf_api.c
LIBIPERF3_SRCS-y += $(LIBIPERF3_SRC)/iperf_error.c
...
Note: The path in the variable LIBIPERF3_SRC may need to be adjusted from the boilerplate code to match the layout of the application you are porting.
Tip: It’s best to add these files iteratively, i.e. one-by-one, and attempt the compilation process (step 5) in between adding all files.
This will show you errors about what’s missing and you can accurately determine which files are truly necessary for the build.
In addition to this, we can also find intermittent errors which will be the result of incompatibilities between Unikraft and the application in question (covered in the next section on making patches).
Now that we have added all the source files, let’s try and build the application! This step, again, usually occurs iteratively along with the previous step of adding a new file one-by-one.
Because the application has been configured and we have fetched the contents, we can simply try running the build in the Unikraft application directory:
$ cd ~/workspace/apps/iperf3
$ kraft build
(Optional) This step occurs less frequently, but is still useful to discuss in the context of porting an application to Unikraft.
Remember in the Unikraft build lifecycle that there is a step which occurs between fetching the remote origin code and compiling it. This step (3), known as prepare, is used to make modifications to the origin code before it is compiled.
This may be useful for applications which have complex build systems or auxiliary files which need to be created or modified before they are built.
Examples for prepareing include:
- Running scripts which generate new source files from templates;
- Compiling files preemptively before Unikraft starts
building source files; - Checking for additional tools or building additional tools which are required to build the library; and,
- Advanced patching techniques to the source files of the library which make changes to it in a non-standard way.
Preparation is done by adding Make targets to the UK_PREPARE variable:
Checking whether the library has been prepared or adding a target which requires preparation before it can be executed is as simple as checking whether the following target exists:
$(LIBIPERF3_BUILD)/.patched
The prepare step is called naturally because of this target.
However, it can be called separately from kraft via:
The steps outlined above helped us begin the process of porting a simple application to Unikraft.
It covers the major steps involved in the process of porting “from first principles,” including addressing all the steps in the construction lifecycle of Unikraft unikernels.
There are occasional caveats to this process, however.
This is to do with context of the “unikernel model,” that is, single-purpose OSes with a single address space, acting in a single process without context switches or costly syscalls.
Applications developed for Linux user space make a number of assumptions about its runtime, for example:
- That all syscalls are available (which is not the case for Unikraft, although there is significant work being done to bring more syscalls to Unikraft);
- That the filesystem is complete;
- That P in POSIX is not silent: Unfortunately it is and Unix-type systems do not always adhere to standards and make their own assumptions.
For example, oftentimes there are differences between Linux and BSD-type OSes which need to be accounted for; and,
- That all features are necessary.
In the next section we address how we can make changes to the application before it is compiled by the Unikraft build system in order to address the points above.
Invoking the Application’s main Method
Traditionally, and by explicit design, Linux user space code invokes a main method (or symbol) for the start-of-execution of application logic.
Unikraft is similar and invokes a weak-ly attributed symbol for main in its main thread.
This is done so that it can be easily overwritten so as to invoke true application-level functionality.
Without any main method, the unikernel will simply boot and exit.
All applications must implement the following standard prototype for main:
/* Definition 1 */
int main(__((attribute unused))__ int argc, __((attribute unused))__ char *argv[]);
/* Definition 2 */
int main(int argc, char *argv[]);
/* Definition 3 */
int main(void);
- The first definition simply indicates that the parameters may be unused within the function body, i.e. no command-line arguments may be passed as the application makes no use of them.
- The second is probably more familiar, with explicit use of command-line arguments.
- Lastly, the third definition explicitly forgoes the use command-line arguments.
There are two ways to invoke the functionality of the application being ported to Unikraft.
Do Nothing and Let main be Invoked Automatically
If the application has a relatively simple main method with one of the prototypes defined above, we could simply leave it and it will be automatically invoked since it represents the only symbol named main in the final binary.
This requires the file to be recognised and compiled however, which is done by simply adding the file with the main method to the Unikraft port of the library’s Makefile.uk as a new _SRC-y entry.
For iperf3, this is done by compiling in main.c which contains the main method:
LIBIPERF3_SRCS-y += $(LIBIPERF3_SRC)/main.c
Manually Invoking main with Glue Code
To increase extensibility or adapt the application to the context of a unikernel, we can perform a small trick to conditionally invoke the main method of the application as a compile-time option.
This is useful in different cases, for instance:
In some cases where the main method for the application may be relatively complex and includes boilerplate code which is not applicable to the use case of a unikernel, it is possible invoke the relevant application-level functionality by calling another method within the application’s source code (this is true in the case of, for example, the Unikraft port of Python3).
In other cases, we may wish to perform additional initialisation before the invocation of the application’s main method (this is true in the case of, for example, the Unikraft port of Redis).
We wish to use the application as a library in the future for another application, and call APIs which it may expose.
In this case, we do not wish to invoke the main method as it will conflict with the other application’s main method.
In any case, we can rename the default main symbol in the application by using the gcc flag -D during the pre-processing of the file which contains the method. This flag allows us to define macros in-line, and we can simply introduce a macro which renames the main method to something else.
With iperf3, for example, we can rename the main method to iperf3_main by adding a new library-specific _FLAGS-y entry in Makefile.uk:
LIBIPERF3_IPERF3_FLAGS-y += -Dmain=iperf3_main
The resulting object file for main.c will no longer include a symbol named main.
At this point, when the final unikernel binary is linked, it will simply quit. We must now provide another main method.
To conditionally invoke the application’s now renamed main method, it is common to provide a new KConfig in the Unikraft library representing the port of the application’s Config.uk file, asking whether to “provide the main method”.
For example, with iperf3:
if LIBIPERF3
config LIBIPERF3_MAIN_FUNCTION
	bool "Provide main function"
	default n
endif
When this option is enabled, we can either:
Disable the use of the -D flag as indicated above, conditionally in the Makefile.uk:
ifneq($(CONFIG_LIBIPERF3_MAIN_FUNCTION),y)
LIBIPERF3_IPERF3_FLAGS-y += -Dmain=iperf3_main
endif
Or more commonly, introduce a conditional file which provides main and invokes the renamed main (now iperf3_main) method from the library, for example:
LIBIPERF3_SRCS-$(CONFIG_LIBIPERF3_MAIN_FUNCTION) += $(LIBIPERF3_BASE)/main.c|unikraft
Notice how the filename is includes the suffix |unikraft.
This is used to simply rename the resulting object file, which will become main.unikraft.io.
The new main.c file as part of the library simply calls the renamed method:
int main(int argc, char *argv[])
{
   return iperf3_main(argc, argv);
}
Patching the Application
Patching the application occasionally must occur to address incompatibilities with the context of a Linux user space application and that of the unikernel model.
It can also be used to introduce new features to the application, although this is more rare (although, here is an example).
Identifying a Change to the Application
Identifying a change to the application which requires a patch is sometimes quite subtle.
The process usually occurs during steps 5 and 6 of providing build files of the application or library in question.
During this process, we are expected to see compile-time and link-time errors from gcc as we add new files to the build and make fixes.
The iperf3 application port to Unikraft has four patches in order to make it work.
Let’s discuss them and what they mean.
The next section discusses how to create one of these patches.
The first patch comes from an error which is thrown when compiling the iperf_api.c source file.
This file is 3rd to be compiled from the list of complete source files.
In this file, we are receiving a duplicate import of <netinent/tcp.h>, simply removing this import fixes it, so the patch addresses this issue.
The second patch comes as a result of missing functionality from LwIP.
The issue was discovered once the application was fully ported and was able to boot and run.
When the initialization sequence was on-going between the client and server of iperf3, it would crash during this sequence because LwIP does not support setting this option.
A patch was created simply to remove setting this option.
(Note: this may not be the most sensible approach)
The third patch arises from an assumption about the host environment and the difference between Linux user space and a unikernel.
With a traditional host OS, we have a filesystem populated with known paths, for example /tmp.
iperf3 assumed this path exists, however, in the case of where no filesystem is provided to the unikernel during boot, which should be possible in some cases, the iperf3 application would crash since /tmp does not exist beforehand.
The patch solves this by setting the temporary (ramfs) path to /.
An alternative solution is to make this path at boot.
Finally, the fourth patch is once again to do with missing functionality from Unikraft.
In this case, the syscalls mmap and munmap are missing.
In this case, iperf3, used mmap simply to statically allocate a region of memory.
The trick used here is to simply replace instances of mmap with malloc and instances of munmap with free.
Note: At the time writing this tutorial, mmap and munmap are being actively worked on to be made available as syscalls in Unikraft.
The above patches represent example use cases where patches may be necessary to fix the application when bringing it to Unikraft.
The possibilities presented in this tutorial are non-exhaustive, so take care.
The next section discusses in detail how to create a patch for the target
application or library.
Preparing a Patch for the Application
When a change is identified and is to be provided as a patch to the application or library during the compilation, it can be done using the procedure identified in this section.
Note that providing patches are an unfortunate workaround to the inherent differences between Linux user space applications and libraries and unikernels.
Note: When patches are created, they are also version-specific.
As such, if you update the library or application’s code (i.e. by updating, for example, the version number of LIBIPER3_VERSION), patches may no longer be apply-able and will then need to be updated accordingly.
To make a patch:
First, ensure that the remote origin code has been downloaded to the application’s build/ folder:
$ cd ~/workspace/apps/iperf3
$ kraft fetch
Once the source files have been downloaded, turn it into a Git repository and save everything to an initial commit, in the case of iperf3:
$ cd build/libiperf3/origin/iperf-3.10.1
$ git init
$ git add .
$ git commit -m "Initial commit"
This will allow us to make changes to the source files and save those differences.
After making changes, create a Git commit, where you briefly describe the change you made and why.
This can be done through a number of successive steps, for example, as a result of having to make several changes to the application.
After your changes have been saved to the git log, export them as patches.
For example, if you have made one (1) patch only, export it like so:
This will save a new .patch file in the current directory; which should be the origin source files of iperf3.
The next step is to create a patches/ folder within the Unikraft port of the library and to move the new .patch file into this folder:
mkdir ~/workspace/libs/iperf3/patches
mv ~/workspace/apps/iperf3/build/libiperf3/origin/iperf-3.10.1/*.patch ~/workspace/libs/iperf3/patches
To register patches against Unikraft’s build system such that they are applied before the compilation of all source files, simply indicate it in the library’s Makefile.uk:
# Add or edit ~/workspace/libs/iperf3/Makefile.uk
LIBIPERF3_PATCHDIR = $(LIBIPERF3_BASE)/patches
This concludes the necessary steps to port an application to Unikraft “from first principles”.
Work Items
Support Files
Session support files are available in the repository.
If you already cloned the repository, update it and enter the session directory:
$ cd path/to/repository/clone

$ git pull --rebase

$ cd content/en/docs/sessions/08-basic-app-porting/

$ ls -F
index.md  sol/  unikraft-overview.svg  work/
If you haven’t cloned the repository yet, clone it and enter the session directory:
$ git clone https://github.com/unikraft/summer-of-code-2021

$ cd content/en/docs/sessions/08-basic-app-porting/

$ ls -F
ndex.md  sol/  unikraft-overview.svg  work/
01. Port libfortune to Unikraft
(Uni)kernel developers often seek guidance from elders, lost man pages, wizards, source code comments and occasionally swear by the reproducible environment. But the unfortunate truth is that “bitshifts happen,” and we cannot always leverage guidance from mysterious forces.
A shared library called libfortune can offer solace in such times, providing much needed guidance to those who find themselves in the position of requiring fast boot times and secure memory isolation of an application.
This library is no joke, it will save us all.
In this mission, if you choose to accept it, port libfortune to Unikraft using the steps in the tutorial above.
libfortune is a simple shared library and should also demonstrate how it is possible to build a library which can be used for both Linux user space as well as Unikraft with a little bit of glue.
If you are successful in porting this library, you should be able to run the app-fortune located in this session’s repository folder:
$ git clone https://github.com/unikraft/summer-of-code-2021.git
$ cd summer-of-code-2021/content/en/docs/sessions/08-basic-app-porting/work/01-app-fortune
$ kraft configure
$ kraft build
$ kraft run
[...]

SeaBIOS (version rel-1.12.0-59-gc9ba5276e321-prebuilt.qemu.org)
Booting from ROM...
Powered by
o.   .o       _ _               __ _
Oo   Oo  ___ (_) | __ __  __ _ ' _) :_
oO   oO ' _ `| | |/ /  _)' _` | |_|  _)
oOo oOO| | | | |   (| | | (_) |  _) :_
 OoOoO ._, ._:_:_,\_._,  .__,_:_, \___)
                   Tethys 0.5.0~825b115

"It always seems impossible until it is done."
        -- Nelson Mandela
02. Add Fortunes to Unikraft’s Boot Sequence
In this task, we are diving a little deeper into Unikraft’s core and finding an opportunity to meddle with internal features which can prove handy for certain application contexts.
In this case, we are going to play with Unikraft’s extensible boot sequence to provide fortunes during the boot of an application.
After word got out, we found that everybody wanted fortunes, right before the application started and main() was called.
This will provide the runtime of the unikernel with good fortune and save it from crashes.
Unikraft calls various “constructor” (ctor) and “initialiser” (init) methods during its boot sequence.
These constructors and initialisers are located in a static section of the final binary image, ctortab and inittab, respectively.
There are 7 entry points during the boot sequence:
| Order | Level | Registering method | Type |
|---|
| 1 | 1 | UK_CTOR_PRIO(fn, prio) | ctor |
| 2 | 1 | uk_early_initcall_prio(fn, prio) | init |
| 3 | 2 | uk_plat_initcall_prio(fn, prio) | init |
| 4 | 3 | uk_lib_initcall_prio(fn, prio) | init |
| 5 | 4 | uk_rootfs_initcall_prio(fn, prio) | init |
| 6 | 5 | uk_sys_initcall_prio(fn, prio) | init |
| 7 | 6 | uk_late_initcall_prio(fn, prio) | init |
New constructors and initialisers can be registered using the methods defined above at various levels (meaning they are called in that order) and at various priorities (between 0 and 9); allowing the registration of numerous constructors or initialisers at the same level.
This allows application developers or library developers to correctly set up the unikernel by registering a constructor or initialiser at the right time or before or after others.
Initialisers have 6 different levels, allowing code to be injected before certain operations occur during the boot sequence.
This includes, in order: before and after the platform drivers are initialised; before and after all libraries are initialised; before and after all filesystems (rootfs) are initialised; and, before and after various “system” methods are called.
The source code for this sequence is defined in ukboot.
In this task, add a new KConfig option to the Unikraft port of libfortune which allows you to enable or disable the ability to introduce a fortune during the boot sequence of a Unikernel.
Demonstrate the ability of using this library by building the Unikraft port of libfortune to the Unikraft port of python3 and show a fortune before the Unikraft banner.
03. Create a Patch to Introduce a New Fortune
There is a well-known kernel quote, which should be introduced to this library as an Easter egg for unikernel users:
“Kernel hacking: where the time to solve a problem is inversely proportional to the size of the resulting diff”
– Anil Madhavapeddy
Please add this quote to libfortune as a patch so it is only available when used with unikernels.
04. Give Us Feedback
We want to know how to make the next sessions better.
For this we need your feedback!
11 - Session 09: Advanced App Porting
Reminders
At this stage, you should be familiar with the steps of configuring, building and running any application within Unikraft and know the main parts of the architecture.
Below you can see a list of the commands you have used so far, and will be useful in today’s session as well.
| Command | Description |
|---|
make clean | Clean the application |
make properclean | Clean the application, fully remove the build/ folder |
make distclean | Clean the application, also remove .config |
make menuconfig | Configure application through the main menu |
make | Build configured application (in .config) |
qemu-guest -k <kernel_image> | Start the unikernel |
qemu-guest -k <kernel_image> -e <directory> | Start the unikernel with a filesystem mapping of fs0 id from <directory> |
qemu-guest -k <kernel_image> -g <port> -P | Start the unikernel in debug mode, with GDB server on port <port> |
Overview
As programs may grow quite complicated, porting them requires a thorough grasp of Unikraft core components, and in certain cases, the addition of new ones.
In this session, we’ll take a closer look at Unikraft’s core libraries and APIs.
Adding New Sections to an ELF
There are situations in which we want to add new sections in the executable file (ELF format - Executable and Linking Format) for our application or library.
The reason these sections are useful is that the library (or application) becomes much easier to configure, thus serving more purposes.
For example, the Unikraft virtual filesystem (i.e. the vfscore library) uses such a section in which it registers the used filesystem (ramfs, 9pfs), and we are going to discuss this in the following sections.
Another component that makes use of additional sections is the scheduler.
The scheduler interface allows us to register a set of functions at build time that will be called when a thread is created or at the end of its execution.
The way we can add such a section in our application/library is the following:
Create a file with the .ld extension (e.g. extra.ld) with the following content:
SECTIONS
{
	.my_section : {
     PROVIDE(my_section_start = .);
         KEEP (*(.my_section_entry))
         PROVIDE(my_section_end = .);
	}
}
INSERT AFTER .text;
Add the following line to Makefile.uk:
LIBYOURAPPNAME_SRCS-$(CONFIG_LIBYOURAPPNAME) += $(LIBYOURAPPNAME_BASE)/extra.ld
This will add the .my_section section after the .text section in the ELF file.
The .my_section_entry field will be used to register an entry in this section, and access to it is generally gained via traversing the section’s endpoints (i.e. from my_section_start to my_section_end).
But enough with the chit-chat, let’s get our hands dirty.
In the /demo/01-extrald-app directory there is an application that defines a new section in the ELF.
Copy this directory to your app’s directory.
Your working directory should look like this:
workdir
|_______apps
|       |_______01-extrald-app
|_______libs
|_______unikraft
Before running the program let’s analyze the source code.
Look in the main.c file.
We want to register the my-structure structure in the newly added section.
In Unikraft core libraries this is usually done using macros.
So we will do the same.
#define MY_REGISTER(s, f) static const struct my_structure      \
        __section(".my_section_entry")                          \
        __my_section_var __used =                               \
                {.name = (s),                                   \
                .func = (f)};
This macro receives the fields of the structure and defines a variable called __my_section_var in the newly added section.
This is done via __section().
We also use the __used attribute to tell the compiler not to optimize out the variable.
Note that this macro uses different compiler attributes.
Most of these are in uk/essentials.h, so please make sure you include it when working with macros.
Next, let’s analyze the method by which we can go through this section to find the entries.
We must first import the endpoints of the section.
It can be done as follows:
extern const struct my_structure my_section_start;
extern const struct my_structure my_section_end;
Using the endpoints we can write the macro for iterating through the section:
#define for_each_entry(iter)                                    \
        for (iter = &my_section_start;                          \
                iter < &my_section_end;                         \
                iter++)
Note
If you’re not familiar with macros, you may check what they expand to with the GCC’s preprocessor.
Remove all the included headers and run gcc -E main.c.Let’s configure the program.
Use the make menuconfig command to set the KVM platform as in the following image.

Save the configuration, exit the menuconfig tab and run make.
Now, let’s run it.
You can use the following command:
$ qemu-guest -k build/01-extrald-app_kvm-x86_64
The program’s output should be the following:

To see that the information about the section size and its start address is correct we will examine the binary using the readelf utility.
The readelf utility is used to display information about ELF files, like sections or segments.
More about it here
Use the following command to display information about the ELF sections:
$ readelf -S build/01-extrald-app_kvm-x86_64
The output should look like this:

We can see that my_section is indeed among the sections of the ELF.
Looking at its size we see that it is 0x10 bytes (the equivalent of 16 in decimal).
We also notice that the start address of the section is 0x1120f0, the same as the one we got from running the program.
Unikraft APIs
One important thing to point out regarding Unikraft internal libraries is that for each “category” of library (e.g., memory allocators, schedulers, filesystems, network drivers, etc.)
Unikraft defines (or will define) an API that each library under that category must comply with.
This is so that it’s possible to easily plug and play different libraries of a certain type (e.g., using a co-operative scheduler or a pre-emptive one).
VFScore
Take for example the virtual filesystem (i.e. vfscore).
This library provides the implementation of system calls related to filesystem management.
We saw in previous sessions that there are two types of filesystems available in Unikraft ramfs and 9pfs.
Obviously, these two have different implementations of generic file operations, such as reading, writing, etc.
The natural question is: how can we have the same API for system calls (e.g. read, write) but with configurable functionalities?
The answer is by mapping system calls to different implementations.
This is done by using function pointers that redirect the program’s flow to the functions we have defined.
In this regard, the vfscore library provides 2 structures to define operations on the filesystem:
struct vfsops {
        int (*vfs_mount)        (struct mount *, const char *, int, const void *);
        ...
        struct vnops    *vfs_vnops;
};
struct vnops {
        vnop_open_t             vop_open;
        vnop_close_t            vop_close;
        vnop_read_t             vop_read;
        vnop_write_t            vop_write;
        vnop_seek_t             vop_seek;
        vnop_ioctl_t            vop_ioctl;
        ...
};
The first structure mainly defines the operation of mounting the filesystem, while the second defines the operations that can be executed on files (regular files, directories, etc).
The vnops structure can be seen as the file_operation structure in the Linux Kernel (more as an idea).
More about this structure here.
The filesystem library will define two such structures through which it will provide the specified operations.
To understand how these operations end up being used let’s examine the open system call:
int
sys_open(char *path, int flags, mode_t mode, struct vfscore_file **fpp)
{
        struct vfscore_file *fp;
        struct vnode *vp;
        ...
        error = VOP_OPEN(vp, fp);
}
VOP_OPEN() is a macro that is defined as follows:
#define VOP_OPEN(VP, FP) ((VP)->v_op->vop_open)(FP)
So the system call will eventually call the registered operation.
Note
In order to find the source that contains the definition of a structure, function or other component in the unikraft directory you can use the following command:
$ grep -r <what_you_want_to_search_for>
For example:

Let’s see now how to link the “file operations” of a filesystem to the vfscore library.
For this, the library exposes a specific structure named vfscore_fs_type:
struct vfscore_fs_type {
        const char      *vs_name;       /* name of file system */
        int             (*vs_init)(void); /* initialize routine */
        struct vfsops   *vs_op;         /* pointer to vfs operation */
};
Notice that this structure contains a pointer to the vfsops structure, which in turn contains the vnops structure.
To register a filesystem, the vfscore library uses an additional section in the ELF.
You can inspect the extra.ld file, in the vfscore directory to see it.
As we mentioned before, these sections come with help macros, so this time is no exception either.
The macro that registers a filesystem is:
UK_FS_REGISTER(fssw)
Where the fssw argument is a vfscore_fs_type structure.
There are three other important structures that we should discuss.
First of all, the vnode structure.
This is the abstraction that vfscore provides for a file (no matter its nature, regular, directory, etc), and it can be seen as the equivalent of an inode in Linux-based systems.
struct vnode {
        uint64_t        v_ino;          /* inode number */
        struct mount    *v_mount;       /* mounted vfs pointer */
        struct vnops    *v_op;          /* vnode operations */
        mode_t          v_mode;         /* file mode */
        off_t           v_size;         /* file size */
        ...
        void            *v_data;        /* private data for fs */
};
This structure maintains the metadata of the file, such as the operations we can perform on it, permissions, or the size of the file.
In addition to this, we notice the existence of a void pointer field which is used to keep a reference to the specific structures of the filesystem.
This field is used by the two available filesystems and we will use it today in our practical work.
The dentry structure is the second relevant structure. It offers the possibility to create links (although currently neither ramfs or 9pfs does not support hard links).
A dentry can be seen as the equivalent of a path in the filesystem, and it has a pointer to the inode.
struct dentry {
        char            *d_path;        /* pointer to path in fs */
        struct vnode    *d_vnode;       /* pointer to inode */
        ...
};
One thing to point out is that an inode is deleted only when there are no dentries that reference it.
Last but not least is the mount structure.
Mounting filesystems is the process by which the user makes the contents of a filesystem accessible.
From this point of view, the filesystem, for example, ramfs, is seen as a device on Linux to which we have to associate a directory (technically speaking a dentry).
struct mount {
        struct vfsops   *m_op;          /* pointer to vfs operation */
        int             m_flags;        /* mount flag */
        char            m_path[PATH_MAX]; /* mounted path */
        ...
        struct dentry   *m_root;        /* root vnode */
};
Notice that the mount structure does have a dentry which will point to the inode describing the root directory.
RAMFS
Now that we have seen the API of the virtual filesystem, let’s go deeper into the hierarchy and look at the implementation of the ramfs filesystem.
For storage, this uses, as the name implies, the memory.
Its advantage is that it is very fast, the disadvantage you probably already guessed it… From a simplified perspective we can look at a file in ramfs as a buffer in memory.
But wait a minute, if a file is just a memory buffer, doesn’t going through so many layers of code mean overhead?
Bien sûr, mi amigo! But having these methods of abstraction makes our work easier in terms of porting an application.
There are applications that need a small filesystem, although the source code is not very easy.
Then we prefer a little overhead than trying to patch the code.
Let’s see how the ramfs system is registered into vfscore. We inspect the code from the ramfs_vfsops.c file from ramfs directory:
static struct vfscore_fs_type fs_ramfs = {
        .vs_name = "ramfs",
        .vs_init = NULL,
        .vs_op = &ramfs_vfsops,
};

UK_FS_REGISTER(fs_ramfs);
It defines the vfscore_fs_type structure and uses the registration macro for the corresponding section.
Next, let’s look at the specific structure, which is essentially the “file”:
struct ramfs_node {
        struct ramfs_node *rn_next;   /* next node in the same directory */
        struct ramfs_node *rn_child;  /* first child node */
        int rn_type;    /* file or directory */
        char *rn_name;    /* name (null-terminated) */
        char *rn_buf;    /* buffer to the file data */
        size_t rn_bufsize;    /* allocated buffer size */
        ...
};
This structure contains the file type, the buffer in which the data will be stored, and its size.
A field that normally should not be here is the name, but for the simplicity of the library, it is used.
Unfortunately, the fact that the name field is here and is used in the code does not allow the creation of hard links.
We notice that the filesystem has the following tree-like structure:

Let’s look at how the filesystem is mounted.
In the boot process, the mount syscall from vfscore is called.
This is redirected to the ramfs_mount function as follows:
UK_SYSCALL_R_DEFINE(int, mount, const char*, dev, const char*, dir,
                const char*, fsname, unsigned long, flags, const void*, data)
{
        ...
        /*
         * Call a file system specific routine.
         */
        if ((error = VFS_MOUNT(mp, dev, flags, data)) != 0)
                goto err4;
        ...
}
Now let’s examine this specific routine:
/*
 * Mount a file system.
 */
static int
ramfs_mount(struct mount *mp, const char *dev __unused,
            int flags __unused, const void *data __unused)
{
        struct ramfs_node *np;

        /* Create a root node */
        np = ramfs_allocate_node("/", VDIR);

        mp->m_root->d_vnode->v_data = np;

        return 0;
}
If we go back to the 3 important structures of vfscore, mount, dentry and vnode we notice this call provides the upper layer the possibility to explore all the file hierarchy.
The reason why it is important to do the vnode - ramfs_node association is that most operations are done on vnodes.
Thus, in the first phases of a defined operation, references to the ramfs_node field are usually found.
For example:
static int
ramfs_read(struct vnode *vp, struct vfscore_file *fp __unused,
           struct uio *uio, int ioflag __unused)
{
        struct ramfs_node *np =  vp->v_data;
        ...
}
Generic List API in Unikraft
Unikraft has an implementation of generic lists similar to those in the Linux kernel.
To use this API, one must include the uk/list.h header.
This type of structure is important because it is a unified way of using linked lists, which is why it is useful to know it, especially if we are working in the Unikraft core.
The uk_list_head structure looks as follows:
struct uk_list_head {
struct uk_list_head *next;
struct uk_list_head *prev;
};
The way these lists are built exploits the way of defining structures in C.
A field in a structure is actually just an offset in memory.
To define a list, for example, we just need to include the uk_list_head structure in our container structure:
struct car {
char name[50];
struct uk_list_head list;
};
All the list operations, adding, removing, traversing will be performed on the list field.
The usual routines from this API are:
UK_LIST_HEAD(name) declare the sentinel of a list globally.UK_INIT_LIST_HEAD(struct uk_list_head *list) declare the sentinel of a list dynamically (i.e. can be used inside a function).uk_list_add(struct uk_list_head *new_entry, struct uk_list_head *head) add a new entry to the list.uk_list_entry(ptr, type, field) returns the structure with the type type that contains the element ptr from the list, having the name field within the structure.uk_list_for_each(p, head) iterates over a list using p as a cursor.uk_list_for_each_safe(p, n, head) iterates over a list using p as a cursor and n as a temporary cursor.
This is useful for deletion.
In the /demo/02-linked-list-app directory there is an application that uses generic lists.
Copy this directory to your app’s directory.
Run make menuconfig and select the KVM platform.
After that run make.
You can start the program using the following command:
$ qemu-guest -k build/02-linked-list-app_kvm-x86_64
Let’s look at the following part of the code:
printf("\nThe structure address for c1 is: %p\n", c1);
zero = (struct car *) 0;
printf("The offset of list field inside car strucure is: %p\n",
&zero->list);
printf("The list field address for c1 is: %p\n",
&c1->list);
printf("The address of c1 based on calculation is %p\n",
(void *) ((void *) &c1->list - (void *) &zero->list));
In this part we calculate the offset of the list field within the car structure, which we subtract from the actual address of the list field inside the structure to determine the start address.
This is precisely the way uk_list_entry macro works.
Practical Work
All tasks are in the work directory.
Support Files
Session support files are available in the repository.
If you already cloned the repository, update it and enter the session directory:
$ cd path/to/repository/clone
$ git pull --rebase
$ cd content/en/docs/sessions/09-advanced-app-porting/
$ ls
demo/ images/ index.md/ sol/ work/
If you haven’t cloned the repository yet, clone it and enter the session directory:
$ git clone https://github.com/unikraft/summer-of-code-2021
$ cd summer-of-code-2021/content/en/docs/sessions/09-advanced-app-porting/
$ ls
demo/ images/ index.md/ sol/ work/
In this task we will add a new section in the elf and we will define a series of macros.
Navigate to the 01-extrald directory.
Copy mycorelibrary to the lib directory in unikraft and the two applications in the apps directory.
Your working directory should look like this:
workdir
|_______apps
| |_______01-app
| |_______02-app
|_______libs
|_______unikraft
|_______lib
|_______mycorelib
|_______Makefile.uk
Edit the Makefile.uk from the lib directory and add the following:
$(eval $(call _import_lib,$(CONFIG_UK_BASE)/lib/mycorelib))
Follow the TODOs from the sources and headers.
After solving all the TODOs compile both applications and run them.
Don’t forget to make menuconfig to select mycorelib and the KVM platform.
02. Using readelf
Use the readelf utility to see the section’s address and size and check them with the program’s output (like we did in the demo).
03. Searching Symbols
Using the grep utility search the following and inspect the source code:
struct vfsops, struct vnops, struct vfscore_fs_typestruct vnode, struct dentry, struct mountsys_open look especially for VOP macros.
How many operations does the open system call do?vfscore_vget can you figure it out what this function does?
04. MyRamfs. Register the Filesystem.
In the following exercises, we will build step by step a simplified version of the ramfs library.
The first step is to register the filesystem into vfscore.
Navigate to the 04-05-06-myramfs directory.
Copy myramfs directory to the lib directory in unikraft and the application in the apps directory.
Your working directory should look like this:
workdir
|_______apps
| |_______ramfs-app
|_______libs
|_______unikraft
|_______lib
|_______myramfs
|_______vfscore
|_______Makefile.uk
Edit the Makefile.uk from the lib directory and add the following:
$(eval $(call _import_lib,$(CONFIG_UK_BASE)/lib/myramfs))
Now we need to make our library configurable from vfscore, for this we will need to edit the Config.uk file in the vfscore directory.
First we will add the configuration menu:
...
if LIBVFSCORE_AUTOMOUNT_ROOTFS
choice LIBVFSCORE_ROOTFS
prompt "Default root filesystem"
config LIBVFSCORE_ROOTFS_RAMFS
bool "RamFS"
select LIBRAMFS
config LIBVFSCORE_ROOTFS_MYRAMFS
bool "My-ramfs"
select LIBMYRAMFS
...
If we run now make menuconfig in the application ramfs-app we should see our library under the vfscore configuration:

The second fundamental step is to add the following line to the same Config.uk file:
# Hidden configuration option that gets automatically filled
# with the selected filesystem name
config LIBVFSCORE_ROOTFS
string
default "ramfs" if LIBVFSCORE_ROOTFS_RAMFS
default "myramfs" if LIBVFSCORE_ROOTFS_MYRAMFS
default "9pfs" if LIBVFSCORE_ROOTFS_9PFS
default "initrd" if LIBVFSCORE_ROOTFS_INITRD
default LIBVFSCORE_ROOTFS_CUSTOM_ARG if LIBVFSCORE_ROOTFS_CUSTOM
This will fill the CONFIG_LIBVFSCORE_ROOTFS with the string myramfs.
Now that we’ve done our setup, let’s get started.
Follow TODOs 1-4 in myramfs_vnops.c and myramfs_vfsops.c.
Now, when you run make menuconfig in the app be sure you use the myramfslibrary and also check the debug library.
If everything is fine you should get a similar output:

Note
Try to rename the filesystem in the vfscore_fs_type structure. What happens? Look for the fs_getfs function.05. MyRamfs. Building the Structure
The ramfs library has a tree-like structure, as we saw in the section dedicated to it.
Our library will be in the form of a list for ease of use.
We’ll use the generic lists given before to make it even prettier.
This indicates that only ordinary files, not directories, are supported.
For this task we will still look in the files myramfs_vfsops.c and myramfs_vnops.c and we will perform the TODOs from 5 to 13.
But first we recommend you to look at the struct myramfs_node which is in the myramfs.h file.
To test this task go back to the ramfs-app and build it again (make sure to properclean).
If you solved everything correctly the output should look like this:

06. MyRamfs. Reading and Writing
In today’s last exercise we will really do what is done most with files, we write and read. Follow TODOs 14, 15 from myramfs_vnops.c.
HINT
Check struct uio structure and the vfscore_uiomove routine.07. Give Us Feedback
We want to know how to make the next sessions better.
For this we need your feedback.
12 - Session 10: High Performance
Requirements and Reminders
For this session, you need Unikraft companion command-line tool kraft and the following extra tools:
qemu-kvmqemu-system-x86_64bridge-utilsifupdowntsharktcpdump
To install on Debian/Ubuntu use the following command:
$ sudo apt-get -y install qemu-kvm qemu-system-x86 sgabios socat bridge-utils ifupdown tshark tcpdump
Configuring, Building and Running Unikraft
At this stage, you should be familiar with the steps of configuring, building and running any application within Unikraft and know the main parts of the architecture.
Below you can see a list of the commands you have used so far.
| Command | Description |
|---|
kraft list | Get a list of all components that are available for use with kraft |
kraft up -t <appname> <your_appname> | Download, configure and build existing components into unikernel images |
kraft run | Run resulting unikernel image |
kraft init -t <appname> | Initialize the application |
kraft configure | Configure platform and architecture (interactive) |
kraft configure -p <plat> -m <arch> | Configure platform and architecture (non-interactive) |
kraft build | Build the application |
kraft clean | Clean the application |
kraft clean -p | Clean the application, fully remove the build/ folder |
make clean | Clean the application |
make properclean | Clean the application, fully remove the build/ folder |
make distclean | Clean the application, also remove .config |
make menuconfig | Configure application through the main menu |
make | Build configured application (in .config) |
qemu-guest -k <kernel_image> | Start the unikernel |
qemu-guest -k <kernel_image> -e <directory> | Start the unikernel with a filesystem mapping of fs0 id from <directory> |
qemu-guest -k <kernel_image> -g <port> -P | Start the unikernel in debug mode, with GDB server on port <port> |
Overview
Welcome to the last session of the Unikraft Summer of Code!
In this session, we will introduce to you how to develop highly specialized and performance-optimized unikernels with Unikraft.
So far, we have focused on applications and POSIX compatibility;
where it is important to provide the same set of APIs and system calls that your application uses on its original environment (i.e., as a Linux user space application).
We achieve this by stacking multiple micro-libraries which then assemble together to form a combination of various necessary “higher-level” APIs .
In the context of network-based applications, we would typically develop network functionality based on sockets.
This requires the following library stack being available within Unikraft for the socket (and friends) API to interface with the virtual Network Interface Card (vNIC):
.-------------------------.
( Socket application )
'-------------------------'
|
V
+---------------------------+
| libvfscore |
+---------------------------+
+---------------------------+
| liblwip |
+---------------------------+
+---------------------------+
| libuknetdev |
+---------------------------+
+---------------------------+
| libkvmplat |
+---------------------------+
|
V
.-------------------------.
( Virtual Network Interface )
'-------------------------'
Especially the Virtual File System (VFS) layer (provided by libvfscore) and the TCP/IP network stack (provided by liblwip) are complex subsystems which are potentially introduce additional overheard.
For high-performance Network Functions (NFs), it is often more efficient to bypass any OS component and interact with the driver or hardware as directly; cutting out any indirection.
A known framework in the NFV arena is Intel DPDK which operates network card drivers in Linux user space.
It operates in user space in order to avoid interactions with the kernel which comes with performance penalties resulting from additional permission checks.
Despite this advantage in performance, you still need to maintain and operate a complete Linux environment in production deployments.
In the case with Unikraft, we can configure the libraries to be minimal and can, similar to Intel DPDK, directly develop our NF on top of network drivers.
In this scenario, our library stack does look like the following:
.-------------------------.
( High performance NF )
'-------------------------'
|
V
+---------------------------+
| libuknetdev |
+---------------------------+
+---------------------------+
| libkvmplat |
+---------------------------+
|
V
.-------------------------.
( Virtual Network Interface )
'-------------------------'
In the following tutorial, you will develop a simple, high performance network packet generator.
This tutorial will guide you through various options and possibilities which can help you during the development of more complex NFs with Unikraft.
Practical Work
Support Files
Session support files are available in the USoC'21 repository.
If you already cloned the repository, update it and enter the session directory:
$ cd path/to/repository/clone
$ git pull --rebase
$ cd content/en/docs/sessions/10-high-performance/
$ ls
index.md sol/
If you haven’t cloned the repository yet, clone it and enter the session directory:
$ git clone https://github.com/unikraft/summer-of-code-2021
$ cd summer-of-code-2021/content/en/docs/sessions/10-high-performance/
$ ls
index.md sol/
01. Getting Started
For this session, a template has been provided which contains some basic building blocks (like crafting a IPv4/UDP packet) for our high performance NF.
Start by making a copy of it:
$ cp -a sol/pktgen path/to/your/copy
Go into your copy and initialize it with kraft:
$ cd path/to/your/copy
$ kraft list update
$ kraft list pull
$ kraft configure
$ kraft build
Check if the image runs and prints the Unikraft banner:
02. Bring Up a Network Interface
We can directly interact with network device drivers which are typically provided by each platform using Unikraft’s internal uknetdev API.
First, make sure that we state a dependency of our application to libuknetdev.
To do this, open Config.uk and place the following dependency accordingly in the file (if not already there): depends on LIBUKNETDEV.
This dependency gives us access to the <uk/netdev.h> and <uk/netbuf.h> headers which are available within the libuknetdev library:
$ ls [PATH-TO-UNIKRAFT]/lib/uknetdev/include/uk/
As described in <uk/netdev.h>, bringing up a network interface means transition it through configuration states before we can use the interface for sending packets:
Check that the platform detected network interfaces.
uk_netdev_count() should tell us how many interfaces are available.
Please note that you should also check that the network driver is enabled in the platform configuration.
For this session we are interested in virtio-net within KVM guest.
Retrieve struct uk_netdev * for further API interaction from a netdev number (they are just incrementally going upwards).
We take the first interface, so our device number should be 0.
Configure the device, which essentially indicate how many receive and transmit queues the device should provide.
In SMP scenarios, you typically configure as many queues as CPU-cores or handler threads you have been allocated.
Note: Not every driver or network card can support multiple queues.
There is a query interface where you can check for queues are supported by your device.
For simplicity, we are going to configure just one queue for each direction.
This is supported by all drivers.
Although we are going to send packets only, we still have to also configure one receive queue (zero transmit or receive queues is not possible with our virtio driver):
/* Device configuration */
struct uk_netdev_conf ifconf = {
.nb_rx_queues = 1,
.nb_tx_queues = 1
};
Configure the transmit queue 0 and the receive queue 0.
This step allows us to specify the size for each queue and which allocators should be used for internal queue descriptors and receive buffers.
We will take the default allocator for those items.
You can define a dummy allocation function for the receive buffers, because we are not interested in receiving for now.
We will also let the driver to choose an optimal queue size for us.
You can hand-over 0.
/* Dummy receive buffer allocation function that is called by the driver */
static uint16_t dummy_alloc_rxpkts(void *argp __unused,
struct uk_netbuf *pkts[] __unused,
uint16_t count __unused)
{
return 0;
}
/* Receive queue configuration */
struct uk_netdev_rxqueue_conf rxqconf = {
.a = uk_alloc_get_default(),
.alloc_rxpkts = dummy_alloc_rxpkts
};
/* Transmit queue configuration */
struct uk_netdev_txqueue_conf txqconf = {
.a = uk_alloc_get_default()
};
Start the network interface.
If successful, the device is now ready to process network traffic.
You will now have the ability to also enable interrupt mode for each queue individually and change the promiscuous setting for the interface.
Because we will operate in polling mode to achieve the highest possible performance, we should not change any interrupt settings.
We also do not need promiscuous mode because we will put the device’s hardware address as sender address into our generated traffic.
It is probably a good moment to print on the console this mac address and store it for later.
We will need it to craft our first network packet.
For easier development of this state transition, we recommend to enable all kernel message types and optionally debug message (go to Library Configuration -> ukbedug).
Many of these steps should produce some kernel output so that you can quicker see if something got misconfigured.
In order to test your code you should run the guest with one interface attached.
For this purpose we need to create a network bridge on your Linux host first (we just need to do this once):
# Ensure you have permissions to change stp
sudo sysctl -w net.bridge.bridge-nf-call-arptables=0
# Create bridge 'usocbr0'
brctl addbr usocbr0
brctl setfd usocbr0 0
brctl sethello usocbr0 0
brctl stp usocbr0 off
ifconfig usocbr0 0.0.0.0 up
# Disable packet filtering on bridge interfaces
echo 0 > /proc/sys/net/bridge/bridge-nf-call-arptables
echo 0 > /proc/sys/net/bridge/bridge-nf-call-iptables
echo 0 > /proc/sys/net/bridge/bridge-nf-call-ip6tables
As soon as your unikernel image builds, the guest can then be started with:
03. Say Hello on the Wire
In this chapter we are going to send out our first packet.
We provide you a function through the header "genpkt.h" which generates an Ethernet-IPv4-UDP frame with a dummy payload for a given size: genpkt_udp4().
In the same header we also provide you the short-hand version genpkt_usoc21() which has some parameters, like the IP addresses, pre-filled.
The only items that the function still wants to know from you are the following:
a: Allocator where the packet should be allocated from.
Use uk_alloc_get_default() for now.
bufalign: An alignment requirement for the packet buffer containing the packet.
Some network drivers require specific alignments.
You find this value after querying the device with uk_netdev_info_get() on struct uk_netdev_info as ioalign.
headroom: Reserved bytes at the beginning of the packet buffer and before the packet data starts.
Some drivers require this in order to do another encapsulation on transmit (like virtio).
You find this value on the struct uk_netdev_info as nb_encap_tx.
pktlen: The size of the Ethernet frame (excluding CRC, FCS, SFD, and preamble) that should be generated.
According to the Ethernet specification the smallest packet size can be created with 60 and the biggest with 1518.
The most interesting are minimum sized packets because those stress software and hardware components the most.
For each packet, the header needs to be parsed and the packet needs to get forwarded to the next processing layer of the stack.
As smaller the packets are, the more load with parsing and handling packet buffers occurs. So, please take 60 ;-)
mac_src: The hardware address of our interface where we are going to send the packet out.
The function returns you a netbuf that can be send out with uk_netdev_tx_one().
Please check the resulting status code for success and free the packet with uk_netbuf_free() in case of failures.
The driver will do the free operation itself only if a packet got correctly enqueued to the device and sent.
In such a case, you aren’t allowed to touch this packet anymore after sending;
so your transmit code should look like this:
/* <...> */
status = uk_netdev_tx_one(netif, 0, pkt);
if (!uk_netdev_status_successful(status)) {
uk_pr_err("netdev%u: Failed to send packet %p\n",
uk_netdev_id_get(netif), pkt);
uk_netbuf_free(pkt);
}
/* Do not touch pkt here anymore */
/* <...> */
In order to see if everything works, attach tshark or tcpdump on your Linux host to usocbr0 on a second terminal:
Whenever you launch your unikernel, you should be able to see the UDP packet:
3 1.050213439 192.168.128.1 → 192.168.128.254 UDP 60 5001 → 5001 Len=18
04. Don’t Stop
Now let us send as much as we can with the current implementation.
You can simply loop forever over packet generation and sending.
You may notice that we get too many messages on the console that slow us down.
Try disabling debug messages and all kernel messages except the critical ones.
Note: You should be able to terminate your unikernel with CTRL+C when you launched it with kraft or qemu-guest.
05. How Fast Are We?
It is now interesting to understand at which speed we are generating.
For this purpose we prepared a little function in "netspeed.h" that computes the packet rate (packets/sec) and current bandwidth (MBit/s): print_netspeed().
Declare before your loop the following two variables:
uint64_t total_nb_pkts = 0; /* total number of pkts successfully sent */
uint64_t total_nb_bytes = 0; /* total number of bytes successfully sent */
Whenever a packet was successfully sent, we will simply increment total_nb_pkts and add the sent bytes total_nb_bytes counters.
In order to see a bandwidth computation that is comparable with physical Ethernet speeds, we have to additionally add the number of bytes (=24) for CRC, FCS, SFD, and preamble to each accounted packet size:
status = uk_netdev_tx_one(netif, 0, pkt);
if (uk_netdev_status_successful(status)) {
/* success */
total_nb_pkts += 1;
total_nb_bytes += 60 /* pktlen */ + 24;
} else {
/* failed */
uk_netbuf_free(pkt);
}
By having this instrumentation, we could now just print the packet rate and bandwidth at every loop iteration with:
print_netspeed(total_nb_pkts, total_nb_bytes);
The problem is that printing is extremely expensive.
This is because it happens synchronously in Unikraft, so the CPU can not do anything else while waiting for the console to finish its operation.
Additionally, for computation, the clock is accessed to measure a time delta, which is also an expensive operation.
In general, this means that we do not want this function to be called very often.
The cheapest option is to call this print function every nth sent packet.
We could do a cheap modulo operation by using a bitmask, for example:
if ((total_nb_pkts & 0x3fffff) == 0x0) {
print_netspeed(total_nb_pkts, total_nb_bytes);
}
You are able to adopt the mask 0x3fffff in order to make printing more often or less often.
- Faster:
0x1fffff, 0x0fffff, 0x07ffff, 0x03ffff, 0x01ffff, … - Slower:
0x7fffff, 0xffffff, 0x1ffffff, 0x3ffffff, 0x7ffffff, …
Another option is to use another counter variable that is reset as soon as we print:
if (count == 1000) {
print_netspeed(total_nb_pkts, total_nb_bytes);
count = 0;
}
Instrument your code with the two statistics variables and implement one of the mentioned printing mechanisms.
We should roughly print not faster than every 2 seconds, ideal are roughly 5-10 second intervals.
Remember, if your rate goes up or down with one of the following experiments, you may need to revisit your chosen value and adopt this nth packet parameter again.
06. Go Faster!
Now, we have can go through some options to play around with.
Our overall goal is to get the packet rate of our packer generator as high as possible.
Note your rate and bandwidth before and, after each of the steps because we are going over this list twice, make sure that you do the steps non-destructive and keep the code of each step.
Try compiler options: Enable Link Time Optimizations (LTO) and Dead Code Elimitation (DCE) within Build Options of the menuconfig.
The compiler reconsiders a second time optimizations like function inlining while linking the final binary;
actually over the whole code base at once again.
These optimizations can have some visible effect on your packet rate.
Try it out!
Don’t waste packets: An obvious idea might be to keep packets which have failed to send.
We could save on packet generation time if we wouldn’t free them.
We retry sending a packet until it finally leaves.
Our assumption is that the reason why it fails is that the transmit queue is full.
This approach can have positive but also likely negative effects.
The reason might be that some drivers may query their device more often to confirm that there is really no space left.
This causes the device to be busy answering instead of doing some actual work.
Try it out!
Copy instead of create: Depending on how expensive the packet generation function is (e.g., because of an extra step computing a checksum), it could be cheaper to do a memcpy operation from a primordial packet buffer instead.
This means that we would run genpkt_udp4() just once and use as source for all cloned packets that are going to get transmitted.
We provide you such an extra routine with "netbuf.h": uk_netbuf_dup_single() duplicates a given netbuf packet with memcpy.
Like genpkt_udp4(), it also needs the same extra information like bufalign, headroom for doing the allocation of the duplicate.
Try it out!
Use a memory pool allocator: This is usually a very promising optimization.
Instead of using a general purpose allocator you can ensure that all malloc and free operations are satisfied within O(1).
If we deal with rates at maximum speed you want to have every job done as fast as possible.
A pool is basically a list of pre-allocated objects that have all the same size and an alignment property (if given).
On malloc, an object is returned out of this list;
on free, the object gets back to the free list.
For trying it out, continue with 06.1 and come back to point 5 of this list afterwards.
Zero-copy with refcounting: Instead of all the optimization ahead, we could also simply increase the netbuf reference counter before sending.
This avoids that the packet being free’d after sending and we would not need to allocate, copy, or generate a packet over and over again.
Every free operation will decrease the refcount until the reference counter becomes zero.
At this point the netbuf is really free’d.
Unfortunately, we do not support this mode with network drivers which modify the packet for the transmission, like virtio-net does.
Unfortunately, it is not an option for virtio-net at the moment.
The transmit function will return an error.
Besides these options, another common technique is using batching.
Instead of sending one packet at a time, you send multiple ones at once.
The advantage is that the device backend is notified just once per batch instead of for each packet.
This reduces communication overhead.
This feature is currently submitted as PR#243 and will be added in the near future.
In order to understand better the bottlenecks in our implementation, we can isolate the code from the netdev device bottlenecks.
This is done by replacing the send operation with uk_netbuf_free().
There we can assume that this means that every transmit operation works but this reveals more dominantly performance differences of the suggestions 1-5 ahead.
Go over the list again and note the new collected rates.
Which option results in the best performance?
Recommendation: The pre-processor can help you switching between these two modes quickly:
#if 0 /* <-- toggle between these two blocks with 0 and 1 */
status = uk_netdev_tx_one(netif, 0, pkt);
if (uk_netdev_status_successful(status)) {
/* success */
total_nb_pkts += 1;
total_nb_bytes += 60 /* pktlen */ + 24;
} else {
/* failed */
uk_netbuf_free(pkt);
}
#else
uk_netbuf_free(pkt);
/* always success */
total_nb_pkts += 1;
total_nb_bytes += 60 /* pktlen */ + 24;
#endif
06.1. Use a memory pool
We provide a pool allocator library with Unikraft: libukallocpool.
First of all, add a dependency to this library in your Config.uk:
depends on LIBUKALLOCPOOL
This dependency makes the header "<uk/allocpool.h>" (within [PATH-TO-UNIKRAFT]/lib/ukallocpool/include/uk/) available.
In order to allocate one pool, you call uk_allocpool_alloc() at your application startup.
The function will allocate the pool memory from a parent allocator.
This happens just during creation time for pre-allocating all the pool objects.
In our case this parent is the default allocator.
As obj_len you should choose 2048 because this is a big enough buffer to keep packet data and needed meta data.
obj_align should be again set to the alignment requirement of the device (struct uk_netdev_info->ioalign).
The obj_count argument should be big enough so that we do not run out of pool objects while sending.
You can try different values, start with 1024.
struct uk_allocpool *pool;
pool = uk_allocpool_alloc(uk_alloc_get_default(), 1024, 2048,
netdev_info.ioalign);
In order to use the pool as allocator for pktgen_udp4() and uk_netbuf_dup_single(), you need to get the compatibility interface from libukallocpool:
struct uk_alloc *p;
p = uk_allocpool2ukalloc(pool);
p can then be handed over as normal allocator, like uk_alloc_get_default().
p will always return 2048B objects as long as the malloc request is smaller or equal to the initialized obj_len.
Any bigger allocation request cannot be satisfied and libukallocpool is returning NULL.
07. Gimme, gimme, gimme!
With the last task you will implement a receive-only unikernel that measures the received traffic.
We keep busy polling for receive as well but you should implement a switching logic to switch between transmit and receive mode.
You can do this either with a configuration option (Config.uk) or with a kernel argument (see: int argc, char *argv[]).
Opening the network device is the same for receive except that we implement and hand-over a proper receive buffer allocation function.
This will replace dummy_alloc_rxpkts() when the receive mode is activated.
We can use the same pool allocator that we allocated for transmit during task 06.1.
Whenever the driver calls our callback, it tries to setup new receive buffers to receive new packet data.
When filled, these buffers are later returned back to us.
The function should look like this:
/* global variables, fill-out before configuring the receive queue */
struct uk_netdev_info netdev_info;
struct uk_alloc *p;
uint16_t alloc_rxpkts(void *argp __unused,
struct uk_netbuf *pkts[],
uint16_t count)
{
uint16_t i;
/* fill out given array with allocated receive buffers */
for (i=0; i<count; ++i) {
pkts[i] = uk_netbuf_alloc_buf(p,
2048,
netdev_info.ioalign,
netdev_info.nb_encap_rx, /* headroom for rx */
0, NULL);
if (!pkts[i])
break; /* We ran out of memory */
}
return i;
}
Please note that this function expects that we initialized the global variables netdev_info and p before we configure the receive queue.
Now you should be able to build the polling receive loop based on the following snippet:
status = uk_netdev_rx_one(netdev, 0, &pkt);
if (uk_netdev_status_successful(status)) {
/* count packet and bytes and free received packet */
nb_total_pkts += 1;
nb_total_bytes += pkt->len + 24;
uk_netbuf_free(pkt);
}
In order to test your configuration, you can run 2 unikernels that are both connected to usocbr0.
One is transmitting traffic and the other one receives it.
08. Give Us Feedback
We want to know how to make the next sessions better.
For this we need your feedback.
Thank you!
13 - Hackathon
Unikraft Summer of Code 2021 (USoC'21) finalizes with an 8 hour hackathon on Saturday, September 4, 2021, 9am CEST - 5pm CEST.
Teams of 3-4 participants will work on adding tests, adding metrics, port libraries, port applications and fix issues in Unikraft components.
Each hackathon challenge will get your team points, depending on the difficulty.
The top three teams will be awarded the most prestigious USoC badges:
Challenges are listed below.
You solve a challenge:
Points listed in challenges are a rough indication of difficulty.
It is possible to solve more than one challenge and earn all points from all challenges solved.
Additional points will be awarded for:
- Signing off your commits with
git commit -s, as part of Developer Certificate of Origin (1 point per commit) (note, teams of multiple people should have multiple sign-offs); - Every commit should include a precise explanation of the changes made (1 point per commit);
- Every commit of the solution should leave the project in a working state (2 points per commit).
Challenges
1. New uktest Suites, Cases & Expectations
| ID | Points | Short description |
|---|
uktest-entries | 1 point per *EXPECT* | Use uktest to add new tests in Unikraft components. |
Description
In this challenge, introduce new test suites, cases and assertions/expects in the Unikraft core repository.
New tests should be introduced as new files under a new directory tests/ of internal microlibraries.
For example, for vfscore, a new directory will be located at libs/vfscore/tests/.
To create a suite, such as for stat() in vfscore, introduce a new file test_stat.c where you register the suite, cases and create expectations from the stat() syscall provided by vfscore.
Expectations and tests can usually be checked by programming different scenarios and checking whether the return code or errno is set correctly.
Check out the relevant POSIX document for the function in question.
Every new *_EXPECT_* test assertion will receive 1 point.
Links and Additional Resources
- uktest: Unikraft’s testing framework
2. Fix Build Warnings
| ID | Points | Short description |
|---|
fix-warnings | 1 point per warning | Fix build warnings in Unikraft components. |
Description
In this challenge, fix compiler warnings during builds of internal Unikraft libraries.
(There may be other warnings in other Unikraft repositories.)
Every warning (1 line) will receive 1 point.
Links and Additional Resources
3. Add ukstore Entries
| ID | Points | Short description |
|---|
ukstore-entries | 1 point per entry | Add new ukstore entries. |
Description
ukstore is a new internal library for storing and retrieving information, such as statistics or state.
Introduce new counters, stats, or states via ukstore in other libraries that generate information.
Links and Additional Resources
3. Add new unit tests to kraft
| ID | Points | Short description |
|---|
kraft-unit-tests | 1 point per test | Add new tests in kraft. |
Description
kraft is a Python-based toolchain and acts as the companion tool for managing, configuring, building and running Unikraft unikernels.
It has very limited unit tests.
In this challenge, add more unit tests to kraft
Links and Additional Resources
4. Run Django on Unikraft
Description
Create a new Python 3 application based on the Django web framework.
Serve a simple HTTP response and run this via lib-python3.
Create a relevant kraft.yaml file with corresponding required KConfig values.
A user should be able to run the project via:
kraft list add https://github.com/$USERNAME/app-django.git
kraft list update
kraft init -t django@staging ./my-django-app
Links and Additional Resources
5. Run Flask on Unikraft
Description
Create a new Python 3 application based on the Flask web framework.
Serve a simple HTTP response and run this via lib-python3.
Create a relevant kraft.yaml file with corresponding required KConfig values.
A user should be able to run the project via:
kraft list add https://github.com/$USERNAME/app-flask.git
kraft list update
kraft init -t flask@staging ./my-flask-app
Links and Additional Resources
6. Run Ruby on Rails on Unikraft
Description
Create a new Ruby application based on the Ruby on Rails web framework.
Serve a simple HTTP response and run this via lib-ruby.
Create a relevant kraft.yaml file with corresponding required KConfig values.
A user should be able to run the project via:
kraft list add https://github.com/$USERNAME/app-rails.git
kraft list update
kraft init -t rails@staging ./my-rails-app
Links and Additional Resources
7. Port PHP to Unikraft
| ID | Points | Short description |
|---|
lib-php | 25 points | Port PHP as a Unikraft library. |
Description
Port the interpreted language runtime PHP so it can be run on top of Unikraft.
Create a matching application component, so a simple PHP program can be run via Unikraft.
A user should be able to run the project via:
kraft list add https://github.com/$USERNAME/app-php.git
kraft list update
kraft init -t php@staging ./my-php-app
Links and Additional Resources
8. Port Postgres to Unikraft
| ID | Points | Short description |
|---|
lib-postgres | 25 points | Port Postgres as a Unikraft library. |
Description
Port the object-relational database program Postgres so it can run as a Unikraft unikernel.
Create a matching application component.
A user should be able to run the project via:
kraft list add https://github.com/$USERNAME/app-postgres.git
kraft list update
kraft init -t postgres@staging ./my-postgres-app
Links and Additional Resources
9. Port MySQL to Unikraft
| ID | Points | Short description |
|---|
lib-mysql | 25 points | Port MySQL as a Unikraft library. |
Description
Port the relational database program MySQL so it can run as a Unikraft unikernel.
Create a matching application component.
A user should be able to run the project via:
kraft list add https://github.com/$USERNAME/app-mysql.git
kraft list update
kraft init -t mysql@staging ./my-mysql-app
Links and Additional Resources
10. Port Tinyproxy to Unikraft
| ID | Points | Short description |
|---|
lib-tinyproxy | 25 points | Port Tinyproxy as a Unikraft library. |
Description
Tinyproxy is a fast HTTP/HTTPS server.
Port this as a new library and application to Unikraft.
A user should be able to run the project via:
kraft list add https://github.com/$USERNAME/app-tinyproxy.git
kraft list update
kraft init -t tinyproxy@staging ./my-tinyproxy-app
Links and Additional Resources
11. Port Bjoern to Unikraft
| ID | Points | Short description |
|---|
lib-bjoern | 25 points | Port Bjoern as a Unikraft library. |
Description
Bjoern is a fast And ultra-lightweight HTTP/1.1 WSGI Server.
Port this as a new library and application to Unikraft.
A user should be able to run the project via:
kraft list add https://github.com/$USERNAME/app-bjoern.git
kraft list update
kraft init -t bjoern@staging ./my-bjoern-app
Links and Additional Resources
12. Lua Telnet shell
| ID | Points | Short description |
|---|
lua-telnet | 10 points | Make use of lib-lua and add telnet server |
Description
Telnet is a protocol for doing bi-directional text communication.
Create a simple telnet server on top of the Lua language and run it on Unikraft.
Links and Additional Resources
13. Port Memcached to Unikraft
| ID | Points | Short description |
|---|
lib-memcached | 25 points | Port memcached as a Unikraft library. |
Description
memcached is a general purpose key-value store.
Port this as a new library and application to Unikraft.
A user should be able to run the project via:
kraft list add https://github.com/$USERNAME/app-memcached.git
kraft list update
kraft init -t memcached@staging ./my-memcached-app
Links and Additional Resources
14. Rewrite a Unikraft Internal Library in Rust
| ID | Points | Short description |
|---|
internal-rust | 25 points per library | Rewrite an internal Unikraft Library in Rust. |
Description
Rust is proving itself to be a type-safe, fast language suitable for the kernel.
Use the newly added capabilities of compiling Rust with Unikraft to re-write an internal library.
A successful port of an internal library, e.g. vfscore to vfscore-rs, should work as the original is expected.
Additional points will be awarded for benchmarks.
Links and Additional Resources
15. Port PicoTCP to Unikraft
| ID | Points | Short description |
|---|
lib-picotcp | 25 points | Port PicoTCP to Unikraft. |
Description
PicoTCP is a TCP/IP stack written in C.
Port this as an alternative to LwIP so it can be used with other network-based applications built with Unikraft.
A successful port will allow the user to replace LwIP completely with PicoTCP.
Links and Additional Resources
16. Fix an Open Bug in the Core
| ID | Points | Short description |
|---|
bug-fix | Depends on bug, contact TA. | Fix an internal bug in the core. |
Description
There are a number of outstanding issues/bugs with the Unikraft core repository.
To help increase the stability and solve problems for edge cases and other issues, solve an open issue that has been reported.
Links